Getting Familiar with Windows ReadyBoost
Suffering from a sluggish Windows machine? This is a very common problem that Windows users experience most of the time. Slow computers can really become annoying especially if you’re set to do a lot of things in a day. A screen that hangs, a mouse pointer that seems to just crawl on your screen and programs which often says “Not Responding” are just few of the many signs that a computer is slow and is running out of resources.
In most cases, users especially those that are not into the geeky side are left with no choice but to continue using it until a major problem gets into the surface. It is therefore important that you know some things that will help improve your computer’s processing speeds and if you are using Windows 8.1, there’s a tool in it that will surely help you with this problem by using a USB flashdrive that will act as an external memory or resource which your computer can use in case it is starting to be slow out of resource problems. This feature is called “Windows ReadyBoost” and in this tutorial, we will be learning how to set it up but before that, let us first see some common causes of slowing down in most computers.
Why is Your Computer Slow?
Slow computers can be very disappointing to use. In most cases, it makes your day become unproductive putting the large portion of your time into waiting in idle for something to load or for the screen to unfreeze. While lack of memory resources can be a cause, you should also be aware that there are some other causes which can either be acquired from online or offline sources while you unsuspectingly use your machine in doing your daily routine. Below is a list of the other causes with some simple solutions for you to avoid them.
Viruses and Malware
If you are fond of getting into different domains on the Internet and you noticed a significant deterioration in your computer’s processing power lately even if there are only few programs and applications installed on it and most of them are not even running then chances are you’ve got something in your system that is causing the slowing-down of things.
Most viruses and other forms of malware feed on your system resource or interfere with the background processes in order to replicate and destroy whatever it finds so if you noticed such unusual behavior in your machine then it would be very wise if you do a system-wide scan using your antivirus or Internet Security Suite so that the virus or malware will be detected and captured before the problem gets more serious.
Overheating
Your computer can also become slow if it senses that the temperature is becoming too hot. Try inspecting your PC’s system unit or check the edges of your laptop and you should feel a gush of hot air coming out from one of its edges. This air is coming from the cooling fan which is there to help maintain temperature in all the components that are inside.
Overheating happens when this fan accumulates too much dust or when you place your laptop on a surface where it can’t breath (maybe on a pillow or other material that hinders air from circulating). To solve this, you need to clean the cooling fan or make sure that you placed your laptop on a hard surface like a table or desk. If you don’t know how to clean the cooling fan then you need to seek help from a friend who knows it or take your machine to an expert for cleaning. Using a laptop cooler can also be of great help in cooling your computer.
Too Many Programs Running in the Background
In other cases, it could be that there are a lot of programs that are running in the background. You will know that this is the particular cause of your machine’s slowing down if you experience a very long booting up process. This is because all of the programs are trying to run first before the system finally takes you to the desktop screen.
Most third-party programs install automatically when you browse the Internet and just click on any advertisement that pops-up on the screen. These programs are not really that helpful and are just there to monitor your every click and see the sites that you visit. In order to solve this, you will need to uninstall any program that you don’t really need and make things lean by retaining only the ones that you really use.
Memory and System Resource is Running Out
The very common reason as we have mentioned earlier is that your computer is running out of storage space as well as system resource or “RAM”. This is true to some older computers which have already accumulated a lot of stuff in it. To solve this problem, you can delete any unused file or uninstall the programs that you’re not really using to free some space on your computer’s hard drive.
You can also use a free utility bundled with your Windows 8.1 computer called “Disk Cleanup” to remove other temporary files such as browsing history, caches and cookies which also takes up space. By doing these things, you are actually freeing up space from the RAM as well. If your computer is still slow after you do any of these solutions, you can try using ReadyBoost.
How to Use Windows ReadyBoost
To solve the problem of a slow computer that is caused by the lack of memory or RAM space, you can use a free utility that is also bundled in your Windows 8.1 machine called “ReadyBoost” but before you start, be sure to prepare a USB memory stick/flashdrive with at least 4GB of space. If you are going to use a flashdrive that has some contents in in, be sure to save them first to your computer because the process will delete all of its contents.
To start, you will need to attach the flashdrive to one of your computer’s USB port. Once it gets connected, simply open File Explorer and click on the “This PC” link that is located on the navigation pane at the left-hand portion of the File Explorer Window.
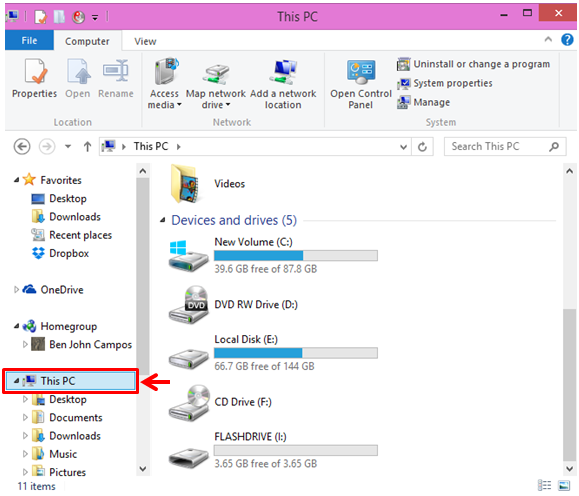
After doing so, the contents of the “This PC” section will appear on the contents pane at the right. From here, simply right-click on the icon which represents the USB storage device/flashdrive that you have attached to your computer earlier and a menu will appear where you will need to click on “Properties”.

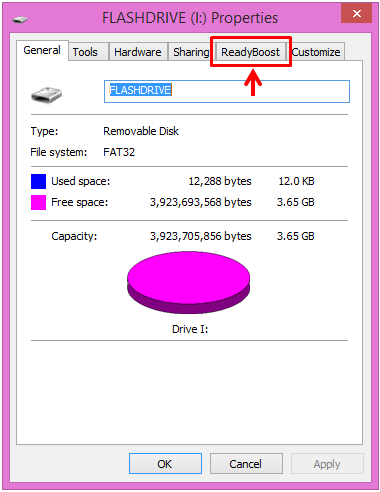
Now, you will be taken to a new Window that shows the properties and settings of your USB flashdrive. At the top portion of this Window are tabs and one of them is labeled “ReadyBoost”.
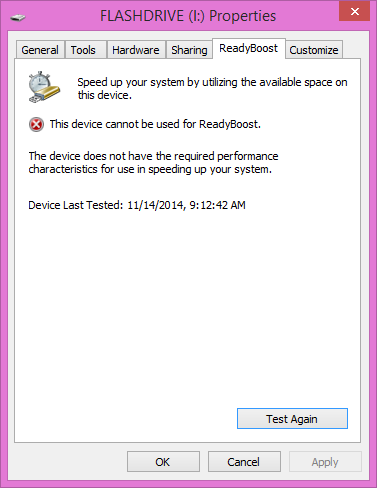
Just click on the said tab and ReadyBoost will start to test if your device is capable of being used for the feature. In case the device does not pass the requirements, you will see a message that looks like the one shown below.
If the device is good then ReadyBoost will give you the choices on how you want it to use the device, you can choose to dedicate it for ReadyBoost and specify the amount of space that will be used for the feature. The space should be more than 1000 MB or approximately 1 GB. After you set these things, simply hit the “Apply” then “OK” buttons and the device will automatically be used as an extra resource to make your machine perform faster.