How to Get Windows 10’s Anniversary Update Today!
Windows 10 is one of those operating system versions that really works great on almost all kinds of devices that supports the Windows OS. It doesn’t matter if you own a smartphone, tablet or a PC as long as it supports Windows 10, you will surely be able to enjoy this newest software from Microsoft.
Ever since its release, Windows 10 has been a topic of many talks all over the Internet. Some say it is the real improvement of the old Windows 8 and its supposed better version called Windows 8.1 but if you already were able to use it then you’ll surely be firm in opposing those who say so. This is because Windows 10 is really good and lately, it just got even better.
Have you ever tried installing the latest version of this Windows operating system into your computer dubbed as “Windows 10 version 1607”? If you haven’t done downloading and installing the update into your Windows machine then you should do so now! In this tutorial, we will be showing all the steps involved in downloading this latest update also known as the “Anniversary Update” into your computer so you can start all of the brand new stuff that was added and improved in it so what are you waiting for? Get your Windows 10 machine fired up and follow the steps that we’re going to show below.
Finding Out if You Really Have Windows 10
The very first thing that you need to learn doing is first finding out if you really have Windows 10 installed on your computer. You will find this out by accessing the “System” Window of the Control Panel. To launch this Window, you will first need to open the File Explorer tool by pressing the Windows + E keys on your machine’s keyboard.

After pressing this keyboard shortcut combination, you should be able to launch the File Explorer tool and from here, all you need to do is right-click on the “This PC” link that is found on the navigation pane at the left of the File Explorer Window as highlighted on the screenshot below.
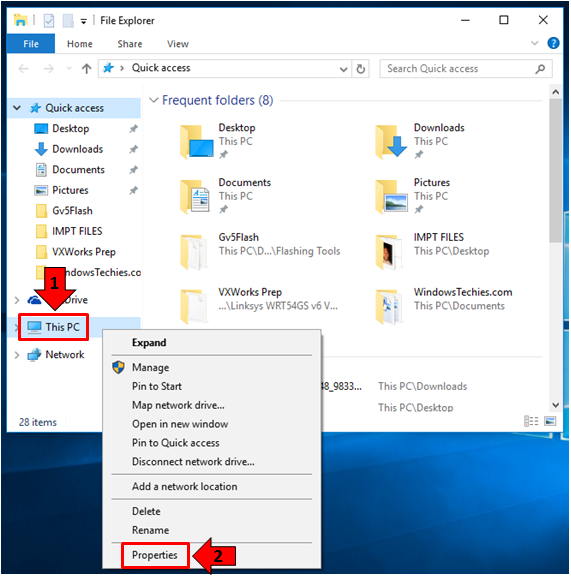
After right-clicking on the “This PC” link, you should be able to access a right-click menu and from here, you will simply need to click on the option that is found at its bottom portion, you will need to click on “Properties” as you can see above. Doing this will open the “System” section of the Control Panel tool.
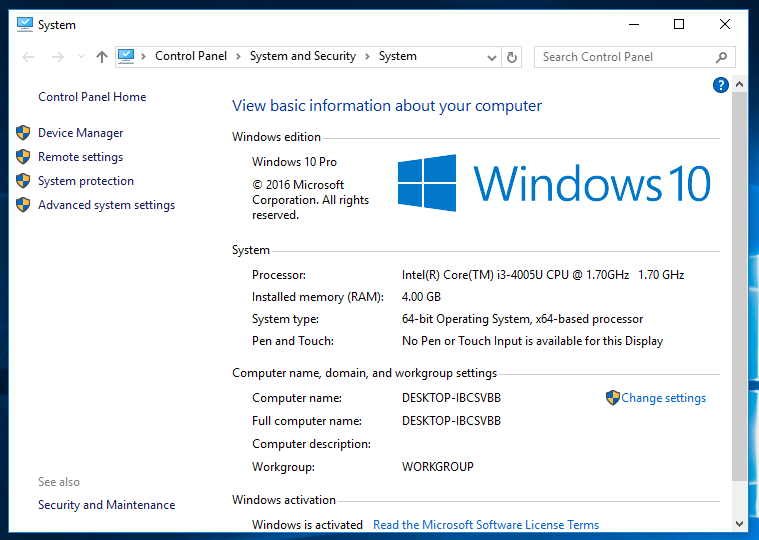
After clicking on Properties, you should be able to open the “System” section of the Control Panel Window as you can see on the screenshot above and from here, you should be able to see the version of Windows that is currently installed on your computer. As you can see on the screenshot above, our test computer already has Windows 10 Pro loaded to it and it is currently ready to get the latest version of Windows 10 called version 1607 installed to it.
Updating Your Windows 10 Machine to the Latest Version!
Now that you already know how to find out the version of Windows operating system that is currently installed on your computer, it is time to find out the steps that are involved in getting the latest update version of it that was released by Microsoft to mark the first anniversary of the operating system since it was released for FREE last year.
The whole process is quite straightforward and all you need to do is follow the steps correctly in order to have Windows 10 version 1607 loaded to your computer. There are actually many ways in doing this and we’re going to show these available steps in this tutorial so get your Windows 10 machine ready and follow the steps that are going to be shown below.
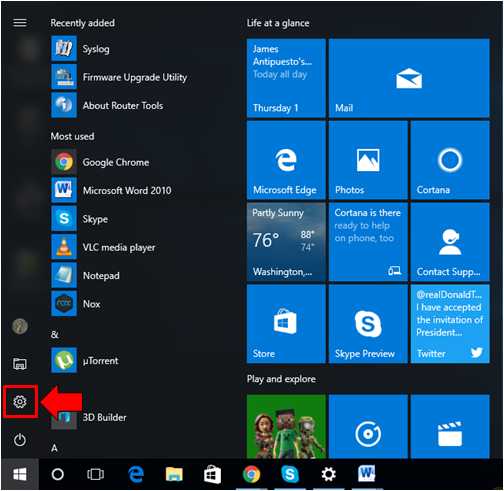
First, you can actually get the latest version of Windows 10 by looking for the Update Assistant tool that is found on the modern Settings Window of Windows 10. To launch this Settings tool, you will simply need to press the Start Button that is found on the extreme-left end of the Taskbar and once the Start Menu appears, all you need to do is click on the “Settings” icon that is found on the vertical bar at the left of the Start Menu as you can see on the screenshot below.
Another method in launching the Settings Window is done by using a keyboard shortcut combination. To do this, just press the Windows + I keys on your computer’s keyboard as you can see on the screenshot being shown below.

After doing any of the methods shown above in launching the modern Settings Window, you should now be able to open it and from here, you will see 9 settings categories available for tweaking certain aspects of Windows 10. The settings category that we are going to focus on in this tutorial is the one that is labeled “Update & security” as shown below.

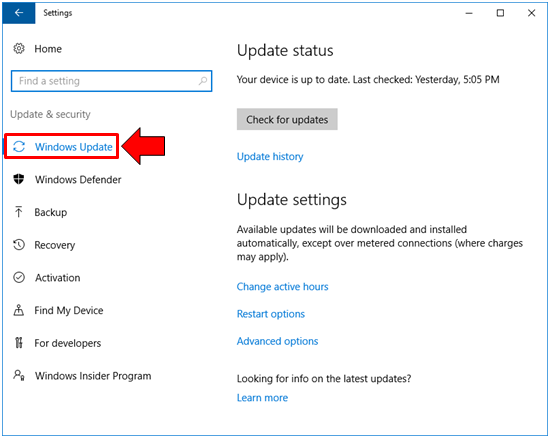
After clicking on this settings category, you should now be able to view all the tweaks that are available under it and from here, we will be focusing on the one that says “Windows Update” as you can see on the navigation pane at the left hand portion of the screenshot below.
Using the Windows Update Assistant Tool
Now that you already know how to access the modern Settings Window on your computer and how to get into the “Update & security” section in it so you can use the Windows Update assistant tool that is available in it, let us proceed to the next step which would now involve getting all the latest update from Microsoft and more importantly, getting the latest build downloaded which is Windows 10 Build Version 1607.
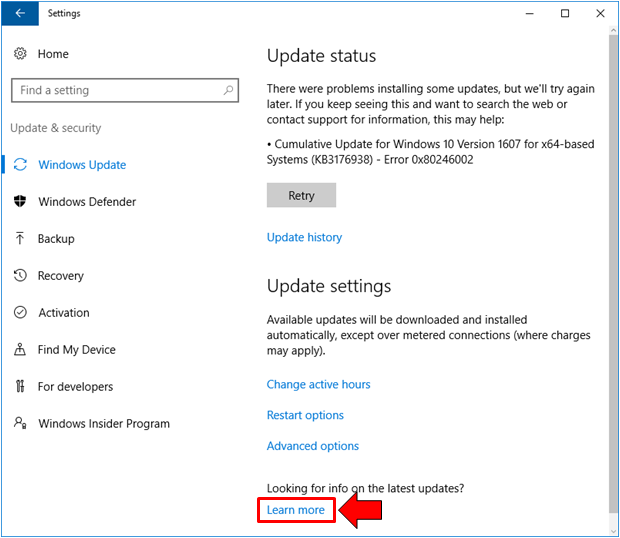
To download this latest version of Windows, you must first click on the “Windows Update” link and once you see its contents on the Window that follows, simply click on the link that is found at the bottom that says “Learn more” as shown on the screenshot below.
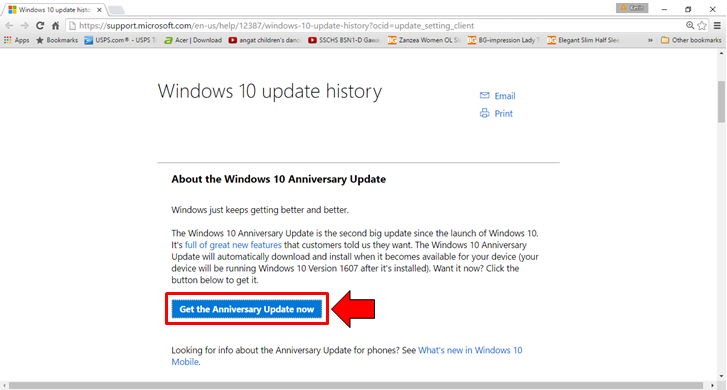
Clicking on the “Learn more” link will open your computer’s default browser and will take you to the Windows 10 Update History page and from here, since you want to get the latest Windows 10 version installed on your computer, just click on the blue button that is found below the Windows 10 Anniversary Update description and is labeled “Get the Anniversary Update now” as you can see being highlighted on the screenshot below.
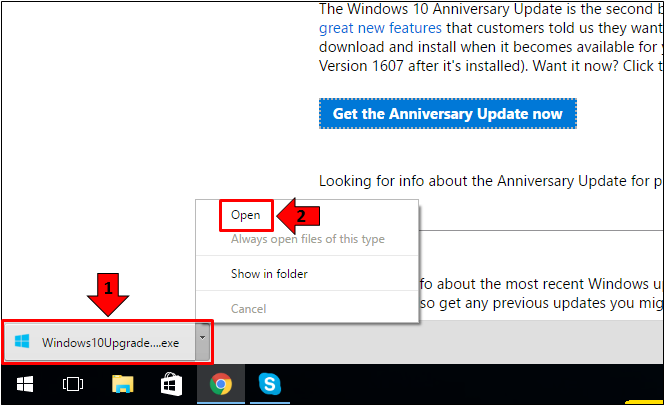
After clicking on the button, an .exe file which is around 5.5MB in size will then be downloaded. If you used Google Chrome in downloading it, the file should appear at the bottom and all you need to do is execute it by opening it as shown on the screenshot below or you can also search for it from the Downloads folder of your computer and execute or open it from there.
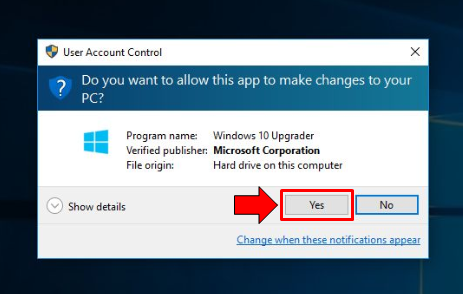
After clicking and executing the downloaded file, you will be able to see the User Account Control prompt will appear asking you if you want the app to make changes on your computer. From here, all you need to do is click on the “Yes” button as you can see on the screenshot below.
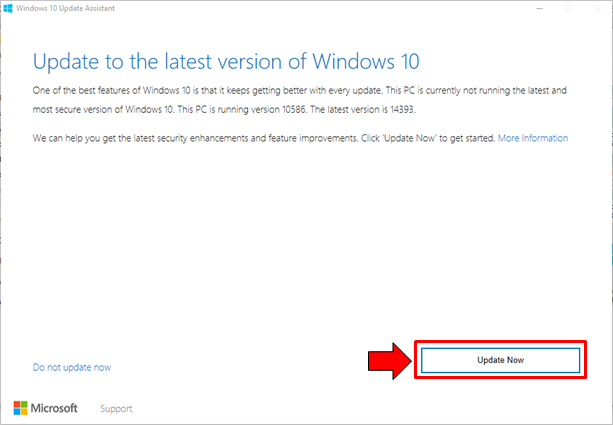
Finally, after clicking on the “Yes” button from the User Account Control prompt that appeared, the “Windows 10 Update Assistant” tool should now initiate and you should be able to see a message saying “Update to the latest version of Windows 10”. At the bottom-right portion of this too, there is a button that says “Update now” and in order to get the update downloaded to your Windows computer, you will need to click on it as you can see below.
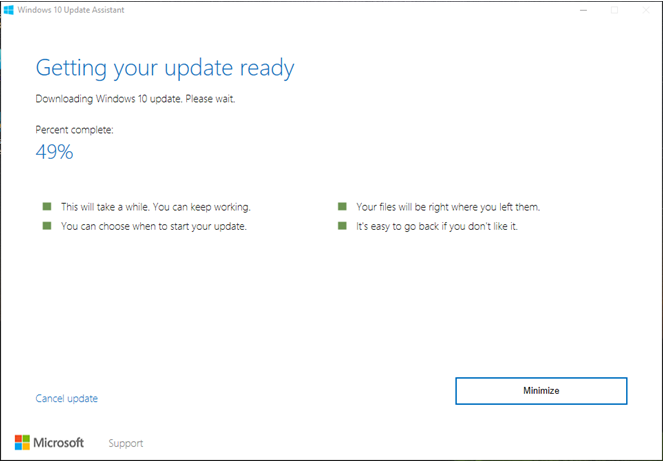
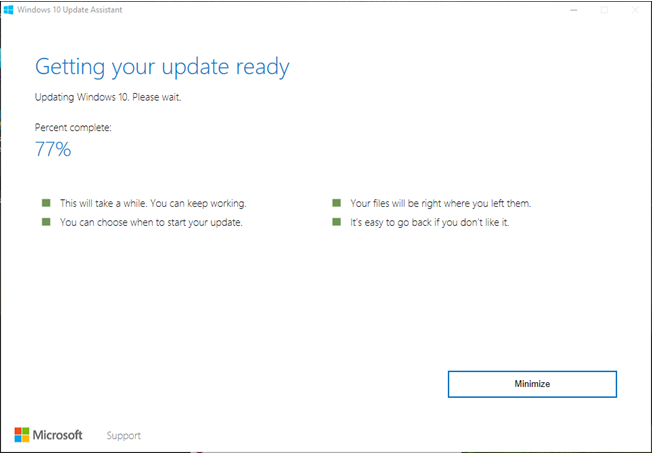
After clicking the “Update now” button, the message on the Windows 10 Update Assistant tool will then become “Getting your update ready” as you can see on the screenshot below and under it, you should be able to see the overall progress in represented in percentage. Below this percentage progress display are some instructions and tips that you can follow once the download is done.
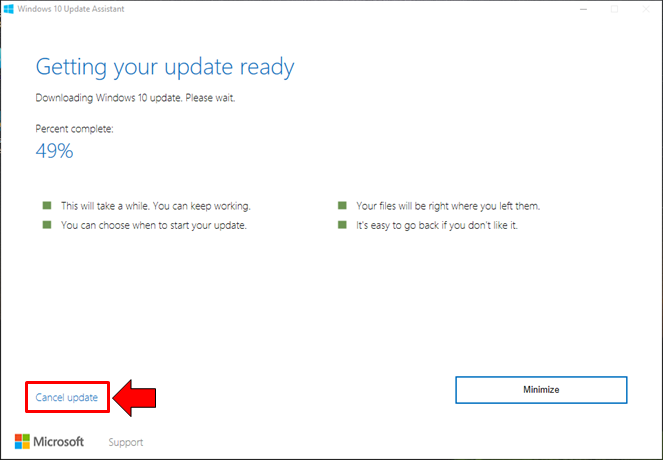
Now, in case you change your mind and just want to do the uploading at a later time maybe because you are going somewhere where Internet connection is not available or you have limited data consumable on your Internet subscription, you can simply cancel the download process simply by clicking on the “Cancel update” link which is found at the bottom-left portion of the Windows 10 Update Assistant tool as you can see being highlighted on the screenshot below.
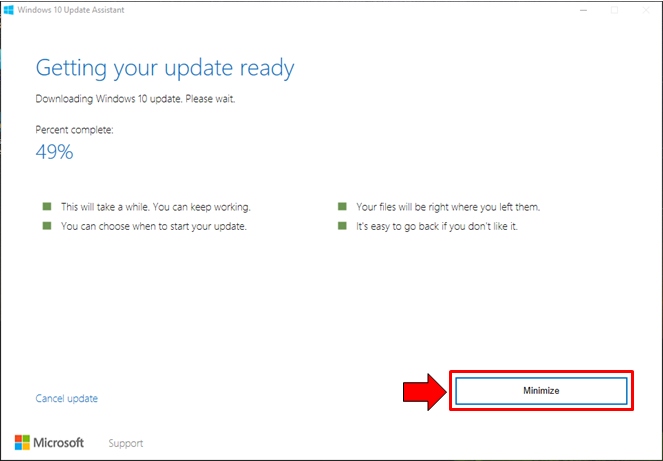
If you choose to just let the upgrade download until it is done, you can get rid of the Windows 10 Update Assistant Window simply by clicking on the “Minimize” button that is found on the bottom-left portion. After you do so, the tool will be minimized into the hidden items of the System Tray as you will see later. The “Minimize” button is shown on the screenshot below.
The Anniversary Upgrade for Windows 10 is quite a big file so it will take a bit long to download depending on the speed of the Internet connection that you are using. Generally, the faster the Internet speed, the quicker will it take for the download to complete and the slower your Internet is, the download process will also be slower. Take not of this because it will need a large amount of data to get all the needed files downloaded so if you are on a subscription to the Internet that has a certain limit of data consumption then it is wise to just do the download and update later on when you don’t have such limitations.
Once the downloading process is done. You can simply proceed on to updating your Windows 10 computer and the Windows 10 Update Assistant tool will now show you the overall progress represented in percentage once again as you can see on the screenshot below. Just wait until this process is done because you can’t cancel it at this point.
Although just like in the previous steps, you can still choose to minimize the Window into the hidden System Tray icons section of the Taskbar simply by clicking on the button that is found at the bottom-right portion of the Window which says “Minimize”. In case you want to launch the Windows 10 Upgrade Assistant Window once again to check on the downloading or installing progress then you can simply click on the arrow-up icon that is found on the System Tray as you can see being highlighted on the screenshot below in order to display all hidden icons.
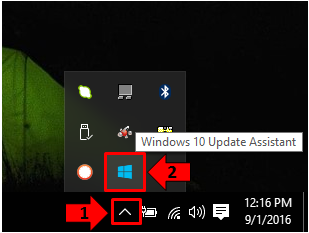
The hidden icons will then display inside a box and from here, all you need to do is click on the Windows logo icon as you can see on the screenshot shown above because it is the one that represents the Windows 10 Update Assistant tool. After you click on it, the tool should again open and you should be able to see the overall progress of the whole downloading or updating process depending on which stage you are currently on.
Enjoy the Better Version of Windows 10!
After following the steps that we’ve shown above correctly, you should now be on the updating/upgrading stage of your Windows 10 computer. The whole process is pretty straightforward and this is all thanks to the Windows 10 Upgrade Assistant that Microsoft has provided for free to all users who want to start enjoying the great changes and improvements that were done to the latest version of this operating system also known as Windows 10 Build Version 1607.
If you want to discover more about these features then you can read our tutorial that tackles all of them. You can also read about the improvements that were implemented on the Start Menu which we talked about in greater detail in our previous tutorial. Have you already installed Windows 10 Build Version 1607 on your computer? What do you think about it? Is it really better than the previous versions? We’d like to hear your opinion and please feel free to share them using the comments section below. You can also get all our latest news and tutorials about Windows 10 straight to your inbox by signing up for our email list! There are still good things to come for Windows 10 and we’re all excited to try them first and share them to you. See you all in our next tutorial!