How to Manage a Child Account in Windows 10
Previously, we’ve talked about the methods that are available in creating different types of accounts in Windows 10 and we’ve also shown how it can be accessed in your computer but we’ve not really gone into the details in how you can manage your child’s account. Do you know that you can actually prohibit your child from using certain apps or even from accessing websites that has some malicious contents in them?

You can even set the times of the day when your child can be allowed to use your PC and when he/she cannot and it is all done within the Accounts section of the Settings feature in your Windows 10 computer. However, before we proceed on with these steps, you will first need to learn the details in setting up the different types of accounts that are available in Windows 10 and that’s exactly what we’ve demonstrated in our previous tutorial. Be sure to read it from top to bottom so you can be sure that you already have the different types of account set and created for the right people who are allowed to use your computer.
Closely Monitor Your Child’s Online Activity and PC Usage with Family Settings
There could be plenty of reasons why parents like us would like to impose certain limits to our children’s PC usage and as well as browsing capabilities. The Internet has been a free media all these years and it hasn’t stopped being so even until now. It is therefore wise to prohibit your child from accessing certain websites or using certain apps and games that are installed on your computer and as well as get a report on how your little one used your PC on the times that he/she was allowed to access it.

We really can’t afford to have that innocent mind destroyed and get addicted to certain vices that exists and are being offered in silver plating all over the Internet so it is always best to prevent them from ever getting into any of these harmful content that are freely available on the web. The screenshot above shows just one of the controls that you can implement to your child’s user account and we’re going to show all of the other controls as we move along in this tutorial.
How to Access the Family Settings Website
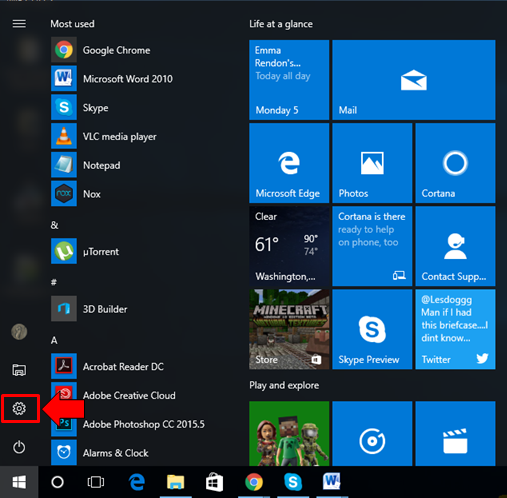
After creating an account for your child, you can just go directly to the Family Safety website provided by Microsoft so you can change certain stuff that will greatly influence your child’s PC usage and as well as monitor his/her activity each day. To do this, you will first need to open the Settings Window on your Windows 10 machine. There are plenty of ways in accomplishing this and the easiest one is through the icon that is found on the Start Menu. To get to this icon, simply access the Start Menu first by pressing the Windows key or clicking on the Start Button and on its left portion sitting right on the narrow vertical bar is the Settings icon as you can see being highlighted on the screenshot below.
You can also launch the Settings Window using a keyboard shortcut which is a more preferred method in doing it since it only involves pressing two (2) keys simultaneously and the modern Settings Window should launch in an instant. So go ahead and press the Windows + I keys and the Settings Window should open up on your computer screen.

Now, once the Settings Window opens, you will need to click on the category that is listed as the fifth (5th) which is labeled “Accounts” as you can see being highlighted on the screenshot below. Doing this will then open a series of links located on the navigation pane at the left showing the tweaks that are available under the “Accounts” settings category.

Under the Accounts section of the Settings Window, you will now need to click on the link that is found on the navigation pane at the left which says “Family & other people”. After clicking on the link, its contents will then be displayed on the right portion and from here, you will need to click on another link again that is found at the bottom of the “Your family” section which says “Manage family settings online” as highlighted on the screenshot below.

Right after clicking on the link, your computer’s default browser should then launch and take you to the Family settings webpage. If you have not yet logged in to it using your Microsoft account, you will need to do so in order to view its contents and we’re pretty sure that you’re going to like every detail of the settings that are available in this section as shown on the screenshot below.

As you can see on the links that are listed on the right of the Family settings webpage, there’s really a good set of things that you are allowed to control in your child’s PC usage. You are even allowed to give your child money for purchasing certain apps from the Windows Store. We will be learning how each one of these controls are tweaked so let’s go over now to the first one.
How the Check Your Child’s Recent Activity
The very first item that is listed on the right of the your child’s account description as we have shown in the previous screenshot is the one that says “Check recent activity”. As the name itself suggests, this section contains logs of what your little one has done when he/she used your PC for his/her daily allowed time and in order to view its contents, all you need to do is click on the link itself as shown below.

The next page will now show different aspects of the “Check recent activity” section and the very first one that you should see is a switch that is labeled “Activity reporting”. Turning this on means that you will be receiving weekly email that shows your child’s activity for the period specified. To the right of it is a link that says “InPrivate browsing is blocked” and this setting should not be changed since InPrivate browsing hides online activity like browsing history making it hard for you to monitor browsing.

Another tweak that you’ll find on the top portion together with the first two that we’ve pointed out above is a checkbox that is labeled “Email weekly reports to me”. We also recommend that you have this checked so that your child’s activity and other usage data will be sent to you each week.
Tweaking Your Child’s Web Browsing Activity
Below the Family settings that we’ve pointed out above is a another one which is labeled “Web browsing”. To be able to tweak this aspect of your child’s PC and Internet usage, all you need to do is click on the “Change settings” link that is found on the right as you can see being pointed out on the screenshot below.

Right after you click on the link, the next page should instantly load and show you all available tweaks that you can enforce so you can have control on your child’s web browsing especially the sites he/she is allowed to visit. First of all, you should be able to see that all inappropriate websites are blocked from your kid’s access as you can see on the top-most setting under the “Block inappropriate websites” section where its switch that is seated just below it is turned on. To better understand what each of these settings do, just read the brief descriptions of each one of them below.

- Block inappropriate websites– This feature is turned on by default and is one of Microsoft’s initiative to protect your child from those websites that has some adult content in them and even the ones that are full of vanity, violence and others.
- Applies to– This section contains a list of apps, programs and services to which the controls you just did on the web browsing section would apply. You need to take note that allowed and blocked websites only work on Microsoft Edge and Internet Explorer so be sure to block other browsers and let your child use only these browsers that we’ve mentioned.
- Only see websites on the allowed list– Next is the setting that will help you specify the websites that you see safe for your child’s viewing. This is very much applicable especially if you have a very young kid at home who has access to the Internet. By checking this setting, you can start entering the websites that you would like to allow for your child to visit into the designated box at the bottom-left of the Window and enter the sites that you want blocked to the box at the bottom-right portion. After entering sites into any of these two boxes, you will need to click on the “Allow” and “Block” buttons on their right respectively to make sure that the websites are added to the allowed or blocked list.
Tweaking the Apps and Games that Your Child Can Access
The next section that you can impose control on is the “Apps, games & media” where you can specify the apps and games as well as those that have inappropriate content to be blocked from being accessed by your child. Thankfully, Windows 10 already has apps containing content that are deemed inappropriate blocked automatically and you can even specify the age that your child is in in order to help Microsoft see which apps and stuff are fit for your kid.

You can also allow and block apps from this section and you will see them on the list that is shown at the bottom when you scroll down. As you can see, Microsoft really cares for your kid and this feature proves this fact many times over!
Setting Your Child’s Allowed Screen Time
Another awesome feature that would really give you control over the time that your child is spending on a PC or any other device running on Windows is the setting called “Screen time”. To access it, all you need to do is click on the link at the navigation pane on the left portion of the webpage which says “Screen time” of course and once it loads, you should be able to see an On/Off switch underneath the “Screentime” section as well as a description of what the feature does.

To set the time when your child is allowed to use your PC or any other device to which he/she can log on using his/her account, all you need to do is turn the switch on by clicking on it and start specifying the times allowed for PC usage for each day of the week.
Purchase & Spending
The next section which you can access by clicking on the link that says “Purchase & spending” at the navigation pane on the left will show you the apps that your child was able to purchase under the “Purchase history”, the top-most item on the webpage as you can see on the screenshot below.

Below it is the “Choose what they can buy and download from Store” section where you can find a box which contains a drop-down options set. In this box, you can choose to let your child purchase and download “All games and apps”, download and install “Only free games and apps” or you can also install the apps and games that you want your child to use and play then set this option to the last available preference which says “None”. Finally, as you can see on the screenshot above, this section also has an option which can be activated by checking/clicking inside the box on its left which says “Let me know when my child gets an app or game”. Enabling this will send an alert via email whenever you kid purchases, downloads and installs an app from the Store.
Find Your Child
Another great feature that is available in the Family Settings website is the “Find your child” tool which will help you locate your child whenever you want to find out where they are anytime. To be able to use this tool, you will first need to turn on location on your child’s device and you can do so from the website by clicking on the switch that is found under the “Show the location of your child’s device” option as you can see on the screenshot below.

Once you have this feature enabled, you will always be updated about the place where your child is using your PC or any other Windows running device from and you will also have a clue on what he/she is doing judging from the location where he/she is currently using the device from. This is such a great feature that will truly help you have control over your child’s device usage.
Make Your Windows Devices More Secure
As you can see, being able to control your child’s online activity as well as his/her app and program usage is easily accomplished from the Family settings website provided by Microsoft for all parents who want their kid to be safe even while browsing the Internet or using certain apps from the Store.
Do you want to implement this same rules on your Windows PC and the Windows device owned by your child, if you do then be sure to first setup a Child account from your Windows 10 machine and you can find the steps in doing this explained in great detail in our previous tutorial. What do you think about the Microsoft Family feature in Windows 10? Has it helped you control your kid’s online and app usage routines? We’d like to hear from your personal experience in using this tool and if you do want your voice heard, please feel free to air them out using the comments section below.