Improve Speed With Ready Boost
The ReadyBoost feature was first introduced in Windows Vista and was even improved in Windows 7. This feature helps you borrow memory from external storage devices such as SD cards, Compact Flash or USB flash drives to give your machine a memory boost when the one that is built-in with it runs out. When a Windows computer runs low in memory especially those that run the older Windows versions, a significant decrease in speed and performance also becomes obvious. This is also true even in your Windows 8 machine but thankfully, the ReadyBoost feature provides an instant solution to this common problem.
What Really Does ReadyBoost Do?
When your PC runs low on its memory, it usually gets sluggish and everything else gets harder to manage. Most of the time, Windows diverts all storage of data and all other stuff to your hard drive since the RAM’s space has already been filled. The hard disk is relatively slower compared to flash drives and other solid state drives because of how it is made. The disk component on hard disks makes accessing some regularly used data a lot harder. This is the reason why ReadyBoost makes use of solid state drives like SD cards, USB flash drives and other similar storage devices.
The ReadyBoost feature in Windows 8 can now handle up to 8 flash memory storage simultaneously giving users an extra 256GB spare memory which will be very helpful especially when you’re using your machine for photo and video editing.
Steps in Using ReadyBoost
If you’re already on the stage where your machine is behaving sluggish because it already lacks RAM space then you need to employ a quick solution that will help give a boost on your computer’s speed and performance so you can get things done quickly. This solution of course doesn’t work like magic, you need to follow some steps in order to get everything started. To learn how Windows ReadyBoost is used, simply follow the steps below:
1. Prepare Your USB Flash Drive/ Storage Device
The very first thing that you need to do is prepare the storage device which will be used for the ReadyBoost process. The ReadyBoost feature can really make a difference in your computer’s speed and performance however, you first need to make sure that your storage device has at least 1GB of available storage space so it can effectively function as an extension of your machine’s memory. You don’t need to worry if in case the device already has some files saved in it since ReadyBoost will only use the free space that is available in it and leave all your files unharmed.

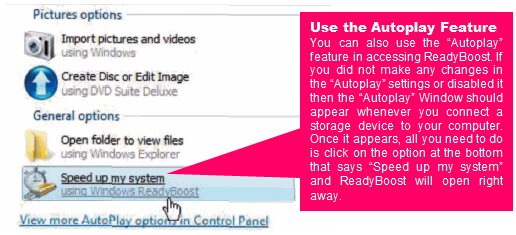
If you didn’t disable the “Autoplay” feature, the “Autoplay” Window should appear after you connect the storage device to your computer and from this Window, simply click on the option that says “Speed up my system using Windows ReadyBoost”.
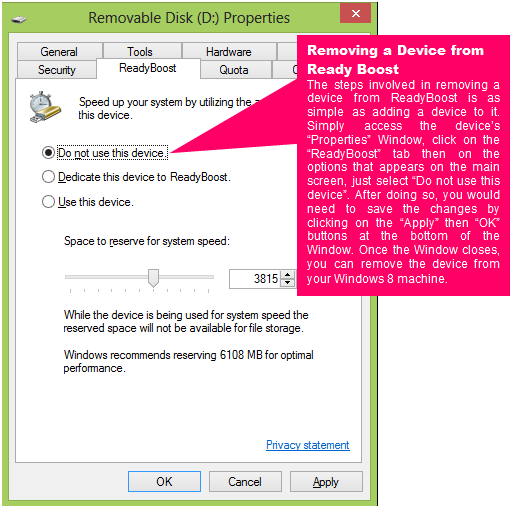
2. Dedicate Your Flash Memory Space
Once you reach the Properties Window for the storage device that you want to use for ReadyBoost, simply look for the “ReadyBoost” tab on top and click on it to open the section where you can set the storage size that you want to use as additional memory for your Windows 8 computer.

3. Share the Storage Space
If you still want to use some space on your storage device for storing other files then it’s possible simply by selecting the third option which says “Use this device” instead of choosing the second one and after doing so, simply adjust the storage space adjustment knob to a value smaller than the available space to tell “ReadyBoost” the amount of space from your card or drive that you want to use for boosting your machine’s memory.

4. Check if Speed has Improved
After turning on “ReadyBoost”, you’ll now need to test if your computer is running faster compared to how it performed before you added memory to it. The boost in speed largely depends on the amount space you’ve added . The larger space added, the faster your machine would become. If you noticed that your machine is not as fast as you expect it to be then you should start to consider adding more memory by putting additional flash devices.
5. Add More Storage Devices
Adding another card or flash drive for ReadyBoost is also possible. You can use up to eight flash devices to give your machine up to 256GB of extra memory. It is like adding a RAM module to your computer without getting a screw driver and fiddling with the parts. The process is the same as what you did from the beginning of this tutorial. If you need one of your flash drives for storing files then you can simply remove it from ReadyBoost and you can do the same for the rest of the storage devices as well.
6. Turning off Ready Boost
To turn off ReadyBoost, all you need to do is simply access the “Computer” section and look for the device that you want to remove. Once you find it, simply right-click on it and click on “Properties” from the right-click menu that appears and after doing so, you’ll be able to see the “Properties” Window.
Enjoy a Faster Windows 8 Machine
Windows “ReadyBoost” is designed to be a quick solution to a slow Windows machine caused by a lack in RAM space. if you are planning to use your computer for heavy tasks such as photo or video editing and you only have 2 or 3GB of RAM space that is running out then you should consider using the “ReadyBoost” feature to add more memory and make everything work smoothly without the hangs, freezes and sluggish performance caused by the lack of memory space. Are you getting any problem in setting up “ReadyBoost”? We would like to help you with it. For any questions regarding the topic discussed in this tutorial, please feel free to let us know by describing the problem using the comments section below.