Logging in and Switching from a Local to a Microsoft Account
Back in the days of some older Windows editions, the only account that you can create are local accounts. A local user account is one of the most important thing that needs to be setup and in fact, it is a requirement that needs to be provided during installation. A Windows machine won’t work as it is supposed to without a user account assigned and set up on it.
In Windows 8.1, you can create not just a Local user account but also a Microsoft account and log in to your computer using any of these accounts. The difference between these two and as well as the way in switching from one to another is what we will be discussing in this tutorial so brace yourself to follow the steps that I’ll be demonstrating below.
Setting up a Local Account in Windows 8.1
Windows 8.1 allows you to create a local user account after it completes the installation process. Brand new computers having Windows 8.1 already has a user account registered on it but you can always delete it and create one of your own. To do this, simply follow the steps below.
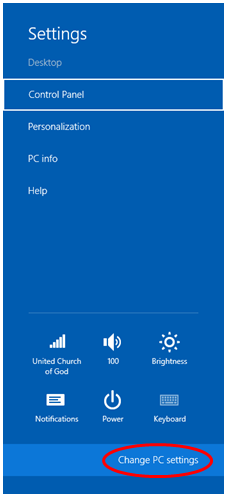
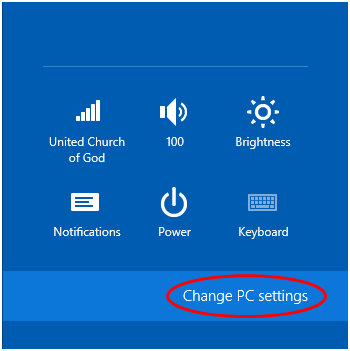
1. First, you’ll need to access the Accounts section of PC settings. To do this, simply press on the Windows + I keys then hit the “Change PC settings” link found at the bottom of the metro screen that appears at the right.
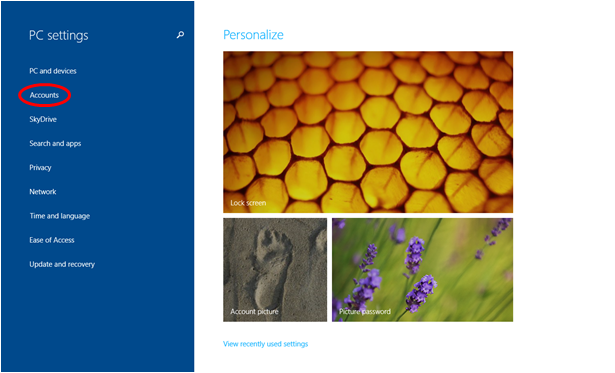
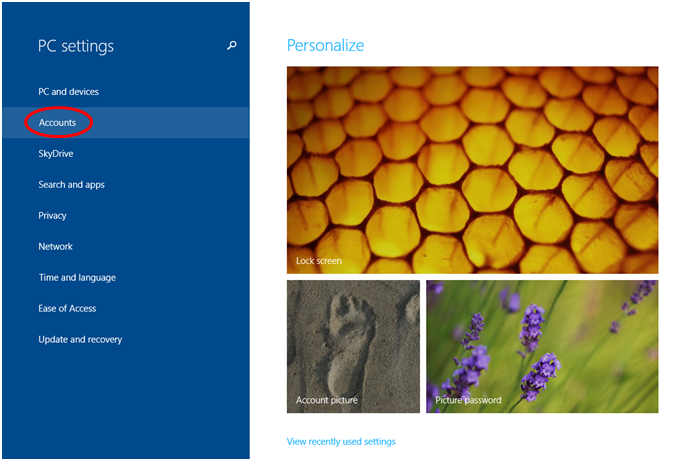
2. Next, you will be directed to the PC settings screen which shows all options for tweaking some aspects of the Windows 8.1 operating system. All the options are arranged one after another on the left hand portion of the screen. From these options, click on the one that says “Accounts”.
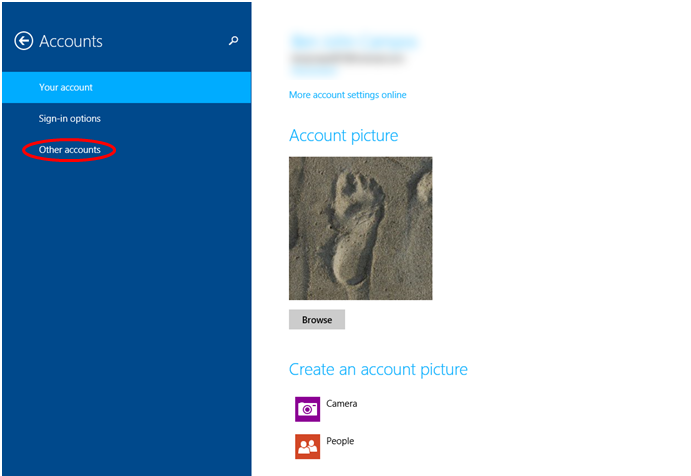
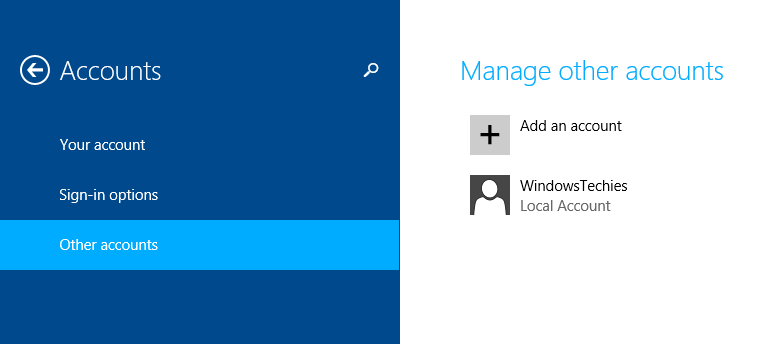
3. The next screen will then display the options under the Accounts menu. From here, you’ll need to click the “Other accounts” option.
4. The next screen will then show only one option which says “Add an account” with a “+” symbol on its left. You will need to click on this option so you can proceed to the screen where the next step is located.

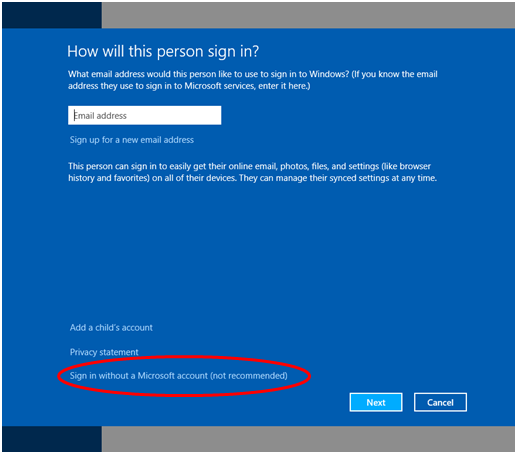
5. On the next screen, you will be asked to enter an email address of an existing Microsoft Live account. Only do this if you want to sign in using a Microsoft account on your computer but since we are trying to learn how to create a Local account, you will need to click on the option that says “Sign in without a Microsoft account” found at the bottom of the screen.
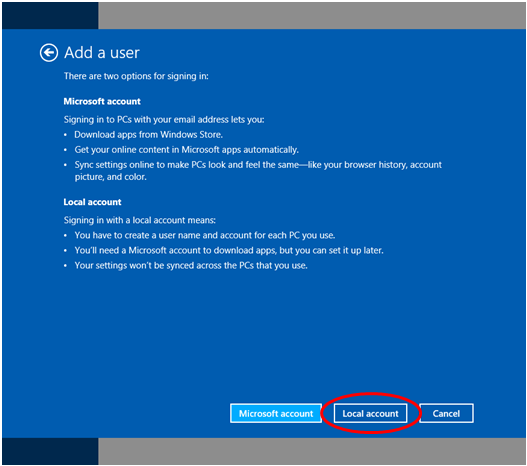
6. Now, you will reach a screen which lists the advantages of creating and signing in using any of the two accounts (Local and Microsoft Account). At the bottom of this screen, you’ll see some buttons that are labeled “Microsoft account” and “Local account”. Just click on the “Local account” button to initiate the creation of a new local account.
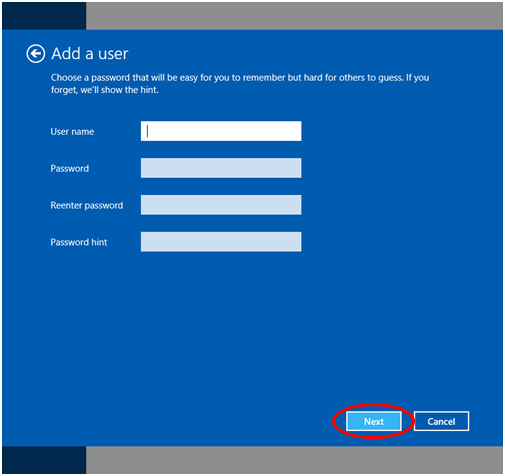
7. The next screen will then require you to input the user name and password of the new local account that you want to create. You’ll also be required to reenter the password for verification purposes and input a password hint. Just enter all of these required information then click the “Next” button at the bottom.
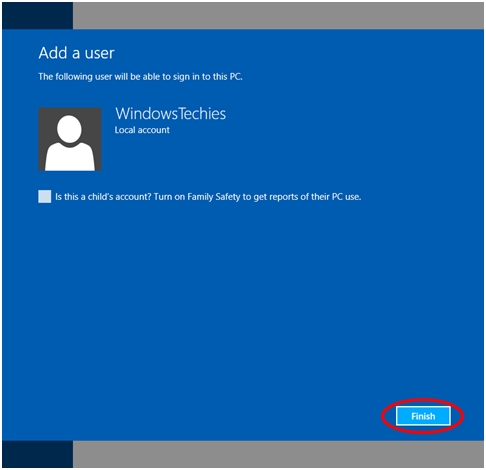
8. After inputting all required information and hitting the “Next” button, you’ll be taken to the final screen. From here, all you need to do is click on the “Finish” button at the bottom to finally save the new Local account.
Creating a Microsoft Account
After learning how to create a Local account, it is time to create a Microsoft account and use it in logging in to your computer. The process is almost the same with creating a Local account but the links and buttons that you’ll need to click are different. Here are the steps.
1. On your computer’s keyboard, you’ll need to press on the Windows + I keys to open the screen that will normally appear when you click on the “Settings” charm. Once this screen appears on the screen, all you need to do is click on the “Change PC settings” link located at the bottom the same as what you did earlier when you created a Local account.
2. Next, on the PC settings screen, you will need to click on the “Accounts” menu again which is located at the left hand portion of the screen like you did earlier. You will then be taken to the accounts section where you need to click on the “Other accounts” option at the left then hit “Add an account”.
3. On the screen that follows, simply input your Microsoft Live email. If you don’t have one yet, you can create one by clicking on the link that says “Sign up for a new email address” found below the email input box. After inputting your email address or clicking on the “Sign up for a new email address” link, all you need to do is click on the “Next” button at the bottom and follow the on-screen instructions that will come after until you reach the final step.

Switching from a Local to a Microsoft Account
After creating both types of accounts on your Windows 8.1 machine, you’ll need to learn how to switch between them but before that, we will first learn how one differs from the other. Let’s start with Local accounts. A local account is actually just the same as the traditional user accounts that we used to have in previous Windows versions. It can only be used in one computer. For instance, you need to have a local account on all the computers that you own or use.
A Microsoft account on the other hand is capable of syncing all your settings, files and other stuff from one device to another. For instance, if you log in to your laptop computer using your Microsoft account, all of the settings you made like the account picture, desktop theme, time etc will be synced to other computers for as long as you log in to them using the same Microsoft account. This means freedom and improved productivity that’s why Windows 8.1 recommends that you sign in with a Microsoft account.
To switch between these two types of accounts on your computer, simply follow the steps below.
1. First, press the Windows + I keys then hit the “Change PC settings” link at the bottom and on the screen that follows, click on the “Accounts” menu from the left hand side of the screen.
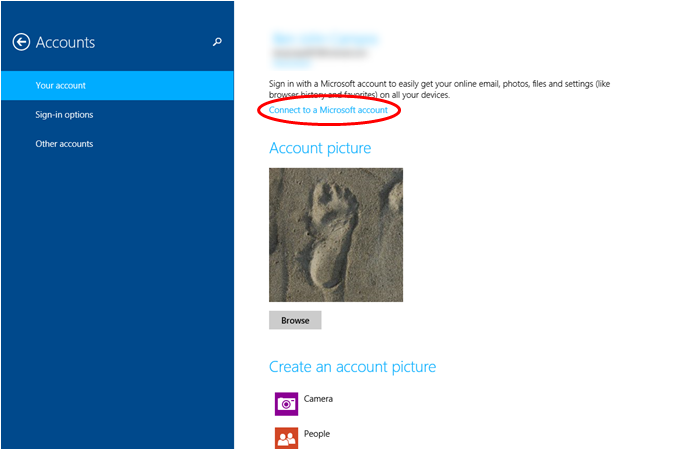
2. Next, on the Accounts screen, click on the “Your account” option at the left. From here, you will see a link that says “Connect to a Microsoft account”. Just click on it to initiate the account switching process.
3. The next screen will then require you to enter your Microsoft email and password, simply enter these required information then hit the “Next” button at the bottom. Just enter any final configuration that the system will ask in order to complete the process.
Freedom and Productivity in One Awesome Operating System
Microsoft has again made an awesome innovation by incorporating the Microsoft account and the syncing capability to the new Windows 8.1 system. This ensures freedom for users and brings productivity to the next level. Are you still using a Local account on your machine? Make the switch to a Microsoft account now and enjoy all the great things that Windows 8.1 has to offer.