Refreshing and Resetting Windows 8.1
In time as you use your computer for a lot of tasks and as you store megabytes if not gigabytes of files to it, a lot of problems may also come to the surface that could affect your machine’s performance and even damage your precious files. If your computer has contracted a lot of problems and errors over time which has worsened to the point of no return, you might think that the only way to fix it is by formatting or restoring it to a working state using a recovery drive or a system image.
After trying some other remedies such as System Restore, Startup Repair and other advanced options and still nothing good happens, you will need to try something new in Windows 8.1 before really getting more serious and doing an operating system reinstallation. This feature is called “Refreshing your PC”.
When a refresh process is done, only third-party programs, software add-ons, printer or scanner software and other installed apps will be removed but all the apps that you have downloaded from the Windows Store as well as your personal data such as the pictures that you saved, your favorite videos or downloaded movies and even your music and documents will remain unharmed.
In this tutorial, we will be learning the steps involved in refreshing your Windows 8.1 computer and as well as resetting it if all else fails. But before getting into the details of these brand new features, let’s first identify he difference between the two of them so you will know which one to use when some problems starts occurring in your Windows 8.1 machine.
Refresh or Reset? What to Choose
When things are not working as they are supposed to in your computer that runs an older version of Windows and when all of the problems worsen, the last solution is to reinstall Windows using its installation disk or to use a system recovery disk. Another method also makes use of a storage device that contains a system image which can be used in making Windows work again.
Though all of these are still available in Windows 8.1, there are two new features that you need to be familiar of which would definitely help get Windows work again without the hassle caused by getting some stuff saved in storage devices. One of them is called a Refresh and the other is Reset. Now, how does the former differ from the latter?
As was mentioned earlier, refreshing your PC would remove all third-party software and apps that you have installed on your computer and keep all of your personal files such as documents, pictures, videos music and even the apps that you have installed from Windows Store. This step would help fix errors and problems that are caused by some third-party programs that you have installed on your machine.
On the other hand, the Reset feature is more synonymous to the formatting step as you have known it in the previous Windows versions. In this step, your computer will be restored to factory defaults which means that all of the programs, apps and even the settings that you made as well as network information and other personal data even those that belong to some connected hardware will be removed and your PC will basically be reformatted.
After undertaking this step, you can access your Microsoft account and restore all your apps as well as saved settings and other data through OneDrive but this is still a major step that you would undergo so we advice that you first try all the other available remedies before doing the Reset step.
Refreshing Your Computer
Since the Refresh feature is not found in any of the previous Window versions, you might find hard accessing it in your Windows 8.1 machine but it doesn’t have to be so, going to the Refresh section is pretty simple and it can be done in many varied ways. However, to make things simple, we will just be showing the easiest method here.
To start, you will need to access the Start Screen by clicking on the Start Button or pressing the Windows key. Once this screen opens, you will need to press the Windows + S keys in order to summon the Search screen which will slide-in from the right edge. On this screen, you will need to enter the word “refresh” into the input box that is located on its top portion then wait until the search results start appearing just beneath the input box itself.

Now, on the search results, you will need to click on the item that says “Refresh your PC without affecting your files” as highlighted on the screenshot above and you will be taken to a metro screen where you will need to click on a button that says “Get started”.
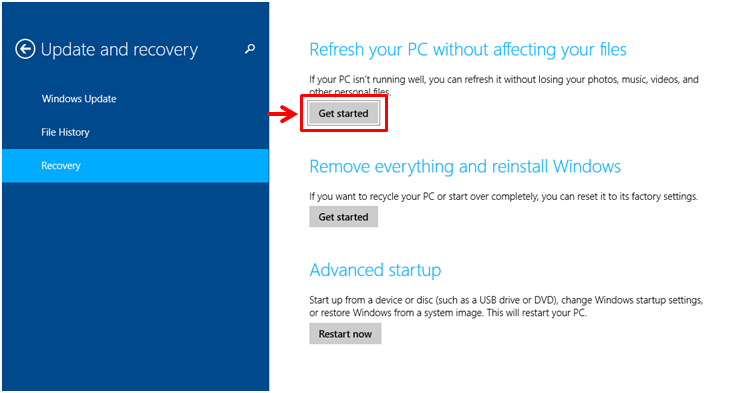
The screen that opened is actually the “Update and recovery” section of the PC settings as you can see on the screenshot above and after clicking on the “Get started” button, you will be taken to another screen showing you some information about the things that would happen if you proceed. Make sure that your recovery media or Windows 8.1 installation disk is inserted before you move on with the process and follow all the steps that will be shown by the refresh wizard.
Resetting Your Computer
If your computer has got to the point that it really is not working as it is supposed to, you can choose to recycle it and get it to its factory defaults. This means that all of your personal files, data, programs and apps will be lost so it would be wise if you save a backup of them first before undertaking this step. To do this, you will again need to open the Start Screen and summon the Search screen simply by pressing the Windows + S keys then type “remove everything” into the input box that is found on top of it.

Now, when the search results appears just below the input box, you will need to click on the item that says “Remove everything and reinstall Windows” and you will be taken to the same “Update and restore” section which we were able to access earlier during the Refresh process. From this screen, you will need to click on the button that says “Get started” and make sure that your Windows installation disk is inserted into your computer’s DVD-ROM for the process to go through. After making sure that the installation disk is properly inserted, you can now click the “Get started” button and you will be taken to a screen that tells you some information about the Reset process. After reading on each item shown, simply hit the “Next” button and follow all the other steps that the wizard would ask you to do. Again, be sure to have all your important files saved in a backup drive or in any other place where it is safe so that you will not lose them.