Preparing an Existing User Account for the Family Safety Feature
Most of us would really want only the best for our child in almost all aspects in life but in our modern digital age and with all the hustle and bustle that we experience from work and the stresses that we get from the bills coming in each month, it’s really hard to stay in control with what our children are doing in school or even when they get their leisure hours over the Internet. Online and offline games are surely part of this but as a responsible parent, you should also be able to set limits to the time that your child can use the PC and set some restrictions to the websites that he/she is capable of accessing.
These things are all taken cared of in Windows 8.1 with the feature which is called “Family Safety” and if it is your first time to hear about this built-in tool that will let you stay in control with your child’s online activities and PC usage then you’re reading the right article right now. In this tutorial, we will take you through the steps in activating Family Safety in your Windows 8.1 machine and give you some idea as to what this feature is capable of doing in ensuring that your children are only getting enough Internet time and visiting only the sites that are suitable for them so be sure to follow the steps that I’ll be showing below.
Accessing the Family Safety Section from the Control Panel
Accessing the “Family Safety” feature in Windows 8.1 is done by first accessing the main Control Panel Window. To do this, you can use a hidden menu or the Search feature which is perfectly integrated to the operating system itself. To use the former, all you need to do is press on the Windows+X keyboard shortcut combination and after doing so, you should be able to see the hidden menu in the form of a rectangular pop-up box that will appear at the bottom-left portion of the screen. From here, just click on the shortcut link that says “Control Panel” and after doing so, the main Control Panel Window should open.

Next, if you want to use the latter method, all you need to do is press the Windows+S keyboard shortcut combination and after doing so, you’ll be able to access the Search screen that will appear from the right edge. From here, you will need to enter the words “Control Panel” into the input box that is provided on its top portion then wait until the search results appears just underneath it. From the search results, simply click on the shortcut that is labeled “Control Panel” and you should be able to access the main Window of the Control Panel in your Windows 8.1 machine.
Control Panel is Open, What’s Next?
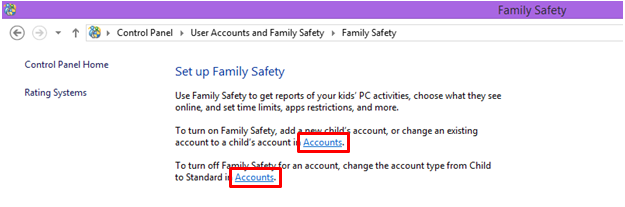
Now that you were able to open the Control Panel Window, you should be able to see some links that will lead you to different sections which bears settings and tweaks mostly for the desktop environment of your Windows 8.1 machine. From these links, you will need to click on the one that says “User Accounts and family Safety” and after doing so, the section will open and show some other locations where you can do changes on the accounts that are registered on your computer or set up the “Family Safety” feature as well as some other add-on features and tools like “Credential Manager” and “Mail”. From these set of links, just click on the one that says “Family Safety” or the “Set up Family Safety for any user” sublink that is located under it.

No matter which link you click- whether the one that says “Family Safety” or the other that says “Set up Family Safety for any user” which is found under it, you will be taken to one and the same Window that describes what the “Family Safety” feature does and shows links towards the “Accounts” section where you can change the type of an existing account into a “Child’s account” or turn off the “Family Safety” feature.
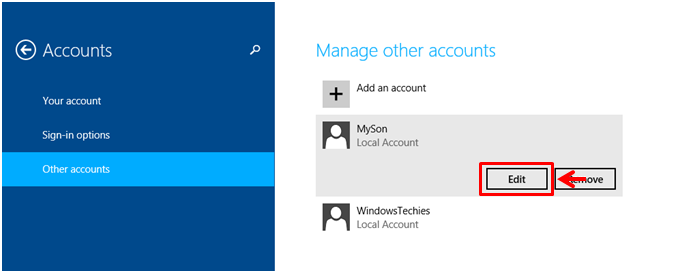
After clicking on “Accounts” link, the “PC settings” metro screen should open and take you to the accounts section where you can do some tweaks and change settings for the accounts that are registered on your Windows 8.1 machine. From here, simply select the account that you want to turn into your Child’s account. Once you’ve decided which account would you like to use (assuming that you have multiple accounts registered on your machine), you will need to click or tap on it to reveal two buttons which are labeled “Edit” and “Remove”. From these buttons, you will need to click on the one that says “Edit” so you can access all available tweaks that are available for the selected account.
After pressing the “Edit” button, you will be taken right away to the screen that looks like the one shown below. From here, simply click inside the box under the label that says “Account type”.
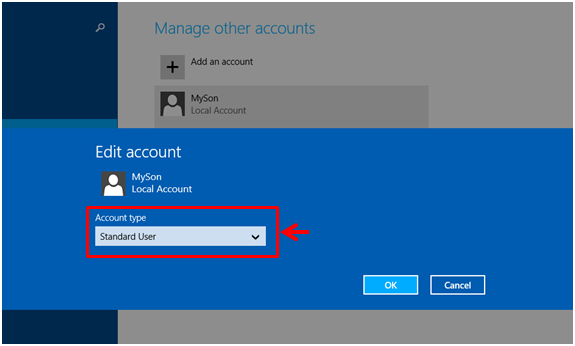
Now, you will see other account types that are available for the user account that you have selected earlier after clicking inside the box. This is the time where you will need to choose the options that says “Child” to change the account type. In the screenshot shown here, I am changing the account type from a “Standard User” to “Child” so I can enable the “Family Safety” feature for the account.

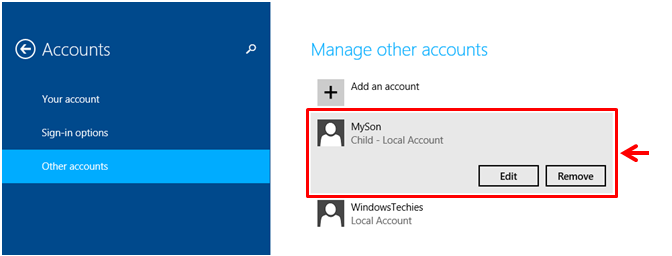
Once you’ve selected “Child” to be the type that the account would change into, simply click on the “OK” button that is located at the bottom-right portion to save the changes you’ve made. Once the account type changing process is done, you will be taken back to the “Accounts” metro screen of the PC settings section in your Windows 8.1 machine and you will notice that the account type will now say “Child- Local Account” as you will notice on the screenshot below.
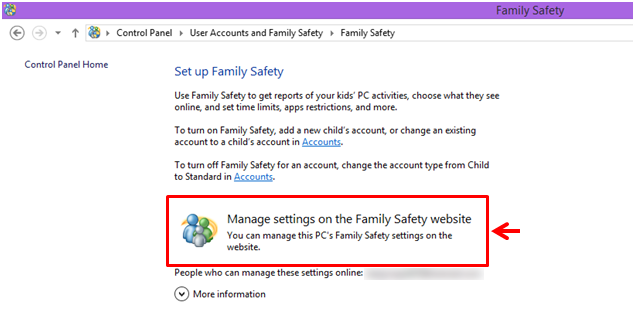
Now, the account is ready for some controls and all you need to do is go back to the Control Panel Window and go to “User Accounts and Family safety > Family Safety” location and once this section opens, just click on the link under “Family Safety” that says “Set Up Family Safety for any user”as you did earlier. This will then take you to the Window that will now show another “Manage settings on the Family Safety website”.
TIP:
You will need to be logged in with a Microsoft Account in order to do all the steps shown in this tutorial. If you are only logged in with a “Local Account” then you will not be able to activate “Family Safety” in your computer so be sure to create a Microsoft Account and use it to log in to your Windows 8.1 machine. You can also create a “Child’s account” if in case you only have one user registered on your computer. For more details about creating new accounts in Windows 8.1, you can refer to this previous tutorial and follow the steps shown in creating an account of any type.
More Details to Learn On the Next Tutorial
Changing the settings of the Family Safety feature in your Windows 8.1 machine is quite a lengthy process so we’ll cover them in our next tutorial. For now, just review the steps that we’ve shown above in changing an account type and accessing the “Accounts” and the “Family Safety” section in your computer so you won’t get confused later. As you can see, Windows 8.1 has a better way in managing user accounts and works perfectly in creating a safe virtual environment for your child. Just continue reading our next tutorials to learn more details in how everything works and how you can take advantage of these free tools available in Microsoft’s latest operating system version.