Tip of the Week: Set Web Access Restrictions on Your Computer
The modern generation is one of the groups that are really adept to computers, gaming and all the other stuff that has to do with the digital world and because of this, they could also be exposed to websites that bear inappropriate content. Computers, smartphones, tablets and the Internet are good tools but they can also be bad if not used with control and moderation especially by our kids but if you are using Windows 8, it will be easy to set restrictions that will keep them away from unsafe sites and limit their Internet or computer usage to the values you have set.
For instance, you might want your child to keep away from Facebook when it’s time for him to study or set computer usage up to 8 in the evening for your teenager while you have unrestricted usage for yourself and your wife at any time of the day. All of these are possible simply by using the “Family Safety” feature but of course, you first need to create your own user account and set up a password for it and later on, create even more user accounts for which you’ll be setting the restrictions. If you are using a Microsoft account then you won’t need to set up a password since your Microsoft account password will automatically be set as the password on your computer. If you’re already logged in to your computer then it time to get started with the steps in creating a child-friendly machine.
Adding Users to Your Computer
The key to setting up effective restrictions for your child while preserving unlimited access to yourself is creating different users for specific people. If there only exists one user account on your machine right now which is used by everyone then it is time to lock it down and create other users for your child as well as your teenager and set the restrictions that you want on each one of them.
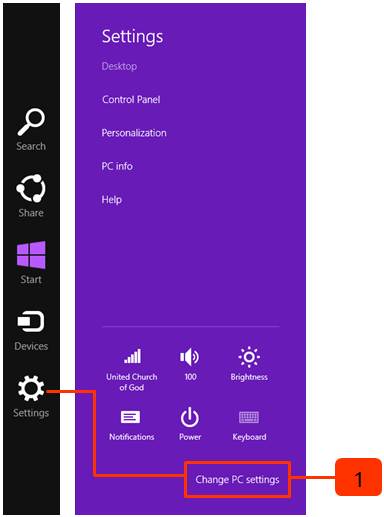
1. To create a new user account, simply bring up the “Charms” then hit “Settings” and when the “Settings” screen appears, click on “Change PC settings”.
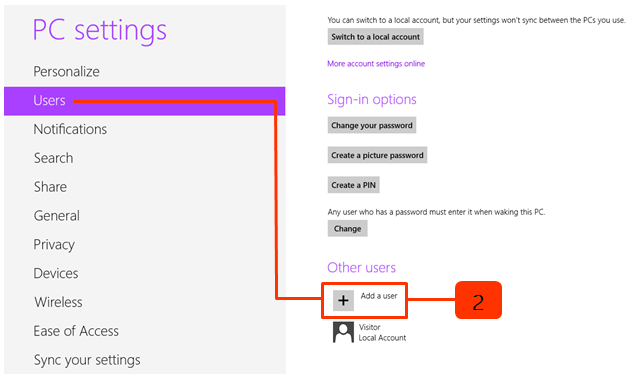
2. On the “PC Settings” screen, simply click the “Users” menu then scroll towards the bottom of its contents found at the right and click on “Add a user”.
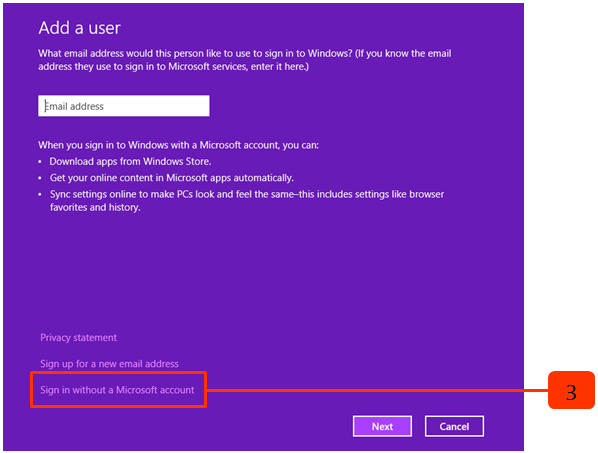
3. On the next screen, simply click on the “Sign in without a Microsoft” account link so you can be able to set up a new “Local Account”. Local Accounts have limited access and poses no potential harm to your computer and this is also the account type which you can set some restrictions with.
4. You’ll then arrive at a screen which explains the difference in signing up with a Microsoft account and a Local account, since we will be setting some restrictions here, you’ll need to click on the “Local account” button at the bottom.

Assign a Username and a Password
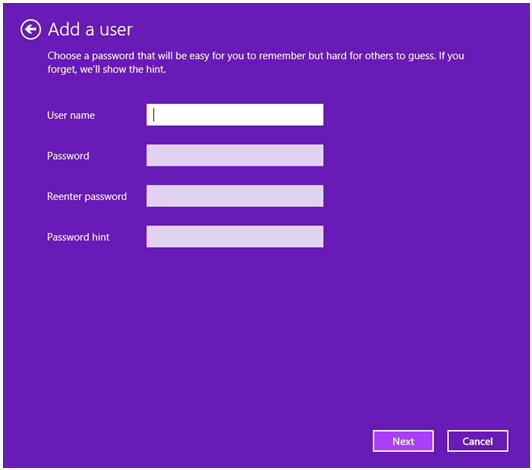
After hitting the “Local account” button, you’ll arrive on a screen that will ask you to input your desired name and password for the new account. It is a good idea to use each of your child’s name for the accounts that you are going to set up and put passwords on each one of them so they can’t log in to each other’s account. List down each log in details as well so that you can fix whatever problem happens on each account in the future.
You might be bothered with what to fill into the “Password hint” box but you don’t have to because it only asks for a clue that will remind you of the password which you have set for the account. The password hint appears after a certain number of tries in entering a wrong password. Just be sure that the clue you used will effectively remind you of the password you’ve set for the account. After entering all the needed information, click or tap on the “Next” button.
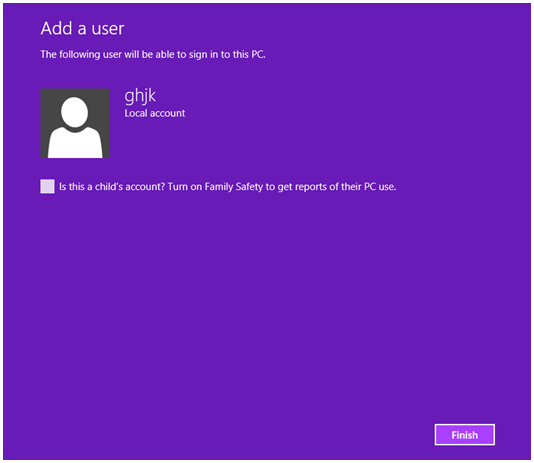
On the next screen, you’ll need to tick on the box that says “Is this a child’s account? Turn on Family Safety to get reports on their PC use” then hit “Finish”. After setting up an account for your kids, be sure to inform them of their “Username” and the “Password” so they can log in to their assigned accounts.
Access Family Safety
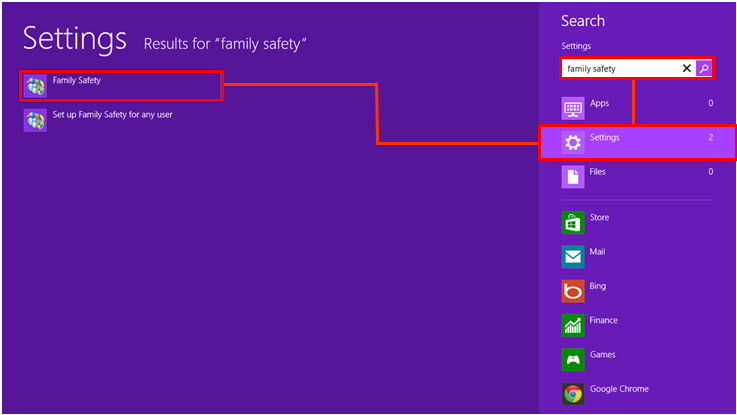
Now, you’ll need to access “Family Safety” by clicking on the “Windows” key and typing “family safety”. After doing so, the search results will appear and from here, you’ll need to click the “Settings” search result category located at the bottom of the input box. The “Family Safety” shortcut will then appear at the left side of the screen which you’ll need to click in order to access the desktop-based Control Panel “Family Safety” Window.
On the “Family Safety” Window, simply select the user that you want to set restrictions for then you will see a list of settings, tweaks and restrictions that you can set for it on the next Window.

Where to Set Certain Restrictions
There are four types of restrictions that you can set for your child’s account like Web filtering, Time limits, Windows Store and game restrictions and App restrictions. If you want to block websites, you’ll find such settings under the “Web filtering” settings while restrictions for the length of time your child can use the computer is found under the “Time limits”section.

For downloaded game restrictions as well as Windows Store access control, you can find it on the next two settings that follows. You can also define age limits so as to tighten the restrictions for apps and other stuff that can distract your kids from doing what they are supposed to do. This is simply done by going back to the “User settings” section and at the bottom section, you will see links that will let you choose which user can and cannot download from the Windows Store as well as the ages that are appropriate in the case of games and other leisure apps.
Get Your Machine Child-Friendly
With the steps I have shown above, you can turn your Windows 8 machine into an instrument of controlled leisure for your kids. It also allows you to monitor what they are doing online even if you’re not watching behind their back when they are using the PC. Take time to do these tweaks and settings on your Windows 8 machine and get in control of everything that happens to their time in front of the screen. If you think Windows Family Safety isn’t enough, you can simply research and download a third party software that does a similar job to secure your child’s safety when surfing the web. Young minds are easily influenced and it all depends on us parents to protect them from the stuff that can harm them. Be extra careful and vigilant to your child’s Internet and PC usage and start using Windows 8’s Family Safety feature now!