Using the Open and Select Options in File Explorer’s Ribbon
When you first used a Windows 8.1 machine, your first reaction might have been more inclined to the negative side thinking that most of the features that you got used to just like the Start Menu was taken out but Microsoft has actually replaced all of these features with better ones that accommodates both the desktop stuff and as well as those that come from the newly added environment that represents the mobile world which is called the “Metro”.
One of the improvements that is considered as a brand new feature which has been added to the Windows system specifically to the File Explorer Window are collectively called the “Ribbon-based options” and in case it’s your first time to hear about it, you will need to learn everything that has to do with it so you can take the use of your Windows 8.1 machine to the next level. In our previous tutorial for the File Explorer series, we’ve already gone through the first three options group under the Home tab of File Explorer’s ribbon-based options and we’re now down to the last two which are labeled as “Open” and “Select” so be sure to catch up by reading our previous tutorials discussing the first three groups of options under the “Home” tab or you may also read this one first and just proceed with the others once you’re done following the steps shown in this tutorial.
2 Ways in Accessing File Explorer
Before you can view all the other options which are available on the top portion of File Explorer’s main Window, you will first need to access it without the help of the Start Menu which is one of the features that was removed in Microsoft’s latest operating system version. Just like all the other Windows features, there are many ways in accessing the File Explorer Window and we’ll be showing each of them here so you won’t need to jump to our previous articles just to read about each one of them.
Access File Explorer from a Hidden Menu
The very first and probably the simplest method in accessing the File Explorer Window is done with the use of a hidden menu that contains links leading to different system tools and other important locations in your Windows 8.1 machine such as the Control Panel and even the Task Manager Window. To access this menu, all you need to do is press the Windows+X keys and after doing so, you should be able to see the menu appear at the bottom-left portion of the screen.
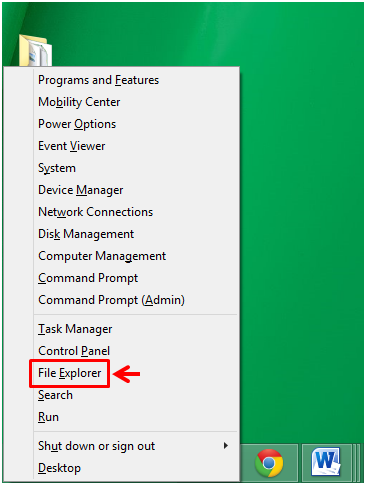
From this menu, all you need to do is click on the link that says “File Explorer” so you can open the File Explorer Window and start working with all the brand new stuff which are located in Windows 8.1’s ribbon-based options.
Open the File Explorer Window from the Apps View Screen
Another method in accessing the File Explorer shortcut which will open its Window is from the Apps View screen which is Windows 8.1’s answer to the missing Start Menu. This section looks like the Start Menu but it presented in full screen with a customizable sorting options. This means that you can easily find any shortcut, app or desktop program in it simply by changing the sorting rule or even by using the search input box that is located at the top-right portion of the screen. To access this section in your Windows 8.1 machine, all you need to do is access the Start Screen first by clicking on the Start Button or pressing the Windows Key and after after doing so, just move the mouse until you see a round button containing an arrow down icon that will appear at the bottom-left portion of the Start Screen.

After clicking on the button, you will be taken to the Apps view screen which contains some shortcuts and tiles for all the desktop programs and mobile apps as well as system locations and tools that your Windows 8.1 machine has. When you get to this screen, just scroll to the right until you arrive at the last portion of the screen itself (assuming that the sorting rule is on its default which is by category) and you should be able to find the File Explorer shortcut under the “Windows System” category.

Using the Options Under the Open Group
Now that you learned some ways in accessing the File Explorer Window, we will now move on to the real meat of this tutorial which are the “Open” and the “Select” options group under the “Home” tab. First, we’ll be talking about the options under the “Open” group. Try to select a file from any folder in your Windows 8.1 machine and take a look at the options under the “Open” group. You will notice a big button that is labeled “Properties” and when you click on it, you’ll be able to view all the details about the file that you have selected.

If you click on the arrow down button that is located under the “Properties” button, you’ll see another option that allows you to remove or delete all the information that has to do with the file you selected. The “Remove properties” option is very useful especially if you don’t want other people to see the source of a file and some other details which will appear in checkboxes on a separate Window after you click on the option itself.

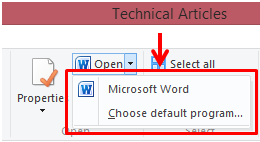
To the right of the “Properties” button are other options and the one located at the top-most portion is labeled as “Open” which nears the icon of the program which is the default one that will open a selected file. If in case you don’t want to use the default program then you can click on the arrow down icon at the right of the “Open” option then hit the program that represents your choice or if there’s no other program that appears, just click the “Choose default program…” and a new Window will appear which will let you select other available programs that supports the file you’ve selected.
Next to the “Open” button is another one that is labeled “Edit” and when you click on it, you will be able to open the selected file using the default program that File Explorer has assigned to it. Finally, there’s still another option next to it that says “History” which you can use to view all the recent changes done to the file itself and even restore a previous version of it. Using File History is quite a lengthy process so we’ll be talking about it in greater in one of our future tutorials.
The Select Options Group
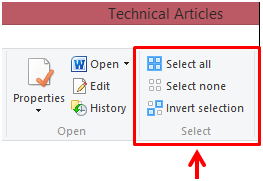
The last group of options that you will find under the Home tab of File Explorer’s ribbon-based options are the ones which are collectively labeled as “Select” which you can use to quickly highlight all items on the contents pane or deselect everything in one single click. There’s also an option for “Invert selection” which will deselect all items that you have already selected and select the ones which were left unselected before you clicked on the “Invert selection” option.
As you can see, Windows 8.1 is equipped with some options that will surely help you become more productive many times over compared to its predecessors. In our next tutorials, we will be talking about the other tabs in Windows 8.1’s ribbon-based options and all the stuff that are in it so be sure to stay tuned with us here in windowstechies.loc to learn more about Microsoft’s latest operating system version.