7 Tips for Working with a Local Account
After booting up and getting through the Lock Screen, Windows 8.1 will bring you to a section that shows your picture and a box dedicated for inputting password in it. If you are currently logged in, you will see only your account picture and an input box where you can enter your account password but if nobody is logged in yet and there are multiple users registered to your computer, you will see all available user accounts and their corresponding account pictures which you can click in order to select and input the password. Assigning an account picture for your Windows 8.1 machine will help it look really like your own and will also help in the easy identification of your account if ever there’s more than one that exists on your computer. In this tutorial, we will learning some tips in how you can tweak some details of your account so you can make your Windows 8.1 machine become more secure against unauthorized users so be ready to follow each of the steps that I’ll be showing below.
Importance of Setting up an Account
Upon installing Windows 8.1 for the first time, you will be asked to enter an account name and assign a password to it. It is one of the requirements in completing the installation. An account is very important even in the very first steps that you need to go through and getting it prepared is a step that will help you secure your machine against outside threats. If you have very important stuff saved on your computer, setting up an account will also help it be secured from other users who want to use your machine in doing some things that they need to do so if you only have one account on your computer right now, you’ll need to learn how to setup another one which you can lend to anyone who wants to use your computer. Here are some tips for you to follow.
1. Adding a New User
The very first thing that you need to learn is how you can set up a new account on your computer which you can lend to other users. You can setup a Local account easily by getting to the PC settings section. To access it, simply press on the Windows + I keys and at the bottom of the Settings screen that will appear at the right-edge, simply click or tap on “Change PC settings”.

Once the PC settings screen appears, simply click on the “Accounts” menu then hit the “Other accounts” option located at the left. After doing so, you’ll see the “Add an account” link at the right. Simply follow the steps that would come next after you click on the link.

2. Changing the Password of an Existing Account
After creating a Local account, there might be a time when you’ll need to change its password especially if there are already a lot of people who knows it. To do this, you will need to access the Control Panel and click on the “User Accounts and Family Safety” menu. Once it opens, simply hit the “User Accounts” option and on the Window that follows, hit the “Manage another account” link.

After clicking on the link, you will arrive at another Window which displays all of the registered accounts on your computer. From here, simply click on the account that you want to change the password of and on the next section, simply hit the “Change password” link and follow all the steps that would come next.
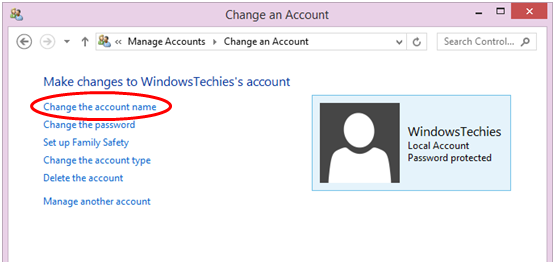
3. Changing the Account Name
You can change not only the password but also the name of an existing account. You can do this simply by accessing the same section which you went to in changing the password. Once you arrive at the Window that is labeled “Change an Account”, simply hit the “Change the account name” link.
4. Changing the Account Type
You can also switch the type of your account from “Standard” to “Administrator”. A “Standard” account is more recommended especially if you just created an account for other people to use it. It allows some basic system settings to be changed and most software can also be used. Nothing of these changes can affect other users and it can’t affect the security of the PC. An “Administrator” account on the other hand has complete control over the PC and can change all system settings and as well as access all the programs and files that are stored in the hard drive.
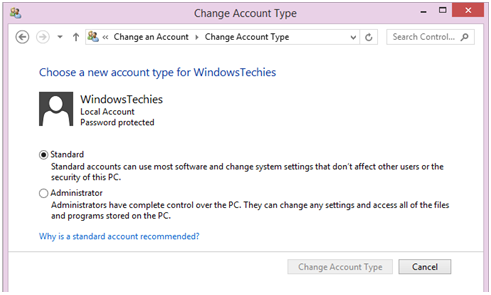
To access the section that will allow you to change the account type, simply click on the account that you want to make changes with, you will then arrive at the “Change an Account” Window as you did earlier in the previous steps and hit the link that says “Change the account type” in it.

5. Changing the Account Picture
You can assign a picture to an account that doesn’t have one yet or change the one that is already set to an existing account. To do this, you will need to access the Start Screen and click on your account name found at the top-right corner of the screen. After doing so, you will be able to see some options on a small box. From these options, simply click or tap on the “Change account picture” link.

After doing so, you will arrive at a screen which will show the “Your account” section. At the right portion of the screen, you will see the “Account picture” settings section and at the bottom of the current account picture, you will see a “Browse” button which you will need to click so you can locate the picture that you want to use as the new one for your account.
6. Making an Account Child-Friendly
Upon creating a Local account, you can enable an option that will make it work as a child’s account. We all know that children should not be able the same computer privileges as adults have and the “Family Safety” feature will help you set up an account for your child. To be able to apply this to a new account, all you need to do is tick on the checkbox that says “Is this a child’s account? Turn on Family Safety to get reports of their PC use” that will appear in the final steps of creating an account.

7. Deleting an Account
There might be an account in your computer that is seldom used. If this is the case, you can remove it completely from your machine by deleting it. To do this, simply select the account that you want to delete and on the “Change an Account” Window, simply click or tap on the link that says “Delete the account”.

That’s it! You now learned some tips for working with the accounts that are registered on your Windows 8.1 machine. The tweaks shown here will only work on a Local account. If you want to really get the most of your Windows machine, you can sign in to it with a Microsoft account. More of the details about this will be discussed in a future tutorial so stay tuned with us here in windowstechies.loc to learn some useful tricks that will help you take advantage of all the brand new features included in the new Windows 8.1 operating system!