Accessing the Windows Speech Recognition Tool
We’ve already covered two of the ease of access features in Windows Vista, Windows 7 and Windows 8.1 but there is still one more tool that you need to learn how to tweak and use which would surely be of great help when the need arises. Imagine being able to control your Windows machine with only your voice and nothing else? Wouldn’t that be great? It may sound a bit futuristic or something that seems like an expensive technology but it’s actually a free tool bundled with your Windows machine and is just waiting to be discovered.
Yes! There’s actually a feature like this in your Windows computer which is called “Speech Recognition” and in this tutorial, we will first be discussing the steps in how you can access it in different Windows editions but before delving into the details, let us first know all the possible uses of this free tool which is found in every Windows computer.
What is Speech Recognition Used For?
The very first thing that you might ask is what on earth can the Speech Recognition tool be used for? Just like Siri in your iphone, Speech Recognition is capable of executing voice commands from anyone who is using a Windows machine. Whenever you feel lazy to control your computer using a mouse or pressing any key on the keyboard, you can choose to just activate Speech Recognition on your machine and start doing things which includes but are not limited to the following:
- Controlling your computer like opening programs. Just speak the name of the program that you want to open and the Speech Recognition will automatically interact with the system so that the program or application will automatically be run by the system. Speech Recognition can also be used to interact with Windows the same as what you are doing when you are using a mouse and a keyboard. To learn about the commands that you can speak to the Speech Recognition tool, you can refer to this list found on Microsoft’s official website.
- Speech Recognition can also be used when you want to multitask or accomplish different things all at the same time. You can use the tool even while you are working with a mouse and a keyboard so you can accomplish more things without the need of getting your hands overheated in doing the scrolls and the key presses. Just speak the command and Speech Recognition will do the rest for you.
- You can also use Speech Recognition in dictating texts or editing them whenever you are working on a document. Just open the Microsoft office app that you want to use in creating a document or open the document that you want to edit and start working with it by dictating the words or the letters that you want to be inserted into it. Again, you can learn some very useful Speech Recognition commands from Microsoft’s official website. To go there, simply click on the link that is given above.
How to Access Speech Recognition in Windows Vista and Windows 7
Accessing the Speech Recognition tool in both Widows Vista and Windows 7 is very much the same. Just click on the Start Button or press the Windows Key in order to open the Start Menu. After it opens, simply click on the “All Programs” tab which is located just above the search input box as highlighted below.

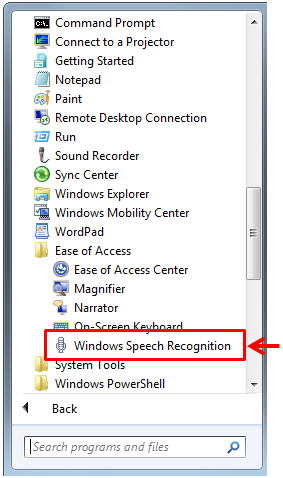
After clicking on it, you will see a list of all the built in Windows features and programs and as well as the other third-party ones that you have just installed on your machine. From here, simply look for the “Accessories” folder and once you find it, you will need to click on it so it will expand and reveal all of its contents.

From the contents list of the “Accessories” folder, you will again need to click on “Ease of Access” and once it expands, you should be able to see the shortcut that represents the “Speech Recognition” tool as shown on the screenshot below.
After doing so, the Windows Speech Recognition tool should open and will be ready to be set up for the first time using the microphone that you have. To make sure that your voice is really heard by the tool itself, it is advised that you use a microphone which can be a standalone one that can be plugged into one of your computer’s USB slots or you may also choose to use a headset with a built-in microphone with it.
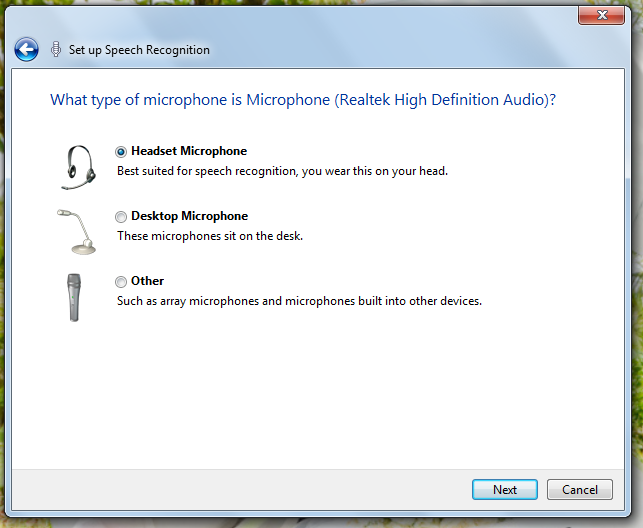
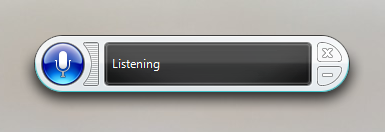
Using your laptop’s built-in microphone might not work that well so be sure to prepare a separate hardware to ensure that Speech Recognition would work properly. After choosing the type of microphone that you are using, you will then be alerted to read a sentence in order to test if the tool really hears the words that you speak and find out if the microphone is working on. The Windows Speech Recognition tool in Windows Vista and Windows 7 looks like the one shown below.

Accessing Windows Speech Recognition in Windows 8.1
Accessing this same tool in Windows 8.1 is quite different but you don’t need to get intimidated just because of the new environment that is present in Microsoft’s brand new operating system. In fact, everything has been made a lot easier in this Windows edition. To access Speech Recognition in your Windows 8.1 machine, you can follow any of these steps that is most comfortable to you.
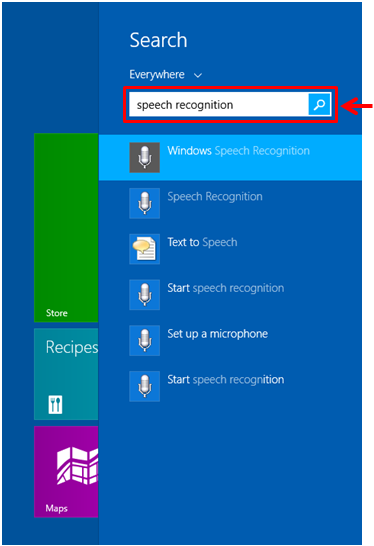
First, you can simply press the Windows Key or click on the Start Button in order to open the Start Screen. Once it opens, you can start typing the words “speech recognition” on your computer’s keyboard and the Search screen should appear from the right edge. From here, you should be able to see “speech recognition” already entered into the search input box that is located at the top portion of the Search screen as shown below.
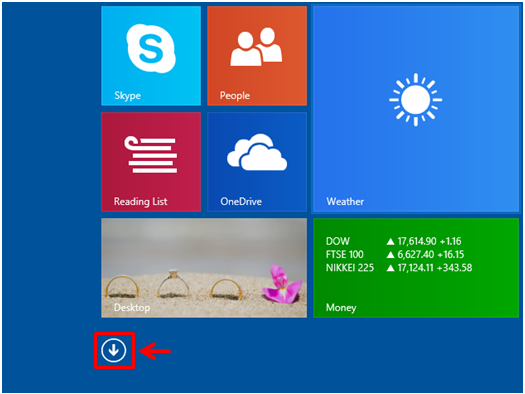
After a few seconds, the search results should appear just below the input box of the Search screen and from here, you will need to click on the shortcut that is labeled “Windows Speech Recogition”. If you want to learn another way in accessing this very useful tool in your Windows 8.1 machine, you can do it by first accessing the Start Screen through a click on the Start Button or a single press on the Windows Key. After doing so, you will need to move the mouse until you see a round button that bears an arrow down icon in it that will appear at the bottom-left portion of the screen. Once this button appears, just click on it and you will be taken to the Apps view screen.
On the Apps view screen, you should be able to see all available modern apps and programs that are bundled with your Windows 8.1 machine and as well as the third-party programs that you have installed. From here, you will need to scroll towards the right until you see the “Windows Ease of Access” group where you should be able to find the “Windows Speech Recognition” shortcut and once you see it, simply click or tap on it and you will be able to open the tool on the desktop screen.
The Windows Speech Recognition tool in Windows 8.1 looks like the one shown on the screenshot above. As you can see, accessing this tool in Vista, Windows 7 and Windows 8.1 is very easy. On our next tutorial, we will be tackling the steps involved in using it so be sure to stay tuned with us to learn more stuff about your Windows machine.