Creating a PIN and Setting Up a Fingerprint Log in
Aside from the normal alphanumeric passwords that we all got very familiar with since the earliest version of the Windows operating system came into existence, Windows 8.1 introduces us to some brand new security enhancing features which are nowhere to be found in the previous Windows editions. We’ve already discussed how you can set up a Picture Password in our previous tutorial but there are two other security features that you can use to protect your Windows 8.1 machine from unauthorized access and usage and one would be very useful provided that your machine has the right hardware to make it work.
You surely are familiar with PINs or “Personal Identification Numbers” that we commonly have in our ATM cards to protect it from theft and other such stuff. PINs can also be used to lock mobile devices such as smartphones and tablets or the other hybrid devices and the good news is you can already setup a PIN as a sign-in option for your computer that runs the brand new Windows 8.1 system. for an even tougher log in, you can also use your fingerprint to protect your machine but you’ll need to have a working hardware for this feature. If it’s your first time of hearing about all these stuff then you’ll need to read through this tutorial to learn the details in how you can set it up in your Windows 8.1 computer.
Getting to the Accounts Section of PC Settings
If you want to do some tweaks to your Windows 8.1 computer’s settings especially those that have to do with its brand new features in the Metro environment, the location that you need to access is the PC settings and there are varied ways in getting to this section in your computer. The easiest way is done by first pressing the Windows+I keys to summon the Settings screen that will slide in from the right edge.

From the Settings screen, just click on the tab that is located at the bottom which says “Change PC settings” and after you do so, you will be taken to the PC settings metro screen which is the place that we’ll be starting to work with in this tutorial.
If you want an even shorter way in accessing the section for creating a new PIN or Fingerprint log in, you will need to learn how to use the search feature. To do this, just press the Windows+S keys and after doing so, the Search screen should slide in from the right edge of your machine’s monitor.

From the Search screen, simply type in the words “Sign-in options” into the search input box that is located on its top portion and wait until the search results appears just below the box. When search results starts appearing, simply click on the one that says “Sign-in options” and you will be taken right away to the “Accounts” section of the PC settings metro screen.
Creating a PIN
Now that you learned different ways in how to access the PC settings section, we’ll start with the process of creating a PIN so you can start using it in securing your Windows 8.1 machine and all contents that are saved in it. To start doing it, just click on the “Accounts” link that you will find at the left hand portion of the PC settings metro screen as shown on the screenshot below.

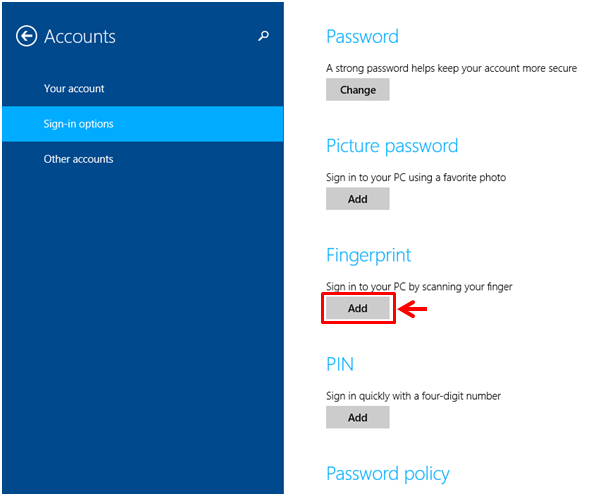
Now, when the “Accounts” section opens, another set of links that each contains options under them will appear on the same spot at the left hand portion of the screen. From these links, you will need to click on the one that says “Sign-in options” and after doing so, its contents will appear on the contents pane where you will need to click on the “Add” button that is located under the item that is labeled “PIN”.

Now, after clicking on the “Add” button, you will see a prompt that will ask you to enter your account password in order to verify your identity. From this prompt, just input your password into the box that is provided then hit the “OK” button.
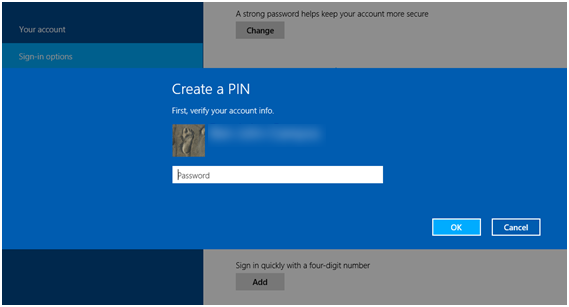
The screen that follows will then ask for a four-digit PIN. From here, just enter your four-digit number combination into the designated box and confirm it by entering the same numbers in the second box which says “Confirm PIN”. Once your PIN gets entered and confirmed, just click on the “Finish” button at the bottom of the screen to finally save it.

NOTE:
Just like other accounts that requires a PIN, the one that you can create in your Windows 8.1 machine would only allow numbers and nothing else and be sure that you will not include any number combination that can easily be identified or guessed such as your birthday or wedding anniversary. Assigning any number that is related to you will defeat the protection and security aspect of the PIN feature so be sure to pick a random number and make it as your computer’s PIN. Just be sure to take not of it not on your smartphone or tablet but somewhere that is far from the reaches of anyone else which only you knows where.
Setting Up a Fingerprint Log in
A more secure log in that is sure to protect your machine with the highest security that Windows 8.1 can offer is your “Fingerprint”. to set up this security feature, you will first need to make sure that your computer has the right hardware to make it possible for you to have your fingerprint read by a scanner so you can access your system. There are laptops in the market that has a built-in fingerprint reader in it but in case you are using a PC or a laptop computer that doesn’t have one, you can buy a peripheral device that you can easily connect to your machine and add the feature instantly.
To start the Fingerprint log in adding process, you will need to click on the “Add” button that is located under the “Fingerprint” item of the “Sign-in options” section as shown on the screenshot below.
After clicking on the button, a prompt will appear asking you to verify your identity by entering your account password. From here, just enter your password into the box that is provided and after doing so, simply hit the “OK” button which is located at the bottom portion.

Now, on the screen that follows, you will be required to swipe your finger on the fingerprint scanning device four times so Windows 8.1 can save it as your log in. Be sure to take longer strokes in swiping your finger on the scanning device to help the it read your finger’s details completely.

After the four swipes gets through, you will a message which informs you that the fingerprint adding to your account is complete. To confirm this, just hit the “Finish” button at the bottom of the screen to save the new security feature that you have just added.

Now that you added two more options for logging in, you can simply select from them (Password, Picture Password, PIN and Fingerprint) whenever you want to get into your computer’s system.