Getting Help Through Remote Assistance
A vast majority of Windows users are not really experts, most are just the average type who knows the basics but never really have enough knowledge in dealing with some situations especially when something wrong happens. This is the reason why most “how to” websites and even those experts forums really get some regular stream of visitors.
However, there are some problems which are not really for the average ones and its solutions, though found in most support websites and expert forums are just too technical to be followed by anyone who only knows the basics and so, seeking some other help like those of your friend who is more knowledgeable or paying someone to do the fixing would be more helpful than doing it alone. However, before you really dabble into these steps, you might as well want to try a free solution which is called “Remote Assistance”.
What is Windows Remote Assistance?
Remote Assistance is a tool that allows any Windows user to ask help from a friend or an expert in solving a computer problem over the Internet or an existing network. For instance, if you are in the office and your computer suddenly runs into some problem, you can easily solve them by asking help from the IT department or from the person that is hired to maintain your company’s network, computers and other IT matters.
If you’re at home, you can also ask the help of a geeky friend who has some technical know-how in dealing with problems in a Windows machine. However, you need to be careful enough not to just let anyone fix your computer remotely. Since this process involves letting the person access your operating system through a network or an existing Internet connection, some cybercriminals could take advantage of it and intercept information or the guy who is helping could himself have an ulterior motive so be sure to allow remote access only on a secure network and ask help only from the people whom you trust or those who have verified identification.
Changing Remote Assistance Settings
Getting to the Remote Assistance section in previous Windows editions like Vista or Windows 7 was a lot easier since the very familiar Start Menu was still available in these Windows editions however, if you made the decision of upgrading to Windows 8.1, you might find it a bit confusing and a lot harder to access the settings which took split seconds for you to get into back in Vista and Windows 7.
There are many ways in accessing this section in Windows 8.1 but first, we will be tweaking some of its settings. To do this, you will first need to get to the Start Screen first by clicking on the Start Button or pressing the Windows key then once you are on it, just press the Windows + S keys so you can open the Search screen then enter the words “remote assistance” into the search input box that is located on top of it as shown on the screenshot below.
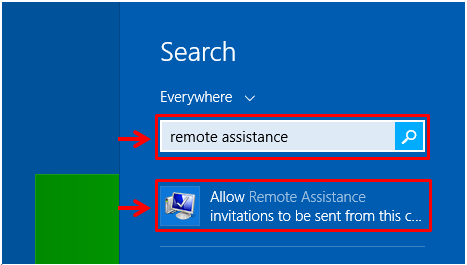
After doing so, you will need to wait for a few seconds for the search results to appear just below the input box and from these search results, simply click on the one that says “Allow Remote Assistance invitations to be sent from this computer” as highlighted on the screenshot above. This will then open a small Window which contains a check box that will allow you to turn on the sending of remote assistance. just check the box and if there are no other options that you want to tweak then hit the “Apply” the “OK” buttons located at the bottom of the Window itself.

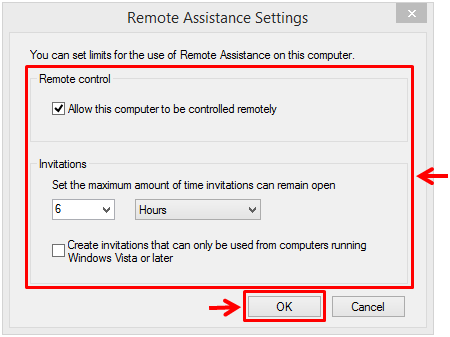
However, if you want to do more tweaks on how Remote Assistance would work, you can simply click on the “Advanced…” button and on the Window that follows, just change any of the aspect of remote assistance that you want to change and when you are done, simply hit the “OK” button.
Accessing the Remote Assistance Section
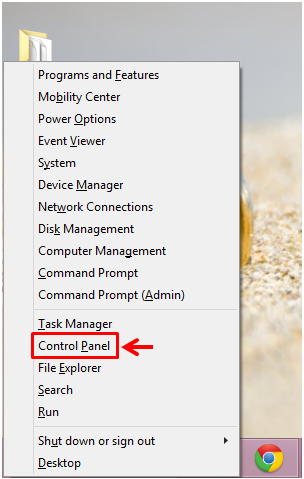
Now that you have tweaked how Remote Assistance would work, it is time to access learn how you can access it in your Windows 8.1 machine. To start, you will need to access the Control Panel Window and since the Start Menu is not existing anymore in this Windows edition, you will need to press the Windows + X keys in order to open a hidden menu that contains the Control Panel link.
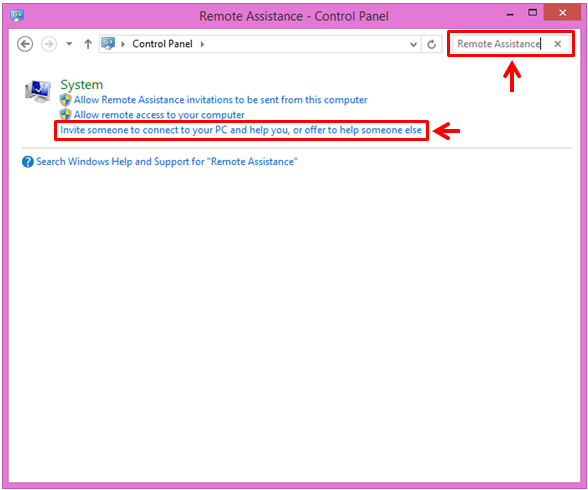
After you do so, the Control Panel Window will open and from here, you will need to enter the words “Remote Assistance” into the search input box that is located at the top-right portion of the screen and wait until the search results would appear. Once the search results becomes available, all you need to do is click on the link that says “Invite someone to connect to your PC and help you, or offer to help someone else”.
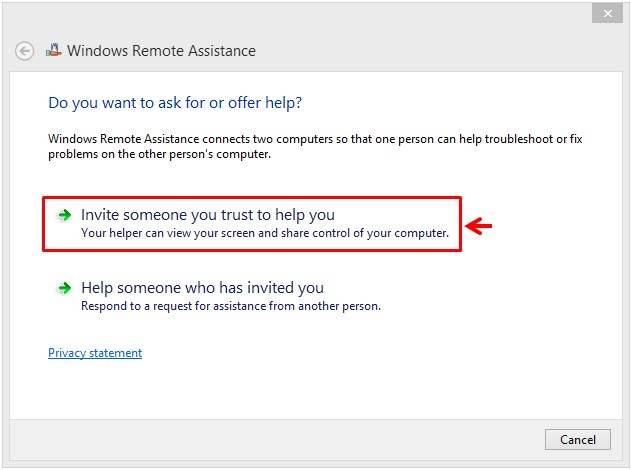
Now, the Windows Remote Assistance Wizard will open and from here, simply click on the option that says “Invite someone you trust to help you”. The other option which says “Help someone who has invited you” is what you will need to click on case you were invited by someone to be of help with his/her problem through remote assistance.
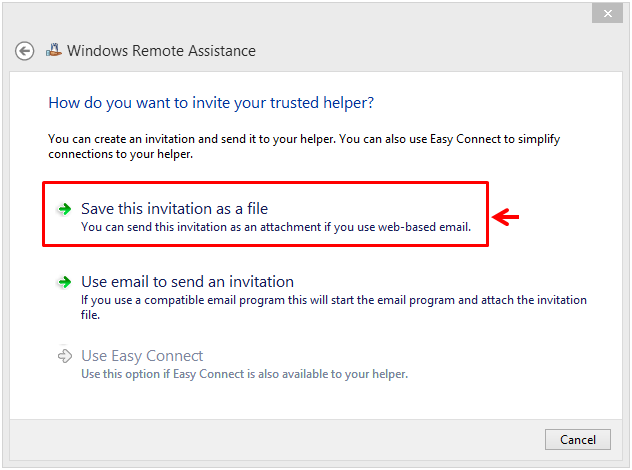
After clicking on the first option, you will be taken to a screen which shows some available choices on how you would like to send the invitation. If you have an email program installed on your machine or if you are using the Microsoft Email service then you can choose the second option but if you don’t have any of these, you will need to choose the first option which says “Send this invitation as a file”. This option will create a file that you can attach to an email which you can send to the person whom you want to ask some help from.
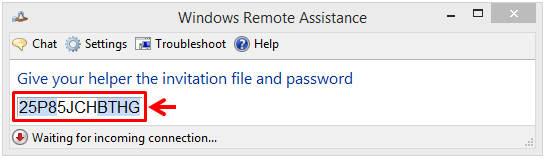
Next, there will be a Window that will ask you where you want to save the invitation will appear and from here, simply choose where you want to save the invitation and hit the “Save” button at the bottom. After you do so, Windows Remote Assistance will generate a password that you will need to give to the person whom you asked some help from so he/she can connect to your computer remotely.
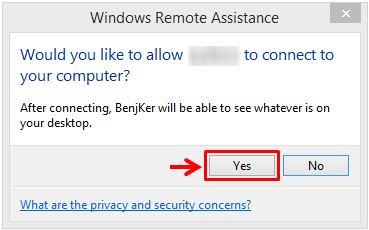
Once the person you asked some help from enters the password, you will see a prompt on your computer screen asking you to allow the person access to your computer. From this prompt, simply click on the “Yes” button to initiate the connection.
Now, the person that you asked helped from will start seeing your desktop but will not have access to it. There is an option though that will allow your helper to control your computer which should be initiated by the helper himself. Once he/she initiates it, you should see a prompt that looks like the screenshot below.

From this prompt, you can simply hit “Yes” and if the problem would involve dealing with the User Account Control many times during its resolution then you need to check the small box that says “Allow <Name of Helper> to respond to User Account Control prompts” before finally hitting the “Yes” button. At the top portion of the Windows Remote Assistance Window are buttons for controls and settings and you will notice a “Pause” button there in case you need to take a break and be off from your computer for a little while.
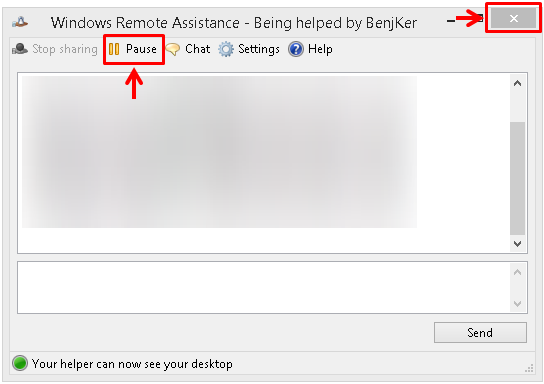
Once the problem that you asked some help for gets solved, just hit the “X” called the exit button at the top-right corner of the screen and the session will be cut off right away.