Learning How to Turn on the File History Feature
If you’ve been using Windows since its earliest versions, you probably experienced losing some important files out of a virus infection on your laptop computer or PC. Losing some precious stuff really is a heart-breaker especially if you’ve been keeping it for a very long time but viruses and other forms of malware don’t really choose which computer to infect and which files to corrupt and destroy. They all do a very destructive job and leave anyone helpless after an attack.
This is the reason why Microsoft and even other third-party software developers created some backup software that will allow you to keep a copy of your important files to prevent them from being permanently lost after an error occurs in your machine. When mobile devices became widely used, cloud storage also became a trend which allows users to store files in an online account and access their them from any device as long as it is connected to the Internet and the folder is synced with it.

In the new Windows 8.1 operating system, Microsoft has included a feature that lets you keep a record of some recent versions of files, contacts and even your favorites stored in a separate storage device like a USB flashdrive or a portable hard drive. This feature is called File History and in this tutorial, we will be learning how to set it up in your Windows 8.1 computer and discuss the steps in how you can use it so you can keep files safe at any time.
Turning On the File History Feature
Just like the other built in features which was introduced in Windows 8.1, File History is also turned off by default so you need to learn how to turn it on first before you can really start using it in saving a latest copy of your files. Doing this crucial step is quite easy especially when you know the shortcuts and some other brand new innovations in the operating system itself. Just follow the steps below to turn on File History in your Windows 8.1 machine.
1. Secure a Portable Storage Device
One of the very first steps that you need to do is to make sure that you have a portable storage device like a USB flashdrive or a portable hard drive where you can store some of your stuff in using File History. Once you have any of these storage devices that I mentioned, simply attach it to your computer and check if there’s still enough space and if it also gets detected by the system. After making sure that the device is working properly, you can now proceed to the second step which is enabling the feature itself.
2. Turn on File History
Since the File History feature is turned off by default, you will need to turn it on manually so you can start using it in securing your crucial files. There are many ways in doing this on your Windows 8.1 machine and I’ll be showing each of the available methods here for you to choose from. First, you can turn on File History by accessing the Start Screen which opens when you click on the Start Button or press on the Windows Key. Once it opens, just start typing “File History” on your machine’s keyboard. After doing so, you should be able to see the Search screen appear at the right edge and the search keyword (File History) which you typed in earlier should already be inside the search input box that is on top of the Search screen as shown on the screenshot below.
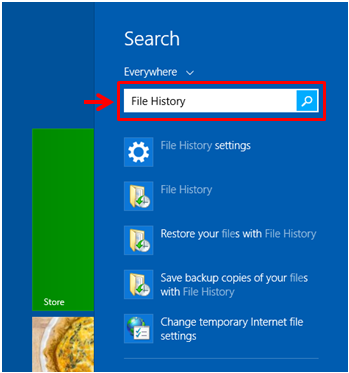
Just wait for a few seconds and you should be able to see the search results that will start appearing below the input box. From here, you will need to look for the item that says “Save backup copies of your files with File History” and once you find it, simply click or tap on it so you can finally open the Window where you can turn on the File History feature.

The Window that follows will search for the portable storage device that you attached earlier and once it gets detected, you’ll see the name of the device and as well as its total storage space and the free space that is available in it. From this Window, you will also find a button that says “Turn on” at the bottom-right side. Just click on it to enable File History in your Windows 8.1 machine.
3. Accessing File History from the Control Panel
Another method in accessing the Window where you can turn on the File History feature is done by first getting into the Control Panel Window. To do this, you will first need to access a hidden menu by pressing the Windows+X keys on your computer and after doing so, just look for a link in it that says “Control Panel” and once you find it, simply click or tap on it so you can finally open Control Panel Window.

When the Control Panel Window opens, just look for the link that says “System and Security” which should be the very first one on the list and click or tap on it to reveal even more items under it which includes the link that heads to the “File History” section. Just browse through the contents of the “System and Security” link and once you see a link that says “File History” as shown on the screenshot below, simply click or tap on it to finally open the feature’s main Window.

On the Window that follows, simply wait until File History is done detecting the device that you want to use as a storage for your files and other stuff and once the device is detected, simply hit the “Turn on” button at the bottom-right portion as I have shown previously. Now, after clicking on the “Turn on” button, a small prompt will appear asking you if you want to recommend the drive to other members of your HomeGroup (in case you’ve set up one). If there’s no HomeGroup set up in your machine, you will be able to turn on File History right away without any further prompts.
More Awesome Things About File History
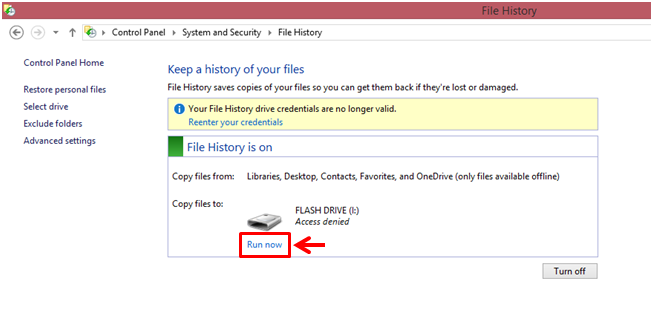
File History isn’t just your ordinary file backup feature but is also a very good drive error detection tool which automatically repairs your portable storage device just in case there’s something wrong with it. You really can’t use File History and enable it for a certain drive if the drive itself contains errors so File History takes the initiative in repairing any error that a drive has and once it is done, you can manually start File History‘s job of saving your important stuff into the drive simply by going back to its main Window and clicking on the “Run now” link that is found at the bottom portion as shown on the screenshot below.
As you can see, enabling the File History feature in your Windows 8.1 machine is a very easy task. In our next tutorial, we’ll be showing the steps in using this very important feature so be sure to watch out for it so you can use this brand new feature to its fullest.