Setting Program Access and Computer Defaults on Windows 7
On a previous tutorial, I have taught you how to set specific programs and applications to handle media files like music, pictures, videos and other stuff saved on a removable storage device like flashdrives, CDs and DVDs or even external hard drives that can be connected through your computer’s USB port. I have also explained the advantages and disadvantages of doing these things using the AutoPlay feature on Windows 7. Moving on with this series, we will now be discussing the steps in setting a web browser, instant messaging application, email access or media player as defaults for your machine.
It can’t be avoided that we come to love a certain web browser or a media player and as well as become so attached to an instant messaging application that we want it to become default programs on our computer instead of having the ones that are set as default by the Windows operating system. Luckily, Windows is not that strict when it comes to this. It actually allows you to change default programs so you can make your machine function the way that you want it to. But of course, there are no shortcuts for doing this which is why we’ll be looking at the steps in doing this tweak with all the details on this tutorial.
Accessing the Program Access and Computer Defaults Section
As I have always mentioned in the previous tutorials we’ve taken, there are always different ways in accessing every feature on Windows and as I did on other tutorials, I will also be showing you two ways of accessing the section where you can do some changes on your machine’s default programs and applications so prepare your computer and get yourself buckled up in following the steps that I’ll be showing below.
1. Using the Search Box on the Start Menu
Using the Start Menu search box is one of the easiest way in accessing different features, tools and utilities on Windows and that’s what we will be looking at first on this tutorial. To get into the “Program Access and Computer Defaults” section on your computer using the Start Menu search box, just follow the steps below:
- Open the Start Menu by clicking on the “Start” button located on the bottom-left corner of your computer screen. You can also open the Start Menu by simply pressing the Windows Key on your computer’s keyboard.
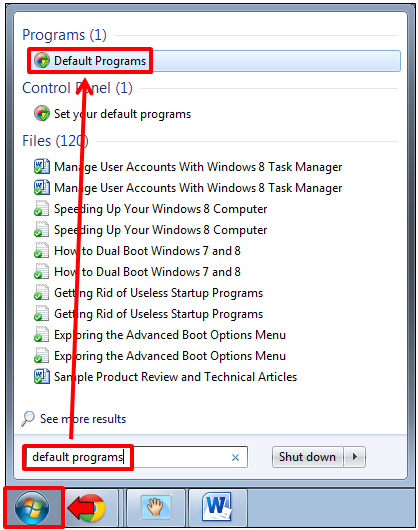
- Next, you need to type “default programs” on the search box as shown on the screenshot above then wait for the search results to appear. Once the results show up, click on the “Default Programs” link located under the “Programs” search result category. After doing so, the Default Programs Window will appear where you will find links that would direct you to the different aspects of this Control Panel section. Just click on the “Set program access and computer defaults” link at the bottom of this Window to open the section which we will be doing some tweaks on.
2. The Control Panel Method
Another way of accessing the “Program access and computer defaults” section on your computer is through the Control Panel. This is also the common way of accessing this section used by average users. Here’s how to do it:
- Open the Start Menu in the same way as I described it in the first method above (clicking on the “Start” button or pressing on the Windows Key) and once the Start Menu appears, click on the Control Panel link.

- On the main Window of the Control Panel, click on the “Programs” link then on the Window that follows, click the “Default Programs” shortcut.

- You will then be directed to the “Default Programs” Window where you need to click on the “Set program access and computer defaults” link to access the section where we will be doing some tweaks on.
Tweaking the Default Programs on Your Machine
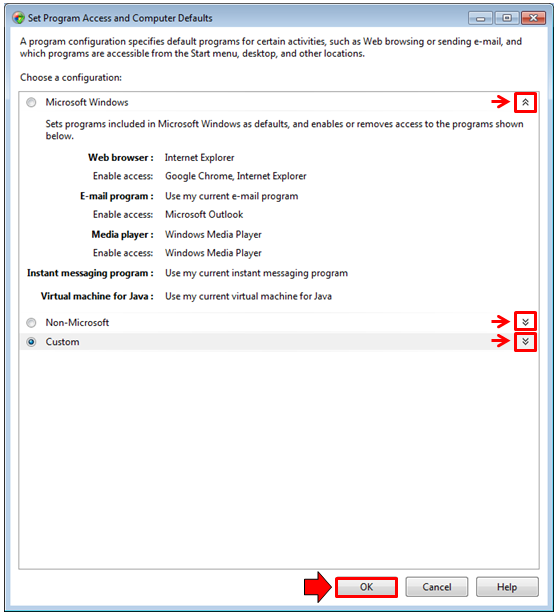
After clicking on the “Set program access and computer defaults” link, you’ll be directed to a Window that looks like the screenshot below showing different setting options (Microsoft Windows, Non-Microsoft and Custom). At the extreme-right corner of each option, you’ll see an arrow down symbol which indicates that there’s more to each option. To see what’s inside, just click on the arrow-down symbol at the right of each of them.
Note:
There would be other computers which will have another option added to become the fourth on the list and would commonly be labeled “Computer Manufacturer”. Choosing this feature will restore all programs and applications which are set by the computer manufacturer. This option would be available if the manufacturer of your machine installed the version of Windows that it has and also set programs and applications aside from the three that already exists on the list.
What Each Option Contains
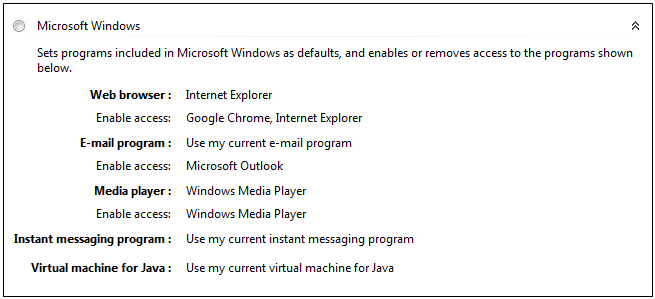
Now, let’s come deeper to what each option offers. First, we will look at the “Microsoft Windows” option.
- Microsoft Windows- This option will set only the programs which are developed by Microsoft and has been preloaded into the operating system (Windows Media Player and Internet Explorer) which runs on your machine and as well as those which you installed like Microsoft Office Outlook. The programs used for playing different media types, instant messaging and Internet browsing cannot be changed on this option so I only recommend this configuration if you want to revert back to Windows and Microsoft developed programs either because you are more familiar with these tools or you just love using everything that is offered by Windows and Microsoft.
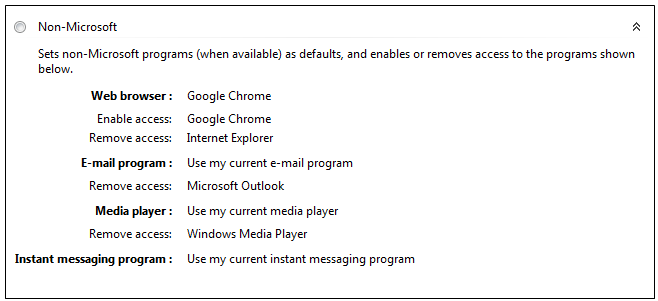
- Non-Microsoft- Next on the list is the “Non Microsoft” option. In this section you’ll observe that all Microsoft developed programs are disabled access. For instance, if you have Google Chrome or Mozilla Firefox installed on your machine, you’ll observe that this section would prefer Google Chrome and Mozilla on the Web Browser area and Internet Explorer as you observe on the screenshot below has a removed access status. It is a rule for this section that pick your choice of programs for the different tasks that you can do on your machine like instant messaging and playing different types of media by simply clicking on the corresponding drop-down boxes.
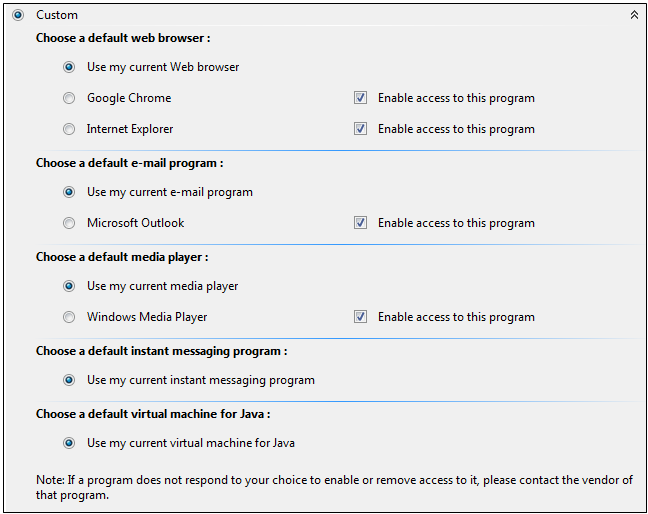
- Custom- The last option on the list is the one labeled “Custom”. On this section, you are allowed to have a combination of both Microsoft and Non-Microsoft programs set as defaults for different tasks. This is what most people prefer because of the freedom that it provides in letting users choose the Web Browser that they love while keeping access to Windows Media Player and other Microsoft stuff. If you are the type of person who has come to love a combination of programs on your machine then this would be the best option which you can use.
As you can see, Windows has a lot to offer when it comes to customization and providing full control of the programs that do certain tasks to every type of user. After all, this is the very reason why most of us loved Windows and Microsoft ever since. If you have concerns and questions or even problems with the topic discussed on this tutorial please feel free to post them as comments below and I’ll do my best to answer them.