Windows 8.1: Setting up a HomeGroup the Desktop Screen Way
If you have your own WiFi network setup at home and you’ve got plenty of people who are connected to it then you can create a HomeGroup to make the sharing of files such as documents, music, photos, videos and some other stuff easier. In a Windows 8.1 machine, you will discover two methods in setting up and joining as well as leaving a HomeGroup and we’ve already discussed the first one in a tutorial that came before this one which involved setting up the feature in the brand new metro environment and if you found it easier, you might think that the old way in setting up a HomeGroup has already been taken out but you’re wrong. The desktop version in setting up, joining or leaving a HomeGroup is still available and as a review or even an additional information for you since some of the preliminary steps have already changed just like accessing the Control Panel Window, I will show all of the steps that you will need to go through in getting your own HomeGroup created and ready for file sharing using your wireless network at home.
Access the HomeGroup Section from the Control Panel
The very first thing that you need to do is to access the Control Panel Window and since the Start Menu has already been taken out from the brand new Windows 8.1 operating system, you might find it hard to figure out the way in getting access to this very important section in every Windows machine but the truth is you won’t need to really take this thing as a problem because accessing the Control Panel is now made easier more than ever! Simply press the Windows+X keys on your computer’s keyboard and you will be able to access a hidden menu which will appear at the bottom-left portion of the screen. From this menu, just look for the link that says “Control Panel” and once you find it, just click or tap on it and the main Control Panel Window will open.

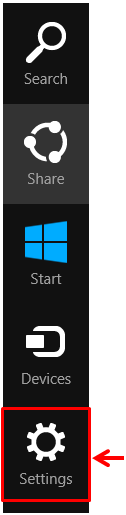
Another way in accessing the main Control Panel Window is through the “PC settings” section. To do this, you will need to press on the Windows+C keys to summon the Charms bar. Once this bar appears from the right edge of the screen, all you need to do is click on the “Settings” charm which is located at the bottom and is the last icon among the 5 charm icons lying on the bar itself.
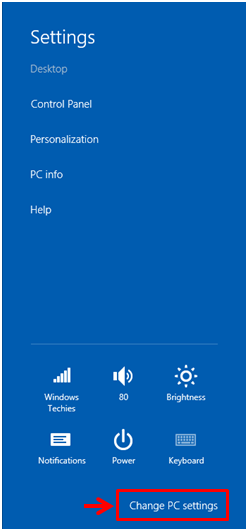
After clicking on the Charm, you will be able to access the Settings screen and at the bottom of it, you will see a tab that is labeled “Change PC settings” which you will need to click to access the PC settings metro screen. As you can see, the settings screen contains some icons that is similar to what is found on the system tray at the extreme-right end of the taskbar.
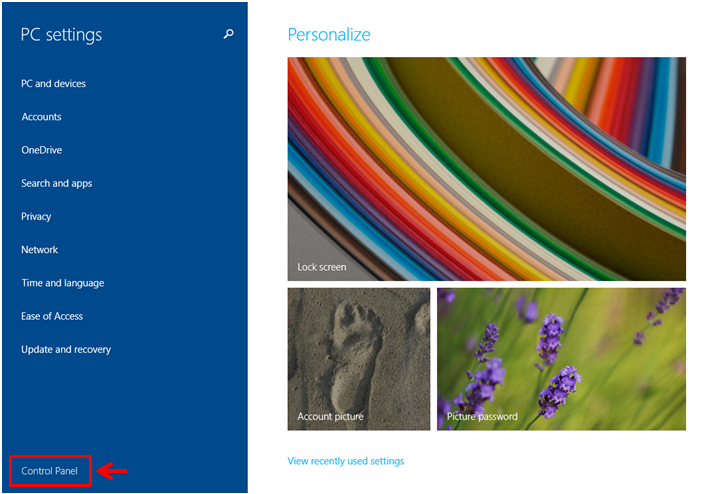
Now, the PC settings screen will open and will display even more links on its left hand portion. Just put your attention to the bottom-most portion of this list and you will see the “Control Panel” link which you can simply click or tap to open the main Control Panel Window.
And finally, there’s still another way in accessing the Control Panel Window in your Windows 8.1 machine which is also the easiest among all and this is done using the Search feature which is perfectly integrated with the system itself. To do this method, just access the Start Screen by pressing the Windows key or clicking on the Start Button and once it opens, you will need to start typing the “Control Panel” on your computer’s keyboard. While you are typing the words, the Search screen should open and the search keyword that you are typing should already be inputted into the box. After the keywords gets entered, you will need to wait a little bit and the search results will appear just underneath the input box. From these results, find the Control Panel shortcut then click on it.

Creating a HomeGroup
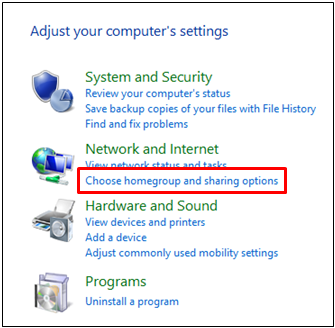
Now, when the main Control Panel Window opens, you will need to click on the “Network and Internet” section since this is the where the settings for HomeGroup is found. If you choose to click on the main link itself, you will be taken to another Window where you will need to click again on “HomeGroup” as shown below.
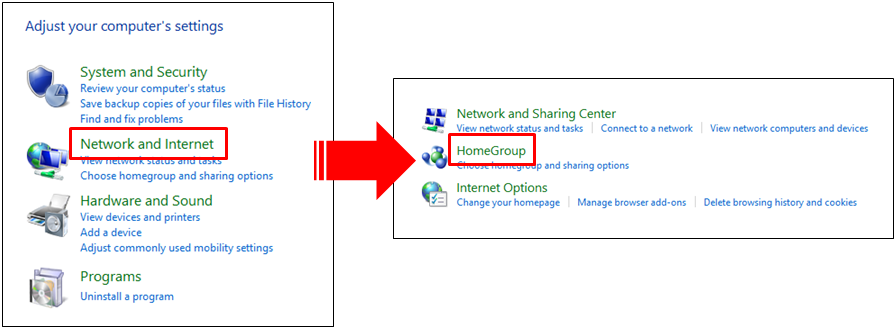
Another way in accessing the HomeGroup section is by clicking on the “Choose homegroup and sharing options” link which is located just under the “Network and Internet” section found on the Control Panel’s main screen.
Now, on the HomeGroup screen, you will be able to see a button that says “Create a homegroup”. You will need to click on this button in order to initiate the HomeGroup creation process.

After doing so, a small Window will appear gives you an overview on what the HomeGroup feature does. After reading the dialogue or information that is on the small screen, you will need to click on the button that is labeled “Next” which is located at the bottom-right portion.

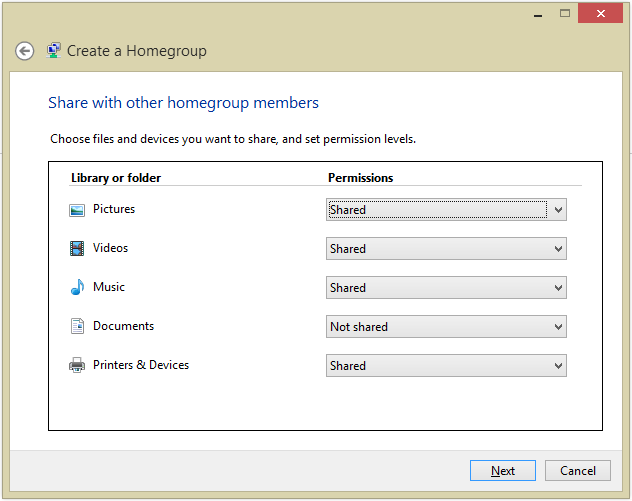
Next, on the Window that follows, you will be able to have access to some options for sharing or not sharing the stuff that are saved in your computer’s hard drive. The options that are available are for pictures, videos, music, documents, and printer & devices. From here, just select the types of files that you want to share with others who are connected to the HomeGroup and make sure that the status at the right says “Shared”. Once this section is taken cared of, you can click on the “Next” button again to move on.
The next Window will now show you the Password for the HomeGroup. You will need to take note of it and be sure that you copy it exactly as shown on the Window because this password is case sensitive and this is the one that you will be giving out to the other users that would like to join the HomeGroup so they can have access to all the files that are enabled for sharing.
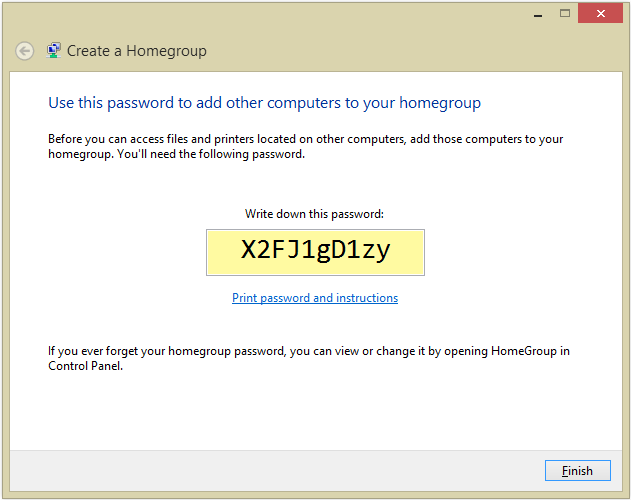
After taking note of the password with a pen and paper or saving it on your mobile device, you can finally click on the “Finish” button and the whole HomeGroup creation process will now be completed. What’s left for you to do now is to connect your other Windows 8.1 devices to it so you can start enjoying your desktop contents on your laptop and in any other computer that is connected to your network for as long as it runs in Windows 8 or Windows 8.1.
Setting up a HomeGroup the desktop screen way in Windows 8.1 is a bit harder than doing it in the other method which is from the metro environment but it is always a big plus in any situation or circumstance that you know more than one way in having some things done and the matter about HomeGroup would surely be a great time and space-saver in any small or simple networking setup that you have.