How to Create a System Recovery Image in Windows 10
Windows has a good set of tools for keeping your computer in perfect shape even if some of the worst things happen. In our previous tutorial, we have shown System Restore being one of the these tools. However, there are still one more repair and restore tool that you can use when things get worse and that’s what we’re going to discuss in this tutorial.
Meet the Backup and Restore (Windows 7) Tool!
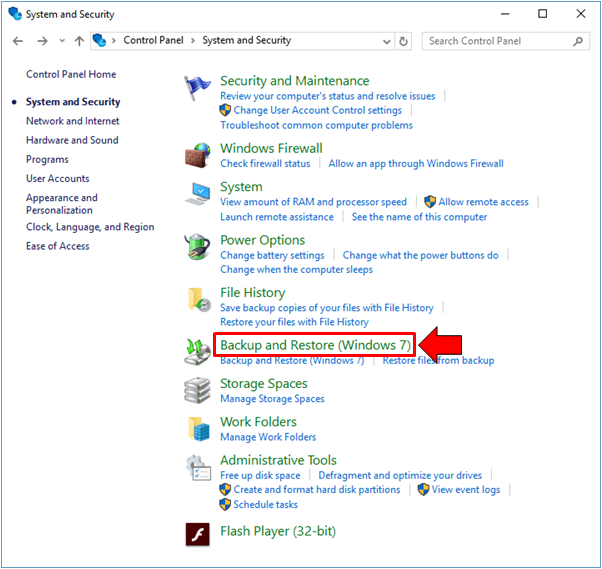
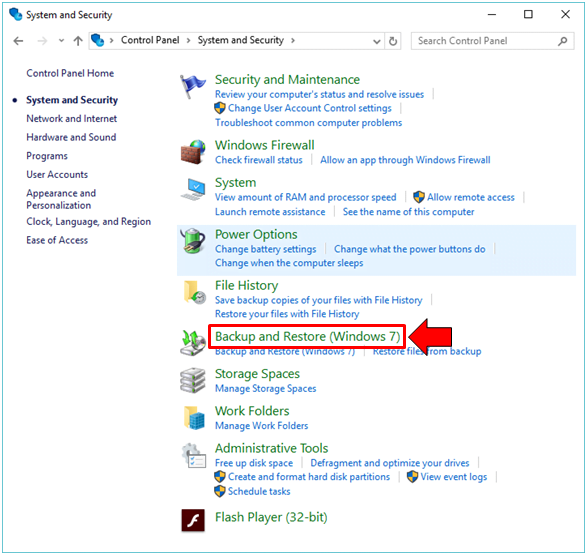
Just like System Restore, the System Image Recovery Tool is a built-in feature in Windows 10 but looking for it using the Search feature and typing in “system image” into the search box won’t return any result. This is because it is found in the Control Panel section and is named differently. Yes! It’s name is actually “Backup and Restore (Windows 7)” as you can see being highlighted on the screenshot below.
So how is this tool accessed and how can you use it in creating a system image that you can use in case your machine runs into a problem? It is always good to be ready- “To be forewarned is to be forearmed” as the famous adage says so join us as we demonstrate the steps in accessing and using this very important tool in your Windows 10 computer.
How to Access the Backup and Restore (Windows 7) Tool in Windows 10
Why is “Windows 7” found in the name of the backup tool? Well, the answer to this is very simple, the tool itself is the same as how it works in Windows 7 and was just carried over to Windows 8, 8.1 and now in Windows 10 as an additional option for keeping your machine and files secure. Now that you already know what the tool’s name is, it is time to learn the steps in how you can access it in your Windows 10 machine.
Just like the other tools that are built within the Windows operating system, the system image recovery tool better known as the Backup and Restore (Windows 7) tool in Windows 10 can be accessed in many ways and we’ll be showing you each method in this tutorial. First of all, let’s start with the hardest.
Accessing Backup and Restore from the Control Panel
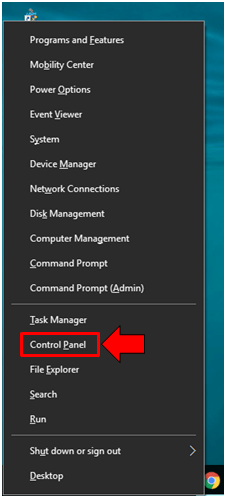
The very first method involves accessing one of the traditional features that has been one of the mainstays in the Windows operating system known as the Control Panel. If you are quite confused on how this feature is accessed because of the absence of its quick launch icon on the Start Menu then don’t panic. Just press the Windows + X keys and a menu will appear at the bottom-left portion of the screen. From here, just look for the link that says “Control Panel” as you can see on the screenshot below.
After finding the “Control Panel” link, all you need to do is click on it and the Control Panel Window should launch instantly. From here, just click on the “System and Security” category as you can see below.
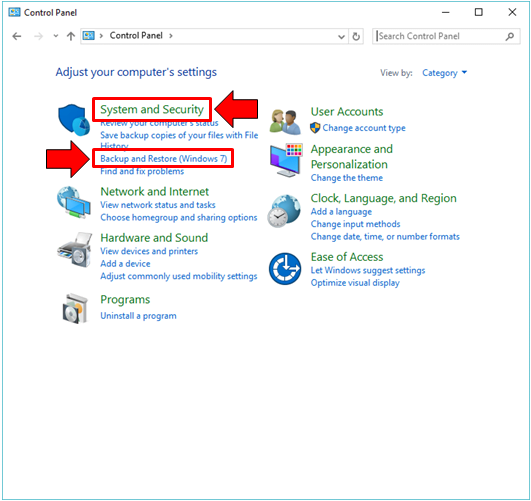
If you wish to jump directly to the Backup and Restore tool, you can also choose to click on the link that is found under the “System and Security” category which says “Backup and Restore (Windows 7)” as you can see being highlighted on the screenshot below. However, if you chose to do the former, you will be taken to a Window that looks exactly like the one shown below.
The Backup and Restore (Windows 7) tool Window looks like the one that is being shown below. As you can see, it can still be accessed from the Control Panel but that’s not the only method available. If you wish to learn easier ones, just read on.
Accessing Backup and Restore Using the Search Feature
Microsoft has really improved the Search feature in Windows 10 and that’s the reason why it can now be found almost anywhere within the operating system itself. In order to use Search in launching the Backup and Restore tool, you will simply need to open the Search screen simply by pressing the Windows + S keys. After doing so, the Search screen should slide up from the bottom-left portion as you can see below.
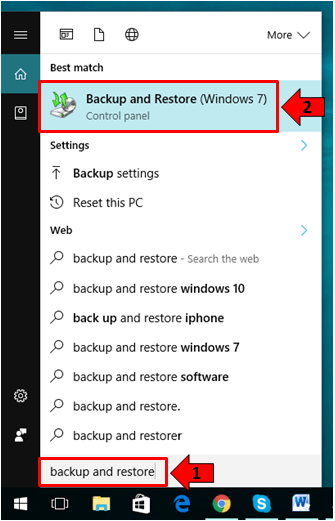
On the Search screen, just enter the words “backup and restore” into the search box that is found at the bottom portion as you can see on the screenshot above and once the search results appear just above it, simply click on the one that says “Backup and Restore (Windows 7)”.
Accessing Backup and Restore from the Universal Settings App
Finally, since you are using Windows 10, you should have met the modern counterpart of the Control Panel feature which is called the universal Settings app. There are different ways available in launching this feature in your computer and one of them is done by using the Windows + I keyboard shortcut combination as you can see below.

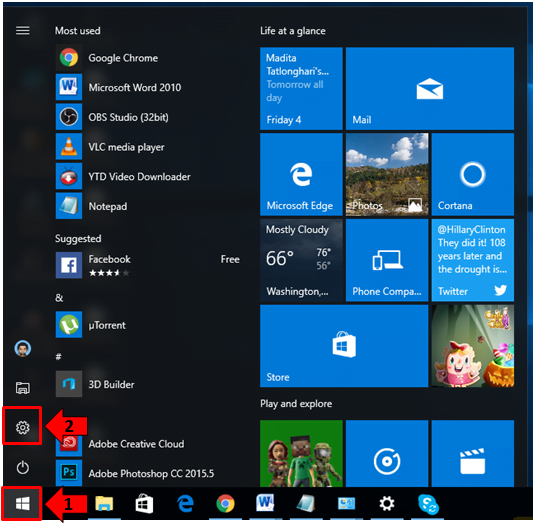
After pressing the keys, the universal Settings app should launch in an instant. If you want to learn another method in launching this same tool, you can do so by first accessing the Start Menu. Just press the Windows key or click on the Start Button that is located at the extreme-left end of the Taskbar and once the Start Menu opens, simply click on the Settings icon that is found seated on a narrow bar at the left as you can see being highlighted on the screenshot below.
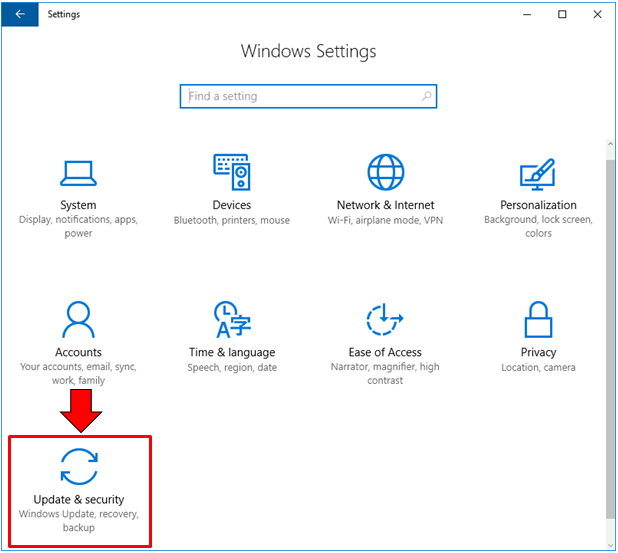
Now, once the universal Settings app opens, all you need to do is click on the category in it that says “Update & security” as you can see below.
Once the Update & security settings section opens, you should be able to see some links located on the navigation pane at the left and from here, all you need to do is click on the one that says “Backup” as you can see being highlighted below.
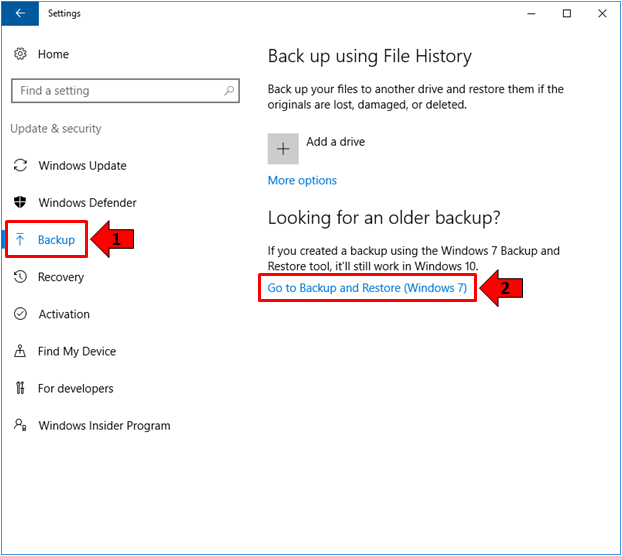
The contents of the “Backup” section will then display on the contents pane at the right and from here, you should be able to see a link that says “Go to Backup and Restore (Windows 7)” which you will need to click in order to launch the Control Panel Window that shows the tool ready for some System Image creation.
How to Use the Backup and Restore Tool in Creating a System Image
Now that you know the different methods that are available in accessing the Backup and Restore (Windows 7) tool in your Windows 10 machine, it is time to get into the details in how it is used but before starting, you need to ensure that you have a separate hard drive partition to which the backup/system image is going to be copied into. If you don’t have a separate hard drive partition yet then you can follow the steps that are shown in our previous tutorial which basically shows how this is done.
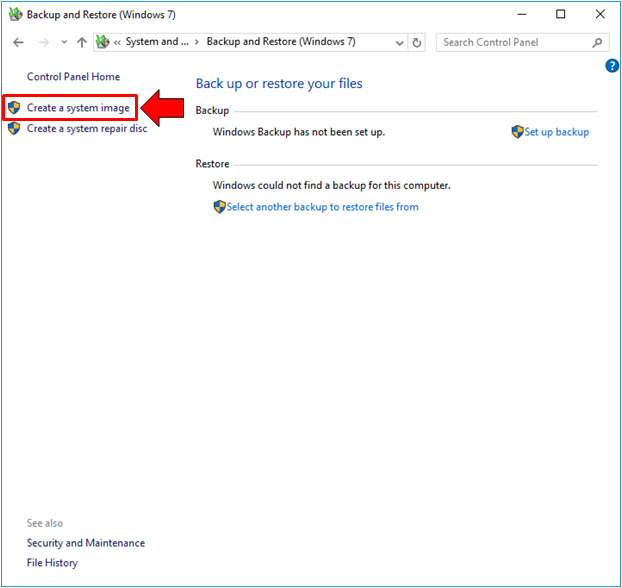
You can also use a portable hard drive for this purpose in case your computer no longer has enough space in it for creating a new hard drive partition. Once you have created a new hard drive partition on your computer, it is time to start the tool and you can do so simply by clicking on the “Create a system image” link located on the navigation pane at the left of the Backup and Restore (Windows 7) Window of the Control Panel as we have accessed earlier. The link location is highlighted on the screenshot below.
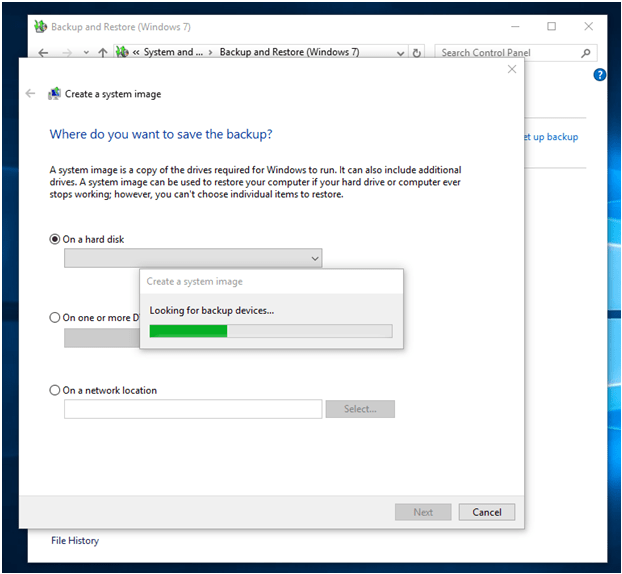
After clicking the link, the “Create a system image” wizard should launch instantly and you won’t be able to choose the drive to which backup files or system image will be saved yet because a progress/buffer bar will first appear telling you that the tool itself is initializing and looking for available backup drives as you can see on the screenshot below.
Once the “Create a system image” tool wizard is done initializing, you should now be able to see the three different options that are available for creating a system image for your Windows 10 machine. The options that you can choose from are as follows:
- On a hard disk- Below this option is a drop-down box which holds a list of all available drive partitions or external hard drive that the “Create a system image” tool was able to detect. Just take note of the drive name or letter of the hard disk partition or external hard drive that you want to use and look for it from the drop-down box just below the option.
- On one or more DVDs- Now, if the hard drive partition or external hard drive is not an available option for you, this second one would be the most cost-effective solution. You can purchase DVDs with the highest available storage space and you can store your backup/system image in it. Just be sure to insert the disk into your machine’s disk drive and select it before starting the system image creation process.
- On a network location- If you have another computer or a server connected to your network, you can choose to store your system image or backup files into it. This one is a more advanced option which is commonly employed in office or workplace setting.
Since our goal is to create a backup/system image into a hard drive partition or external hard drive, we will be proceeding on with the first option. In case the drive that you have selected does not have enough space in it for storing the backup/system image files, you should be able to see a warning which looks exactly like the one that being shown on the screenshot below.
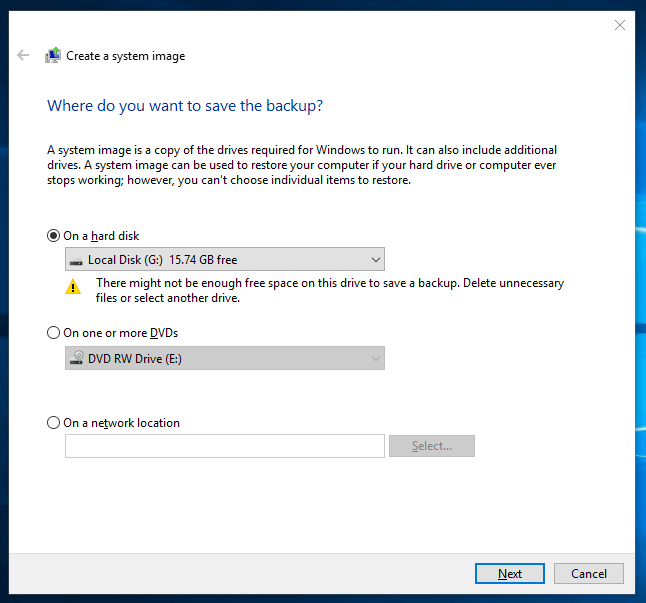
The warning says “There might not be enough free space on this drive to save a backup. Delete unnecessary files or select another drive” and it obviously requires you to take action in case it is the only drive that is available in your machine to handle the backup/ system files. However, if you have some other hard drive partitions/external hard drive which is attached to your machine, you can choose any one of them that still has enough space to handle the system image.
After selecting the drive to which you’d like to save backup/system image files into, you can simply click on the “Next” button that is found at the bottom-right portion of the “Create a system image” tool wizard as you can see being pointed out below and you will automatically be taken to the next step.

The next step will then allow you to choose which drives are to be backed up. In case you have multiple hard drive partitions or external hard drive that is connected to your computer, you should be able to see them as clickable items within the box as you can see below. The drives and items that are grayed out are system files and you cannot choose to deselect them since they are all required to be saved for the system image.
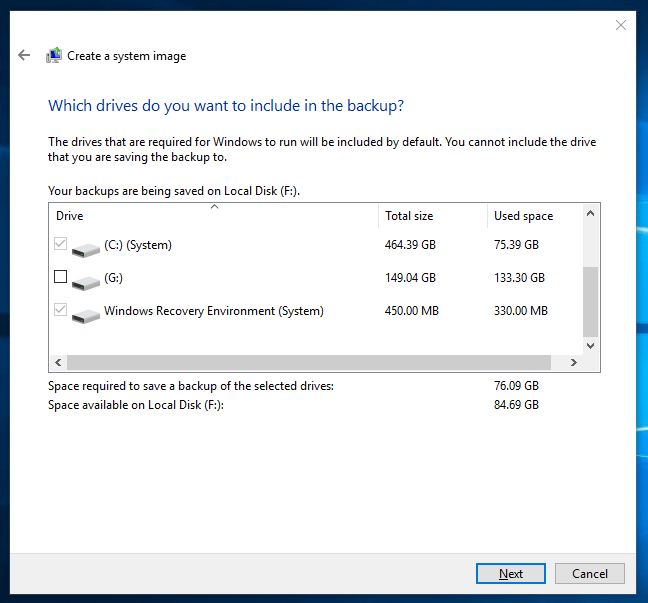
Below the box that shows the drives and files that can be backed up are items that show how much drive space is going to be consumed to save everything and how much space is available on the drive that you have selected. As you can see on the screenshot above, the required backup space is 76.09 GB for the drives and system files that are selected by default (since I did not choose to select other hard drive partitions) and the space still available on the drive that I want to use is still 84.69 GB so I still have more than enough for storing backup files/system image for my computer.
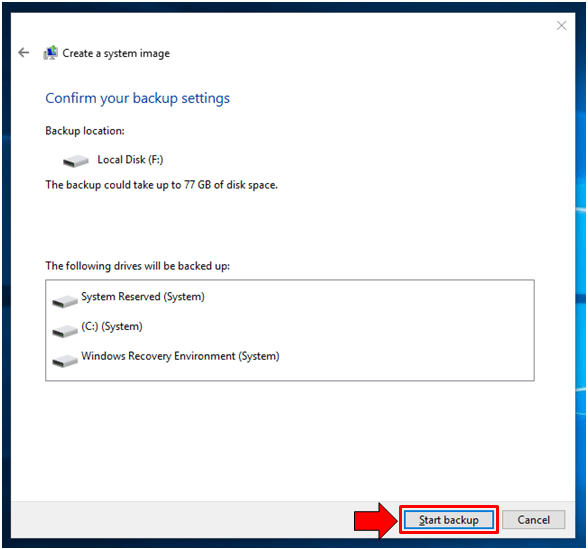
Once you are done selecting the drives to be backed up, just click on the “Next” button at the bottom-right portion and you will now be taken to the next Window which will now ask you to confirm your backup settings. Once you are sure with this selection of drives to be backed up, you can simply click on the “Start backup” button that is found at the bottom-right portion of the screen as you can see below.
Now, the tool will initiate the creation of the backup/system image and it will show you a progress bar so you will know at what level the backing up process is already on. The time it would take for this process to complete depends on the size of the drives and system files that needs to be backed up. The larger the size, the longer it would take for the process to complete. Just be patient and you can continue doing your usual tasks on your Windows 10 machine while the backing up process is ongoing.
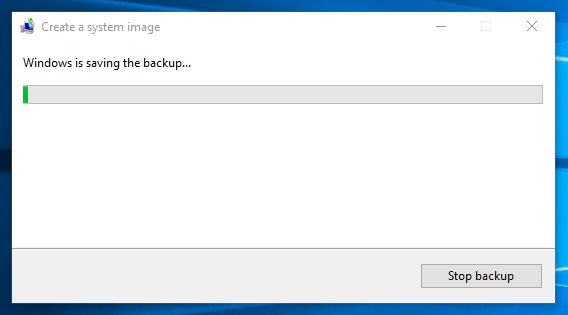
If you changed your mind and you don’t want to continue on with the process for now maybe because you want to use a different drive or you will be leaving and you need to take your computer with you then you can choose to stop the backup process and you can do so simply by clicking on the button that is located at the bottom-right portion of the “Create a system image” tool Window which says “Stop backup” as you can see on the screenshot above.
You can just proceed on with the creation of the backup/system image on a future time when you already have the freedom for it to be created. Just be sure that the drive to which you want to load the backup/system image files into has enough memory space in it to store the needed stuff.
The tool will also inform you if the process has not been successful. You will know this because the process bar will be red and a prompt will appear in it telling you the error that has occurred. This commonly happens if you used an external hard drive and the connection on your computer suddenly gets loose causing the saving of the backup to be interrupted. If this happens, you can simply check the connections then repeat the selection process for the desired drive.
System Image: An Effective Tool for Virus and Malware Stricken PCs
We have shown how Microsoft has made sure that users are protected against serious problems that can cause loss of important files using the System Restore tool in our previous tutorials but if you want to save a completely working system image that you can use when the worst thing happens to your Windows 10 machine then you definitely need to create a System Image by following the steps that we have shown in this tutorial.
Remember, it is always a good thing to be prepared for anything and the steps that we’ve shown in this tutorial is one of those preparations that you can use in order to counter the problems that viruses, malware and other system problems can bring. There really is no perfect operating system so the best thing that we can do is to take advantage of all the tools available in Windows which will help us protect ourselves, our families and all the files that took many years to accumulate which you have saved in your Windows machine.