3 Methods in Booting to Safe Mode in Windows 10
Windows has changed much over the years but it still remains to be one of the most user-friendly operating systems existing on the planet up to now. If you’ve been using it for a long time now and encountered much with it including errors and problems that need booting up to Safe Mode then you should have noticed that the old ways in accessing this mode does not work anymore in this latest operating system version from Microsoft.

Yes! Pressing the Shift + F8 or the F8 keys while Windows 10 is booting up doesn’t work anymore and the reason for this is that the boot up process and speed has been made faster than before that there is no time anymore for any key presses to be recognized.
However, that doesn’t meant that Safe Mode isn’t available anymore or this important aspect has already been removed from Windows 10. There’s just a new set of methods in booting to Safe Mode that you need to learn about and we’re going to go over each one of them in this tutorial so if you’ve been wanting so much to boot into Safe Mode in order to troubleshoot your Windows 10 machine after it started to act abnormally then you will need to follow the steps in launching it that we’re going to demonstrate in this tutorial but before that, let’s first make things clearer- what exactly is Safe Mode?
What is Safe Mode?
Before trying to boot into this mode in Windows 10 and for the benefit of our novice and basic users, we will first define what Safe Mode actually is and what it is used for. Errors and other problems are common in Windows as we all use it and load different programs into it. In order to troubleshoot these errors, you can boot Windows to Safe Mode which basically opens the operating system with only the basic components such as drivers and files that it needs to boot up.
If the problem does not appear in Safe Mode, you will know that the problem isn’t caused by any file or driver on your computer so tracing the source of the problem should now be narrowed down to any program or app that you recently installed on your computer. With the Safe Mode being available in Windows 10 and in all the of the older Windows OS versions, finding what causes certain problems becomes a lot easier.
This is the very reason why you need to be able to learn how to boot into this mode in your Windows 10 machine and that’s exactly what we are going to show to you as we go through in this tutorial.
Different Methods in Booting to Safe Mode in Windows 10
Just like any other feature that is built within Windows 10, there are several ways in accessing and launching the Safe Mode in the operating system. These methods range from easy ones to those that are quite complicated but learning each one of them is important so you would always have a method to use in case the easiest one does not work or using it isn’t possible. So what are these methods and how are they performed, let’s start with the easiest one.
1. Use the MSConfig.exe Tool
There’s a very useful and handy tool in Windows that you can use in launching different features and system locations in the operating system which is called “Run” box. You can use this tool in accessing different stuff in Windows 10 for as long as you know the exact names of their .exe files. In order to launch the “System Configuration” section in your Windows 10 machine using the “Run” box, you must first be able to launch the tool by pressing the Windows + R keyboard shortcut combination and the tool itself should pop-up on the bottom-left portion of your computer screen.
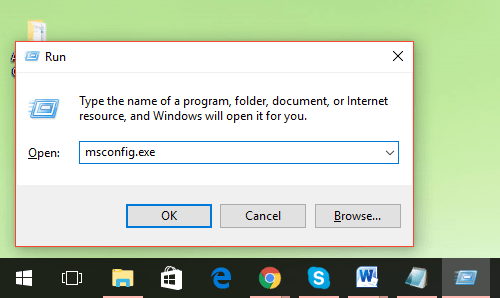
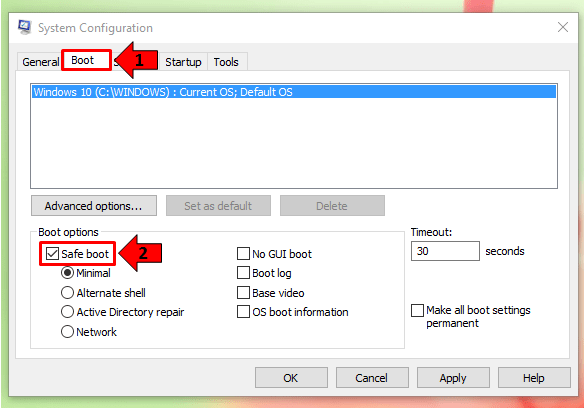
From this tool, all you need to do is type in “msconfig.exe” into the input box that is found on it (excluding the quotation marks) and after you do so, just click on the “OK” button that is found at the bottom. After that, the “System Configuration” Window should open and from here, you will need to click on the tab that is found on top which says “Boot” as highlighted below. Once the contents of the “Boot” tab displays, just click on the tickbox that is found beside (to the left) of the “Safe boot” option then hit the “Apply” then the “OK” buttons in order to have the changes saved.
After making these changes on the System Configuration Window and clicking the “Apply” the the “OK” buttons, the Window should automatically close and Windows 10 should now notify you to restart your computer as you can see on the prompt that is shown below. From here, just click on the button that is found on the left which is labeled “Restart” and voila! Windows 10 should automatically restart and open in Safe Mode without you being required to do anything.
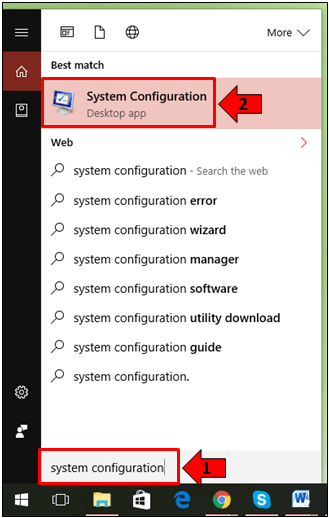
If you want a faster way in launching the System Configuration Window, you can also choose to do so using the “Search” feature. To launch this feature on your Windows 10 machine, all you need to do is press the Windows + S keyboard shortcut combination as shown below.

Right after you press these keys, the Search box should open at the bottom-left portion of the screen and from here, all you need to do is type in “system configuration” to the search input box that is found at the bottom and the shortcut link towards launching the System Configuration Window should appear on top. Just click on it and you will now have the tool opened on your computer screen!
2. Boot to Safe Mode Using a Recovery Drive
Recovery Drives are perfect weapons for countering the effects of problems caused by system errors and issues that originate from virus infections and other problems that are common in the Windows operating system. You can also use this same tool in launching Windows 10 into Safe Mode and the process in doing so is pretty straightforward. If you don’t have a recovery drive yet, you can create one by following the steps that are outlined in this tutorial. Once you have it, you can now use it to boot into safe mode by first booting your computer through it.
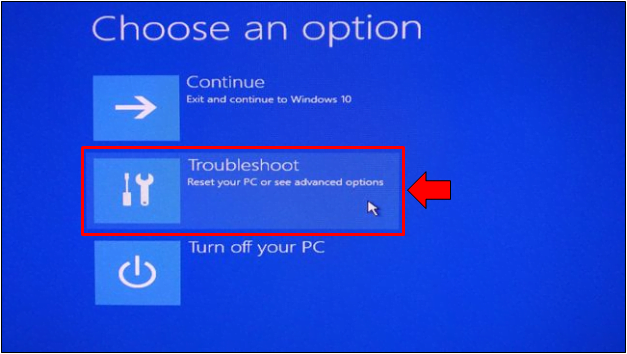
The first screen that will open will ask you to choose your desired keyboard layout and after selecting the one that you want to use, you will automatically be taken to the next screen which is labeled “Choose and option”. From here, you will need to click on the option that says “Troubleshoot” as you can see being highlighted on the screenshot below.
On the next Window, just click on the “Advanced options” item in order to see even more options for booting up Windows 10 or fixing it using other available tools.

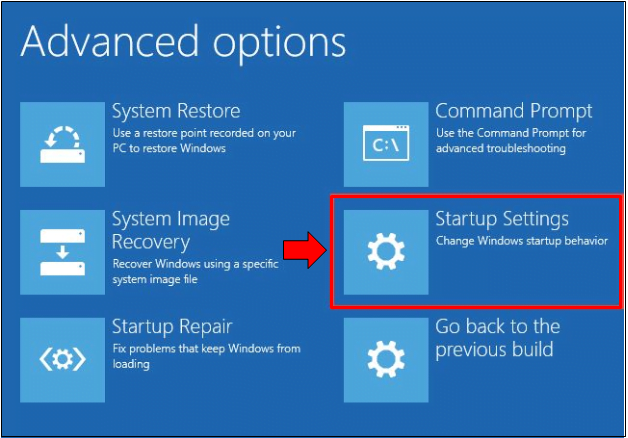
Fixing Windows startup can be done in different ways in the next screen and you can do it with certain tools which you need to have with you such as “System Restore” (which requires that you have created a restore point back when your Windows 10 machine was working normally), “System Image Recovery” (requiring a recovery disk) or you can also choose to set Windows back to the previous build you had which worked perfectly well before you did an upgrade. Since we are trying to boot up into Safe Mode, the option that we’ll need to click is the one that says “Startup settings” as you can see being highlighted below.
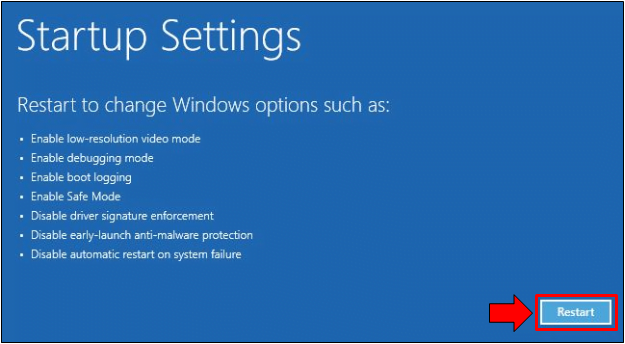
The Window that follows will then show you a list of things that you can change once Windows 10 starts up again and this now includes “Safe Mode”. In order to proceed on to the next step, all you need to do is click on the button that is found at the bottom-right portion which says “Restart” as shown on the screenshot below.
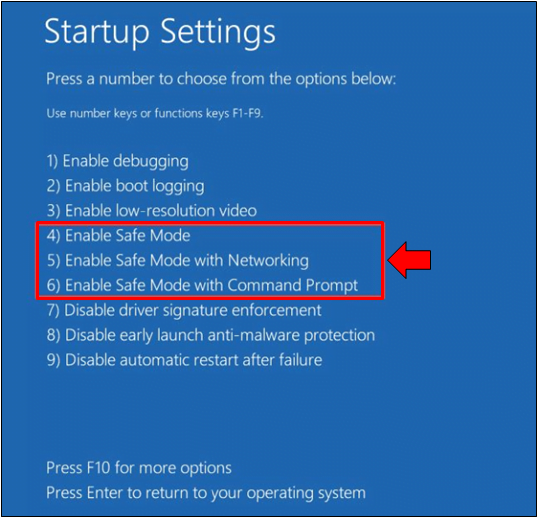
Once Windows 10 reboots, the very first screen that you will see is labeled “Startup Settings” and from here, you should be able to see a list of startup modes and options that are available which includes items 4-6 for Safe Mode. If you want to boot into normal Safe Mode you can select item number 4 simply by pressing the F4 key. If you need Safe Mode with Networking then you will need to select item number 5 by pressing F5 and lastly, if you want Safe Mode to have Command Prompt then you will need to select item number 6 by pressing F6.
After pressing any of these Safe Mode options, Windows 10 will again restart and boot up to the Safe Mode configuration that you have selected.
3. Press Shift then click Restart Method
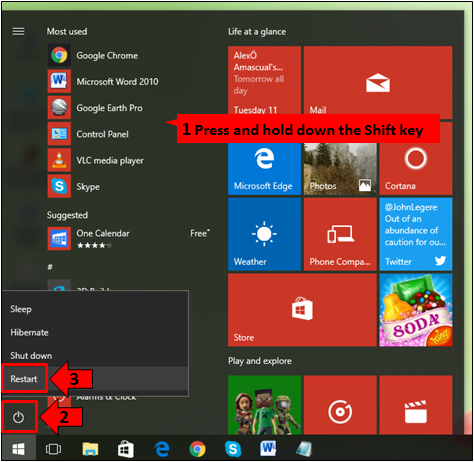
Lastly, there is another hidden method is accessing Safe Mode on your Windows 10 machine which is not really known to most users but it is quite a simple one and is probably the second easiest among these three methods that we have shown in this tutorial. To start, you must first access the Start Menu and once it opens, be sure to hold down the “Shift” key and then click on the Power icon that is found seated on the narrow bar at the left hand portion of the Start Menu as you can see below.
You can also do this same action even from the Lock Screen. Just hold down the Shift key then press the Power icon located at the bottom-right portion and from the power off options that would appear, just click “Restart”.
After doing the steps above, your Windows 10 machine will then restart and once it boots up again, you’ll be able to see the same screens that we’ve shown in method number 2 above but in order to help you have smooth reading through this article without having the need of scrolling up and down, we would show the steps once again.
First, on the “Choose an option” screen you will need to click on the item that says “Troubleshoot” as you can see being highlighted on the screenshot below.
On the Window that opens next, you will simply need to click on the item that says “Advanced options” as shown below and you will then be taken to the other tools that can help you fix problems on your Windows 10 machine.
Next, you will now see the “Advanced options” screen and from this section, there are actually some other available tools that you can use in repairing Windows but since we are trying to boot into Safe Mode, the “Startup Settings” is the next option that we’ll need to click as you can see on the screenshot below.
Moving on, you will again see the list of changes that you can choose to do when your computer boots up according to the modes that will be available after Windows 10 restarts. From here, you will simply need to click on the button that is found at the bottom-right portion which says “Restart”.
Finally, when Windows 10 boots up once again, you should be able to see the same blue screen but this time, there are already 9 options available for booting up your computer and items 4-6 are the ones that would actually boot your machine into Safe Mode. To choose any of these Safe Mode configurations, you will simply need to press the “F4” key to select “Enable Safe Mode” which is the basic Safe Mode option, “F5” to choose “Enable Safe Mode with Networking” and “F6” to select “Enable Safe Mode with Command Prompt”. Just press any of these keys according to the Safe Mode configuration that you want to boot your computer into and voila! Windows 10 should boot up into it automatically.
There is also an option for viewing even more options which can be accessed by pressing the “F10” key or you can also boot back to your normal operating system configuration simply by pressing “Enter” as the options at the bottom of the screen shown above says.
Safe Mode: An Easy and Convenient Way in Troubleshooting Windows
As you can see, Windows 10 has really changed as far as booting into Safe Mode is concerned. Back in the days of older Windows editions such as Windows Vista and Windows 7, booting into this mode just required pressing a function key such as F8 or Shift + F8 or any other function key at Windows startup in order to enter the options screen which had a black background containing methods in booting up into Safe Mode.
Is it your first time to learn how to launch the Safe Mode in your Windows 10 machine? What did you use it for? If you have some valuable information to share with us or you know of a trick that can easily boot Windows 10 into Safe Mode, please feel free to share them by joining the discussion on the comments section below.