6 Ways in Accessing Settings on Windows 10
The best Windows ever is yet to be released but even in its Preview edition, there are already a significant number of users who have already made the decision of migrating to this brand new Windows operating system even on its trial stage and it is all made possible by Microsoft’s Windows Insider Program.
The program seeks to extract suggestions and other comments from users in how Windows 10 can be made even better by letting them use a version of the operating system in a Technical Preview version. Anyone who wants to try out Windows 10 and have their feedback heard by Microsoft experts and developers are welcome to sign up for free to the Windows Insider Program.
So how does Windows 10 fare in terms of providing access to the the settings screen and other important system settings section? Windows 8 and Windows 8.1 didn’t do very well on this aspect so in this tutorial, we’ll try to explore all the ways in accessing the settings section in Windows 10’s Technical Preview version and see how it compares to the methods in accessing the same section in the Windows 8 and Windows 8.1 editions.
1. Click the Settings Shortcut Found on the New Start Menu
Loyal Windows users really missed one important feature that has been existing in XP, Vista and Windows 7 but was suddenly removed in Windows 8 and Windows 8.1 which is called the Start Menu. This quick access menu which offered shortcuts to almost all of the crucial sections that are found in the Windows operating system has become a very popular one because of the ease and convenience that it provides but sadly, it has been taken out in Windows 8 and Windows 8.1 and was replaced by the Start Screen which seeks to introduce users to the new hybrid world of Mobile and PC environments merged into one operating system.
After all the clamors that users vented out because of the absence of the Start Menu in these operating systems, Microsoft finally made decision to bring back the Start Menu in the brand new Windows 10 operating system that’s coming out really soon and you can also get to try it in Windows 10’s Technical Preview version!
If you’re using Windows 10 right now, you can click on the Start Button or press the Windows Key to make the new Start Menu appear. In order to access the Settings screen, you will simply need to click on the “Settings” shortcut that is located at the left side as highlighted on the screenshot below.

2. Access Settings from the Notifications Screen
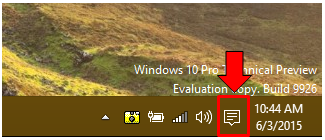
Another brand new feature that you will find in Windows 10 is called the “Notifications screen” which is the feature that replaced Action Center. To access this screen, all you need to do is click on the Notifications icon found on your computer’s system tray as highlighted below.
After the icon is clicked, a screen will slide in from the right-edge and from here, you will need to put your attention at the bottom section where you will need to click on the link that says “Expand ^”.
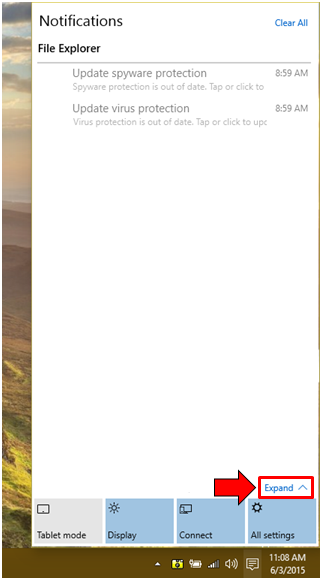
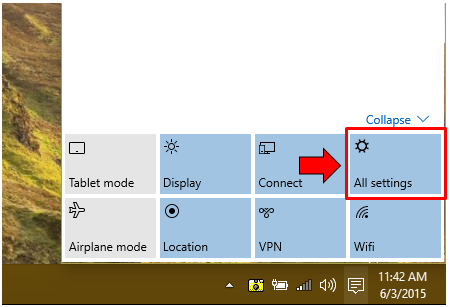
The items that are found at the bottom section of the Notificatiosn screen are collectively called “Quick Action” buttons and after clicking on the “Expand ^” link, you’ll be able to see even more “Quick Action” buttons that will appear. From these buttons, you will simply need to click on the one that is labeled “All settings” as highlighted below in order to open the Settings screen.
3. Access the Setting Screen from the Control Panel
Another way in getting into the Settings screen on Windows 10 is through the Control Panel. If you’ve been using some older Windows editions for a long time then you should be very much familiar with the Control Panel Window. To access the modern Settings screen from the traditional Control Panel Window, you will need to open Control Panel first by clicking on its shortcut from the Start Menu then on the main Control Panel Window, simply click on the “User Accounts and Family Safety” link then under it, hit “User Accounts”.
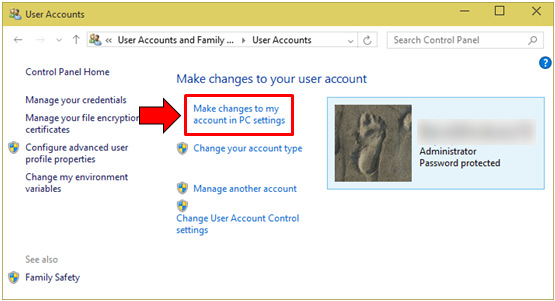
Once the “User Accounts” Window opens, all you need to do is click on the link that says “Make changes to my account in PC settings” as highlighted on the screenshot above and you will be taken right away to the modern Settings screen where you can make tweaks to your user account.
4. Use a Keyboard Shortcut Combination
All of the new keyboard shortcuts that were introduced in Windows 8 and Windows 8.1 still work in Windows 10 and this includes accessing the PC settings. To be able to open the modern Settings screen in this brand new operating system using a keyboard shortcut, all you need to do is press the “Windows + I” keys.

5. Use the New Cortana Virtual Assistant
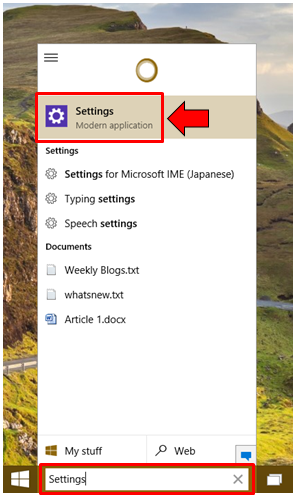
Microsoft’s flagship operating system now has a brand new feature which is geared towards competing with Siri and Google Now. It is a virtual assistant called Cortana and you can use this feature in accessing the modern PC settings screen. To do this, simply type in “Settings” into the search box that is found at the left portion of the taskbar just beside the Start Button then simply wait until the search results appear where you will need to click on “Settings” in order to open the modern PC settings screen.
6. Pin a Settings Shortcut on the Taskbar or Start Menu
Now, if you really want to get access to the modern Settings screen in the easiest manner then you can simply pin an icon of it into the Taskbar or the Start Menu itself. To do this, you will again need to open the Start Menu by clicking the Start Button or pressing the Windows key and once it appears, just right click on the Settings shortcut that is found in it as shown below.
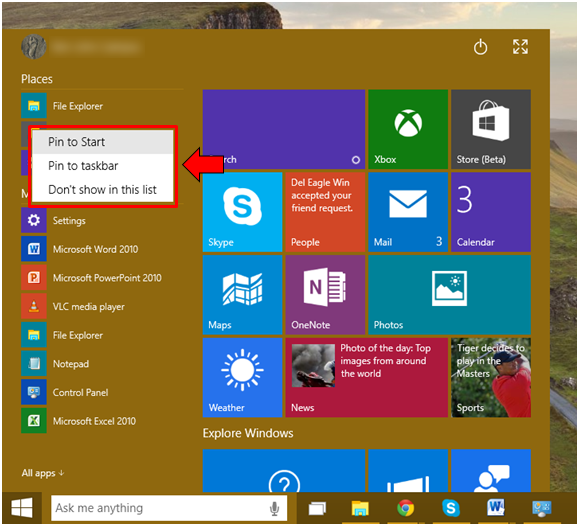
After the Settings shortcut is right clicked, you will see three options inside a white box. To pin a Settings tile into the Start portion, you will simply need to click on the “Pin to Start” option while if you want to pin a Settings icon to the taskbar, just hit the “Pin to taskbar” option.
More Improvements to Watch Out For
The version of Windows 10 that we’ve used for the illustrations and screenshots in this tutorial is still on Technical Preview. This means that it is not yet the final one from Microsoft which is why it is safe to conclude that we’re all set to experience even greater features as the company strives to make the new Windows the best one ever. If you want to get all the latest news, tips and tricks about the Windows operating system then just stay tuned in with us here on WindowsTechies.com and we promise to make everything simple for you!