How to Pin Programs and Apps to Windows 10’s Taskbar
After learning some facts about the Taskbar in the new Windows 10 operating system edition and discovering the steps in removing some items that are pinned in it including the Search box/icon and the Task View feature, it is time to move on to the next part which will now involved pinning different items into this new and improved feature.
Back in Windows XP, Vista and Windows 7, there were only a limited number of items such as program shortcuts, system locations and tools which can be pinned to the Taskbar for quick and easy access but in Windows 10, you can pin even more and when we say more, we mean much, much more including tiles/shortcuts for the modern apps that you install to your computer coming from the Windows Store.
So without further ado, let’s now start our journey through all of the available methods in pinning varied stuff into the Taskbar that is found in the latest Windows edition dubbed as the “best one yet” and see what additional items are now allowed to be pinned to this mainstay Windows OS feature aside from the ones that you already know pinning about back in older Windows versions.
Pinning Program Shortcuts to the Taskbar
The very first item that can be pinned to the Taskbar which has been an option that is available even in previous Windows editions as early as Windows Vista are Desktop program shortcuts/icons. Doing this is also very simple and the methods in doing so hasn’t changed at all. To start, you will simply need to locate the program shortcut that you want to pin to the Taskbar and once you find it, just right-click on it to pull-up a menu that looks like the one shown below.
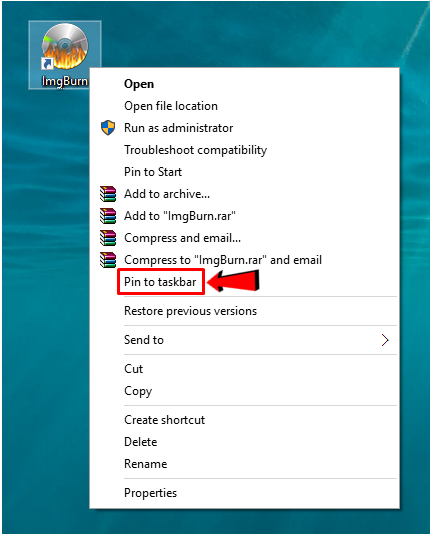
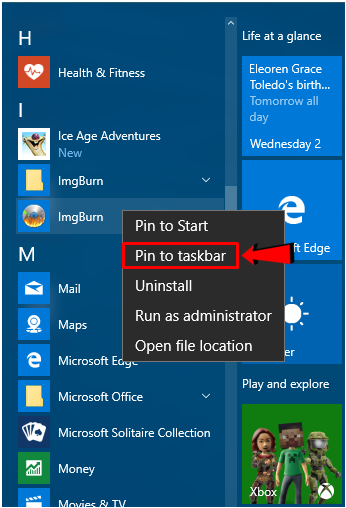
Once the right-menu appears, you will simply need to click on the “Pin to taskbar” option as highlighted on the screenshot above and after doing so, the program shortcut/icon will now be pinned to the Taskbar. Now, if the program shortcut is not found on the Desktop screen, you will simply need to head to the Start Menu, click the “All apps” list that is found at the bottom-left portion and the list of all the apps and shortcuts will appear in alphabetical order. From here, just look for the shortcut of the program that you want to pin to the Taskbar and once you find it, just right-click on it then hit the “Pin to taskbar” option as highlighted on the screenshot below.
NOTE:
The options that appear on the right-click menu whenever you right-click a program shortcut that is on the Desktop screen is highly contextual. This means that the options set for one program differs from the other. These options may also change depending on the programs and other apps that are installed in your computer which can interact with the item that you have selected.
Pinning App Tiles to the Taskbar
Pinning Desktop program shortcuts to the Taskbar has been very popular to geeky individuals in previous Windows editions especially to those who want to get access to certain stuff in the quickest way possible but in as I have mentioned earlier, Windows 10 offers more than just pinning old-fashioned programs to the Taskbar. Yes! You can pin not only those program shortcuts but even shortcuts for the modern apps that you install to your computer from the Windows Store. Again, doing this is quite simple, just look for the tile of the app that you want to pin a shortcut for into the Taskbar then you will see a menu that contains some options as shown below.
From this right-click menu that will appear, simply click on the option that says “Pin to taskbar” as highlighted on the screenshot above. After the option is clicked, the app tile should now be pinned on the Taskbar. Just do this same steps to all of the other apps that you want to pin on your machine’s taskbar so you can launch them quickly without all those clicking and scrolling.
Pinning Settings to the Taskbar
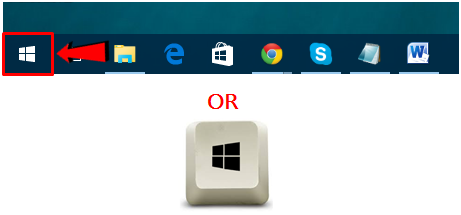
Now, aside from Desktop program and app shortcuts/icons that you can pin to the Taskbar in Windows 10, you can also choose to pin some important system settings and locations so you won’t need to be digging through the Start Menu or from other locations just to find them. To do this, you will first need to find the system setting or system location shortcut that you want to pin to the Taskbar. For illustration purposes, we will be pinning the shortcut for the modern “Settings” Window and in order to do so, you will first need to open the Start Menu by clicking on the Start Button or pressing the Windows key.
Once the Start Menu opens, all you need to do is look for the “Settings” link which should be located at the bottom-left portion and once you find it, simply right-click on it and a menu will again appear where you will need to click on the option that says “Pin to taskbar” and after doing so, the Settings icon should now appear on your computer’s Taskbar.
Pinning Items from Start Menu’s Most Used List
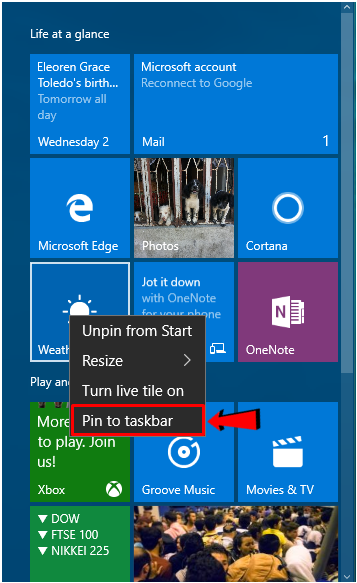
Aside from items on the right-portion of the Start Menu which is also referred to as the “Start” section and from the “All apps” list that we have shown earlier, you can also pin item coming from the “Most used” list that readily appears at the top-left portion of the Start Menu. And doing it is as simple as the ones that we’ve already demonstrated earlier. To start, simply launch the Start Menu and once it opens, just look for the shortcut from the “Most used” list and when you find it, simply right-click on it. Again, a right-click menu will appear which contains options that are applicable to the shortcut that you have selected as you can see below.
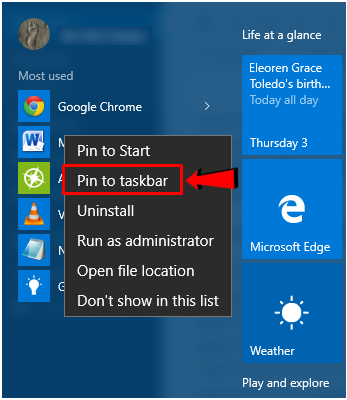
Once this menu appears, all you need to do is click on the “Pin to taskbar” option as highlighted on the screenshot above and after doing so, the selected shortcut should instantly appear on your machine’s taskbar and you can launch it from there in a quicker and more comfortable manner.
Explore Even More About Windows 10 With Us!
As you can see, pinning some items into the Taskbar isn’t a complicated task at all. It works just the same as how it is done back in older Windows editions only that this time, even the modern apps can already be placed in a quick to access location for convenience. Windows 10 still has more to show off and we will be exploring deeper into this brand new operating system edition from Microsoft in our future tutorials so if you want to master and use Windows 10 like a pro, just stay tuned-in with us here on WindowsTechies.com and we’ll take you to a journey of discovery and learning with the newest Windows OS dubbed as “the best one yet”!