A Detailed Guide for Using the Home Tab in the New File Explorer Window (Part 2)
In our previous tutorial, we’ve discussed about the very first group of options under the “Home” tab which is labeled as “Clipboard” but there are still 4 more groups of options under this first tab found on the top-left portion of the File Explorer Window that you need to learn more about.
Most of the options found in the ribbon of the more improved File Explorer Window were used to be found in the right-click menu that appears whenever a file, folder or any other item on the File Explorer/Windows Explorer Window is right-clicked but thankfully, after Windows 8 and Windows 8.1 was released, these options were readily made available on the top portion of File Explorer and in this tutorial, we will be discussing about two more features under the “Home” tab so join us as we discover what these features are and learn how you can use them to increase your productivity while using your Windows computer.
How to Use the Options Under the Organize Section
So let’s go directly to the next group of options/tools that are found under the “Home” tab which is labeled as “Organize”. While working on a certain library in your Windows 8 or Windows 8.1 computer, you can actually be able to move or copy an item/s to varied locations in your machine with just a few clicks but before we learn how it is done, here are the descriptions of each of the options that are found under the “Organize” set of options:
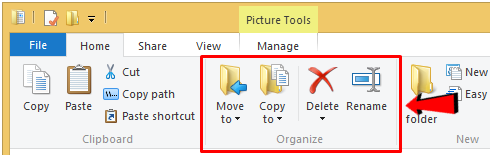
- Move to- This option allows you to cut and move selected items to a location that you have selected.
- Copy to- If you want to keep the original file/s in its original location and place new copies of it to a new location that you have selected then the “Copy to” option is what you’ll need to use.
- Delete- As the name itself suggests the “Delete” option erases or removes a file from a certain library in File Explorer and moves it to the Recycle Bin.
- Rename- Each item that is saved in any library found in the File Explorer Window has a name but you can rename it instantly by hitting the “Rename” option.
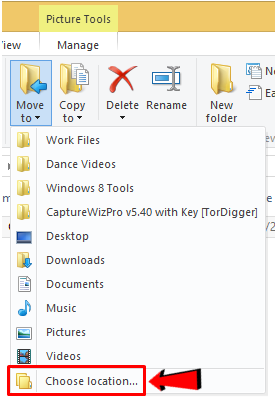
Now, if you want to use the “Move to” option, you will first need to select the file that you want to move to a new location and afterwards, just click on the “Move to” button and you will see a drop-down options box that displays the locations where you can move the file/s into. If the location does not appear on the list, you will simply need to click on the “Choose location…” option found at the bottom of the drop-down box.
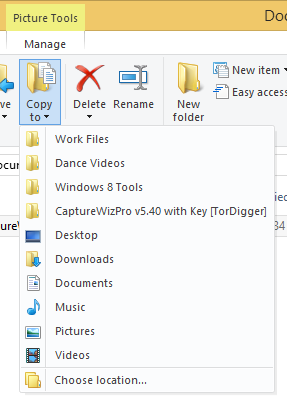
The “Copy to” option also works in the same manner. First, you will need to select the file/s that you want to copy to a new location and afterwards, you will simply need to click on the “Copy to” option and the same drop-down box containing available locations where you can copy the file/s into will appear and again, if you want to specify a location that does not appear on the list then simply click on the “Choose location…” option which is found at the bottom-most portion of everything.
Now, move to the next option to the right and you will see one that is labeled “Delete”. Again, you can use it simply by selecting the item/s that you want to delete then click on the big, red “X” icon to execute the action but if you want to access more delete options then you can click the small down-pointing arrow located just below the big, red “X” icon.
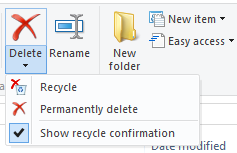
After you do so, there will be an options box that’s going to pop-out and from here, you can choose to either “Recycle” the item and move it to the Recycle Bin or just delete it permanently and skip the step that moves it to the Recycle Bin. If you are annoyed with the prompt that appears after you chose to delete a certain item then you can simply remove the check mark from the “Show recycle confirmation” option that is located at the bottom of the options box.
How to Use the Options Under the New Group
Now, let’s get to the next group of options that is found under the “Home” tab which is labeled as “New”. This group also has the fewest number of options under it. First, you will see the biggest item in it which is labeled as “New folder” and again, as its name suggests, you can use the option in creating a new folder on any library that you open in File Explorer. How the two other options under the “New” section of the “Home” tab works are described below.
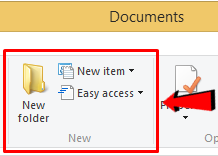
- New item- This option allows you to crate a new file or folder of your chosen type to be created within a library or even under an existing folder.
- Easy access- Allows you to get access to tools that makes opening or launching your files a lot easier.
Now, try clicking on the “New item” option and you will again see a new set of options in a drop-down box which lists all available apps and programs that you can use in creating a new item in a library or folder on the File Explorer Window.

Next, we go to the “Easy access” option and when you click on it, you will see even more options that will appear and are listed in a drop-down box as shown on the screenshot below.
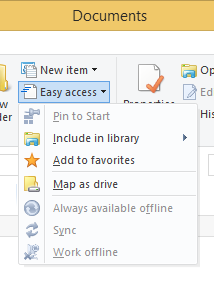
The function and use of each one of these options are listed below:
- Pin to Start- When you select an item or group of items then click this option, it will create a tile on the Start Screen which you can easily click to open the file, folder instantly.
- Include in library- Instead of doing a Copy-Paste task, you can just use this option to move an item to any library that is existing in your computer such as “Documents”, “Videos”, “Music”, “Pictures” and many others.
- Add to favorites- This option instantly adds a link of the selected file or folder into the “Favorites” section which is located at the top portion of the left navigation pane in File Explorer.
- Map as drive- This option allows you to map a network drive as a local drive in your Windows computer.
- Always available offline- This makes files or folders which are allowed for sharing in your network to be available even if your machine is not connected to the network or the Internet itself.
- Sync- This option syncs the changes to any file of folder in your network so it can be updated to the latest version.
- Work offline- If you want to continue working offline with some files and folders that are found in a network drive then you will need to click on this option.
As you can see in the last screenshot, some of the options under “Easy access” are grayed out. This means that the options are actually unavailable because the file/folder that we have selected are either not part of a network drive or cannot be pinned to the Start Screen. These options will eventually be available when you select some stuff where they can be applied into.
More Options in Our Next Tutorial
Again, we’ve run out of space in this tutorial so we’re going to make another one that will finally discuss the two remaining option groups under the “Home” tab of the File Explorer tool so be sure to watch out for Part 3 only here in WindowsTechies.com!