How to Access and Use the Device Manager Tool in Windows 10
Previously, we have discussed about the System Information tool which shows all of the relevant data that you or a more knowledgeable person might need in order to find problems and fix them and one of the common problems that a Windows machine suffers are missing drivers.
A driver is a software that makes an installed or attached hardware work. Just think of it this way, the hardware is your car and the driver is you who will be the one responsible in driving it. Without the proper driver, a hardware would not work since it won’t be able to have a software that will communicate with the operating system.
While drivers are displayed in great detail on the System Information Window, it does not really show which one is working good and which hardware need drivers which is why we decided to make another tutorial which will introduce you to another built-in tool that will help find hardware that needs the right driver for it to work.
After all, you have paid for all of the hardware that your computer has so you need to be able to use them to the fullest. When a hardware lacks a driver, it won’t be usable at all so in this tutorial, we will teach you how to access the “Device Manager” tool in your Windows 10 machine and show how you can take advantage of it in doing some hardware and driver related tasks to ensure that your machine and all of its tiny components are working 100% all of the time!
How to Access the Device Manager Tool in Windows 10
In order to see the Device Manager tool for what it really is, you’ll first need to be able to launch it in your Windows computer. There are plenty of methods in doing this on Windows 10 and we’re going to show them first in this tutorial so that you can choose which one is most comfortable to your. We’ll start with the easiest way which is done from a new feature called the WinX menu. To launch this, all you need to do is press the Windows + X keys and the menu should appear on the bottom-left portion of your computer screen as you can see on the screenshot below.
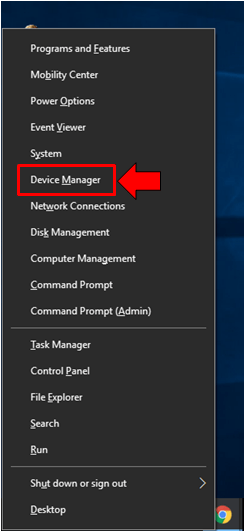
Once this menu launches, all you need to do is click on the shortcut link that is found on it which says “Device Manager” as you can see being highlighted on the screenshot above and after doing so, the Device Manager Window should launch instantly.
Accessing Device Manager Using Search
Another easy method that you can use in launching the Device Manager tool is done from the Search feature which has been made even better in Windows 10. To launch it, you will again need to press another keyboard shortcut combination- Windows + S and Search should launch right away at the bottom-left portion of your computer screen as shown below.
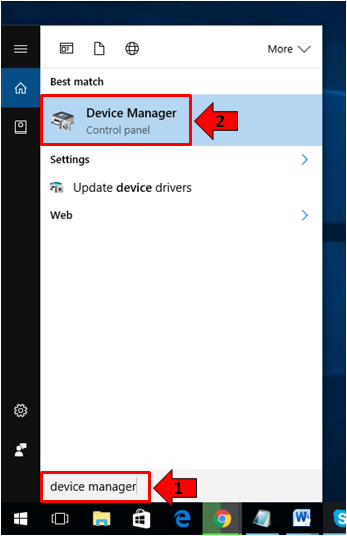
On the Search screen, you will be able to find a search input box on its bottom portion and in here, you will need to type-in the words “device manager”. After you do so, the search results should appear just above the input box and from these results, simply click the shortcut that is labeled “Device Manager” as you can see being highlighted on the screenshot above. The Device Manager tool will then launch right after you click on the shortcut that is found on the search results list.
How to Find Devices that Lack Driver in Device Manager
Now that you already learned the available methods in launching the Device Manager tool on your Windows 10 machine, it is time to learn how you can use it in finding hardware that don’t have a driver installed for it. There are plenty of third-party software that claim they can scan for hardware that lack driver but nothing really beats that which is built within the Windows operating system.
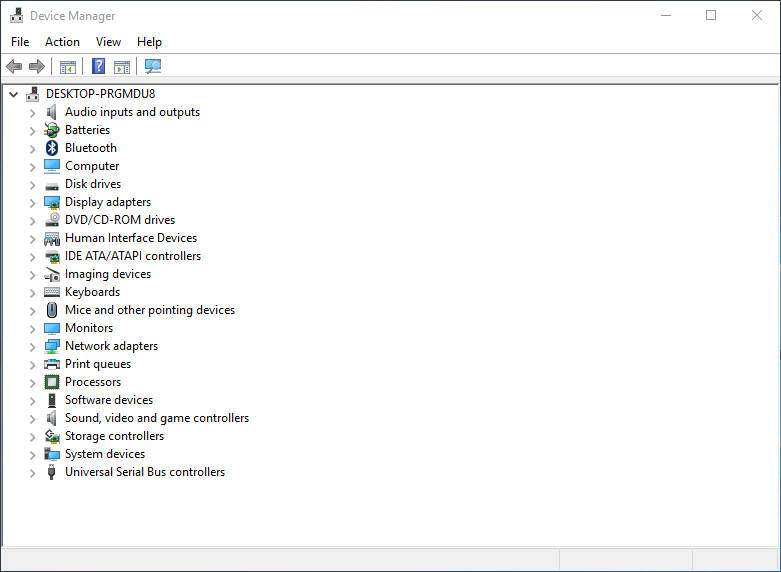
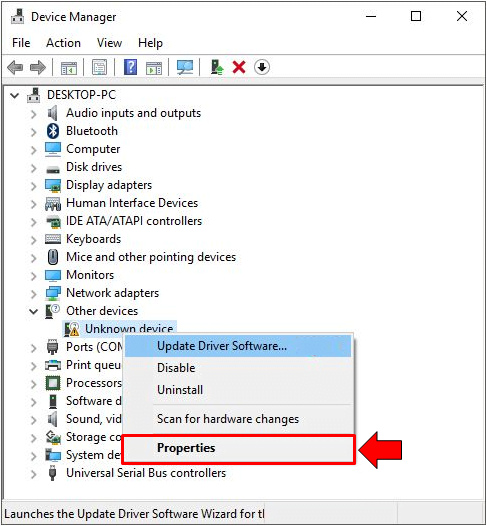
Finding hardware that don’t have the right driver installed is very easy if you use the Device Manager tool. After all, it is meant to do this and is designed to detect malfunctioning or non-functioning hardware so you can find and install the right driver for them or fix any problem that a certain system component/hardware is currently having. To look for these useless hardware (those that lack drivers to work), you will simply need to look for an item on the list of all the hardware attached or built-in with your computer which is labeled “Other devices” as you can see on the screenshot below.
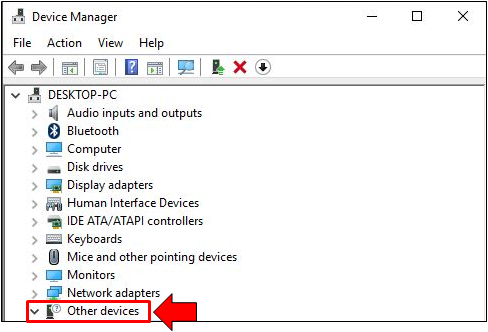
Clicking on this “Other devices” item from the list will cause it to expand and show all the hardware that currently don’t have the proper driver for them to work. These devices should be labeled as “Unknown device” as shown below and its icon should have a yellow triangular overlay on it that contains an exclamation mark in it.
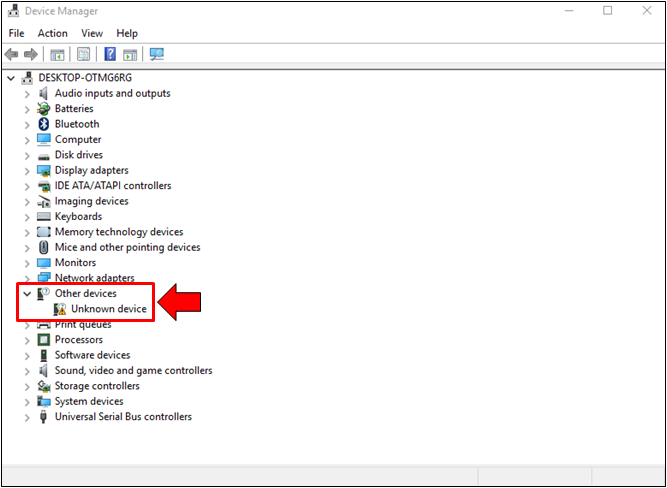
If your computer has all the required drivers for all the hardware that it has, this “Other devices” item should not appear anywhere in this list but if you found it after you launched the Device Manager tool in your Windows 10 machine, it means that there is something that is built-in or attached to your computer which needs a driver and you will need to install the drive itself for the hardware to work. If you don’t have a clue on how this is done, we’re going to show the steps next so just read on.
How to Install Driver for an Unknown Device
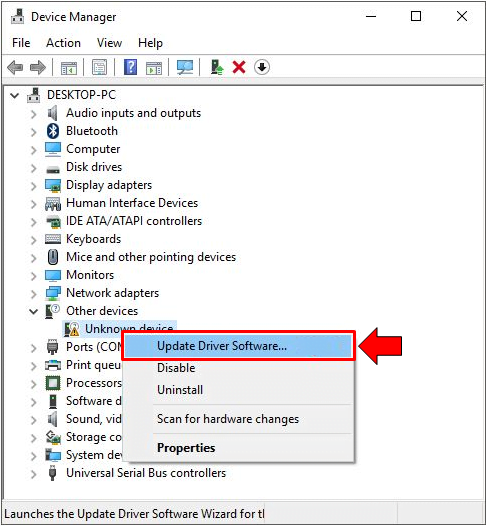
As we have mentioned earlier, finding the “Other devices” item from the list of hardware that is attached or built-in with your computer means that there is something that needs a driver. The hardware will just appear as an “Unknown device” and it won’t really be identified unless you access the properties, get the hardware ID and search it on Google. However, if you don’t have the time to do this then you can simply jump into installing a driver for the unknown device.
Thankfully, the Device Manager tool allows this and the process is very easy to do. To start, you will need to right-click on the “Unknown device” in order to launch a right-click menu which is also known as a contextual menu. Once this menu appears, just click on the “Update Driver Software…” option in order to launch the “Update Driver Software” wizard which will guide you though the process of installing the right driver for the unknown hardware that you’ve just found.
Once the “Update Driver Software” wizard opens, you will see two options in it for installing or updating the driver for the unknown device that you have found earlier. The first option says “Search automatically for updated driver software” which when clicked will help you find the driver from your computer or from the Internet in an automatic manner. The second one which says “Browse my computer for driver software” is the one that you would need to click if you already know what the unknown device actually is but most of the time, the first option is clicked since it is easier to just let Windows do the searching by itself.
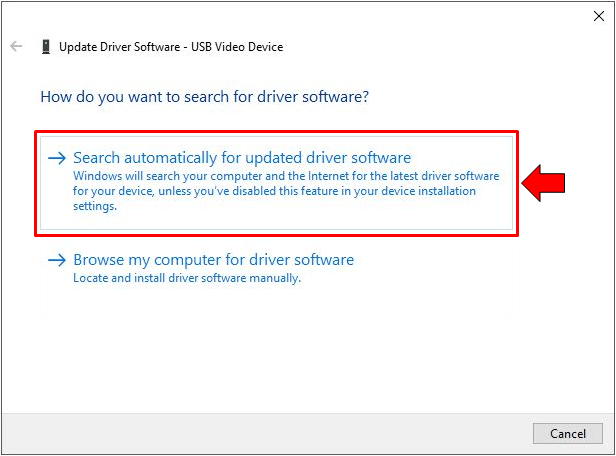
Now, we will choose the first option and right after you click on it, the Update Driver Software Wizard will start doing its job of automatically searching for the right driver which might be stored on your computer or if it doesn’t find one that is compatible with the hardware, it will go on and look for the right driver online. Just remember that you need to connect your computer to the Internet so that the wizard can really do its job and fix the hardware that needs a driver.
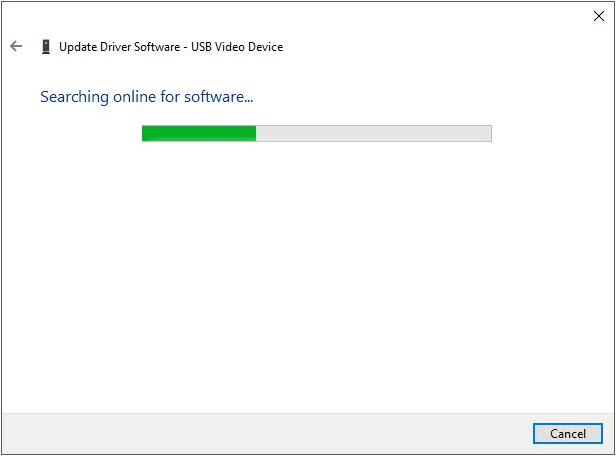
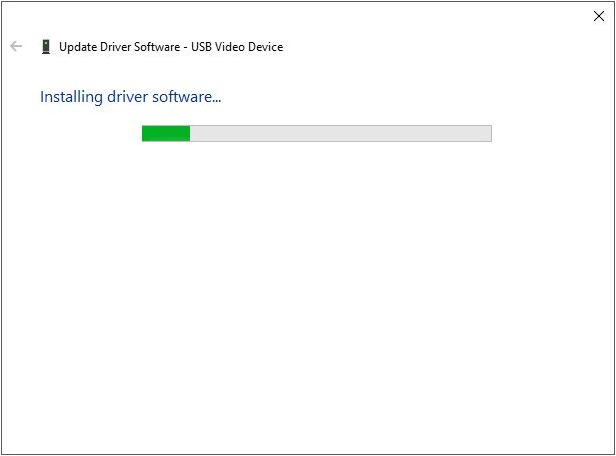
Once the right driver is found, the Update Driver Software Wizard will show that the installing process for it is already in progress as you can see being shown on the screenshot below. You can just continue doing your usual tasks on your computer while the wizard is looking and installing the right driver for the unknown device.
When the search and install process for the right driver is done, the Update Driver Software Wizard will show a message on its Window that the driver installation has been successful and once you see this, you can just click on the button that is found at the bottom-right portion which says “Close” then proceed to looking for the right driver for the other “Unknown devices” that is found on your computer (if there’s any) by following the same process that we have shown above.
The device that you’ve just installed a driver for should now be usable and it should be able to work normally doing its task since it already has the right software that will let it work and communicate with the operating system that is installed on your computer.
NOTE:
Letting Windows 10 look for the driver automatically is the recommended option to choose because installing the wrong driver for a certain hardware can cause further system problems ranging from the hardware not working properly to worst ones like the Blue Screen of Death or BSOD error.
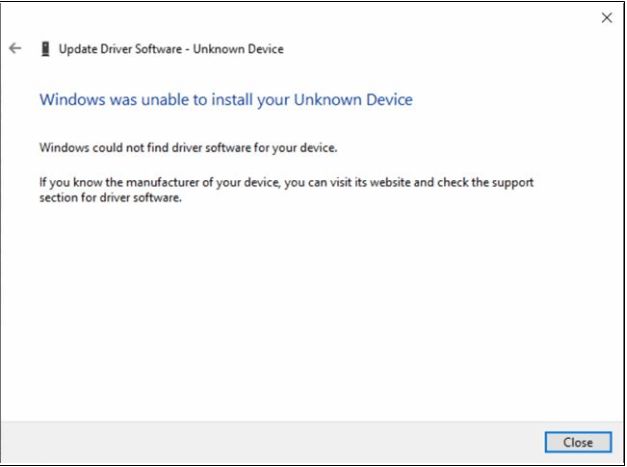
What to Do When the Wizard Fails to Find and Install the Right Driver?
The Update Driver Software Wizard isn’t really perfect at all so there would be instances that it would not be able to find the right driver for a certain hardware. If this happens, you will no longer have to do the task using the wizard so you can just close the Device Manager Window and proceed on to the device manufacturer’s website and download the driver from there.
Beware of fake drivers which are commonly found in websites pretending to provide certified drivers other than the manufacturer’s official website. Most of these fake drivers actually have some bloatware or even viruses with them and installing them into your machine would result to doing more harm instead of fixing the problem.
How to Identify Unknown Devices
When the Update Driver Software Wizard fails to find and install the right driver for an unknown device that you found on your computer, the first thing that you need to do in order to find the driver that will make this hardware work is to identify the hardware first. You can do this by right-clicking on the “Unknown device” item that is listed in the Device Manager Window and on the right-click menu that would appear, simply hit the option that says “Properties”.
After the “Properties” option is clicked, you will then be able to launch a small Window which contains tabs on top of it showing some information about the Unknown device. In order to really identify what the device is, you will need to click on the “Details” tab that is found on top of the “Unknown device Properties” Window and under it, just click on the drop-down options box under the “Property” section and select “Hardware Ids” from the list that would appear.
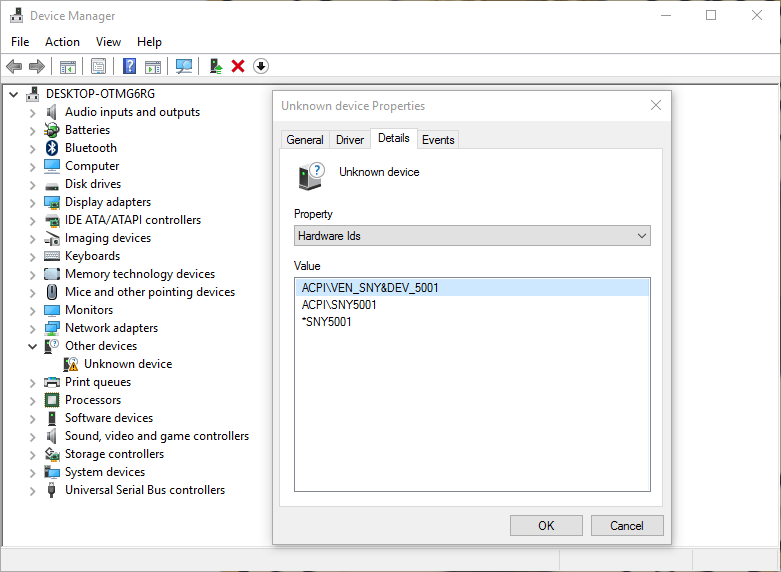
The identifying values for the hardware will then appear inside the “Value” box and all you need to do is copy one of these values then open your favorite browser and search for it using Google Search or any other Search engine. Doing this will help you identify what the device is and even lead you to find the official website of its manufacturer so that you can get the right driver for it.
How to Disable or Enable a Device
There are times that a certain hardware would not work and in our experience using Windows through the years, it is the wireless network adapter that suffers this kind of problem in most cases. If you noticed that your machine is having problems with your wireless network connection even if there is actually Internet connection then you might need to restart the hardware which is the wireless network adapter on your machine and you can do this by using the Disable/Enable options that is found in the Device Manager Window.
To start, you will first need to locate the Wireless Network Adapter device on the list of devices. It is found under the “Network Adapters” item so go ahead and expand it. After doing so, you should be able to find your machine’s wireless network adapter as you can see on the screenshot below (although yours might be of different brand) and once you locate it, simply right-click on it to pull up the right-click menu.
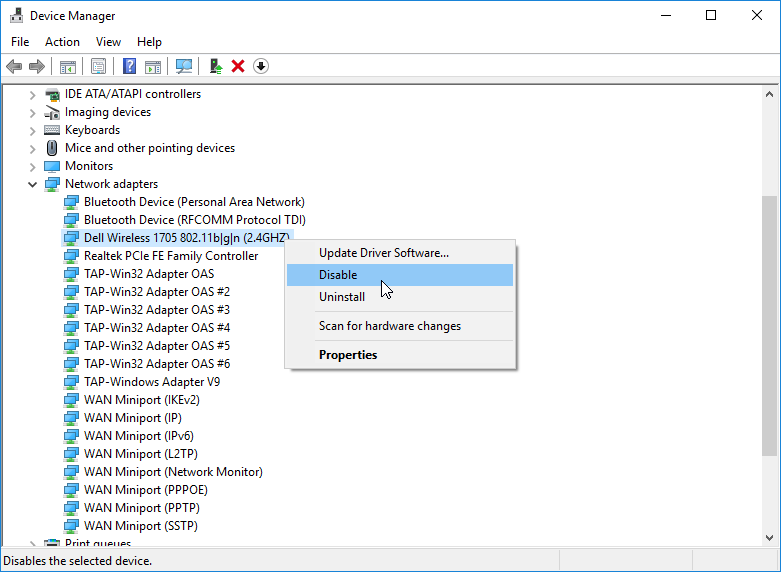
Once the right-click menu appears, you will simply need to click on the option that says “Disable” and what would happen next is that your network connection would be lost in case it is the wireless network adapter that you’ve disabled just like what we are showing in this tutorial. In order to fix the problem, you will simply need to right-click on the same device again and from the right-click menu that would appear, just click on the option that says “Enable” as shown on the screenshot below.
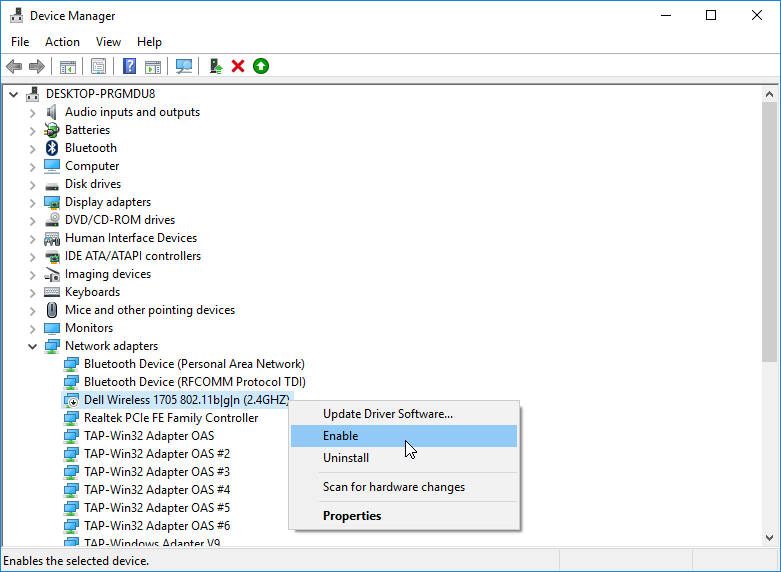
In most cases, doing this disable then enable trick for a certain hardware like the Wireless Network Adapter fixes a problem. If it didn’t work on your computer then you’ll need to inspect your Wi-Fi router or contact your Internet Service Provider because the problem might already be with them and not on the hardware that is installed on your computer.
How to Show Hidden Devices in the Device Manager Window
Now, not all of the devices in your computer are listed or allowed to appear on the Device Manager Window by default. There are others that are hidden and if you want to view these hidden devices, all you need to do is to follow the steps that are shown below.
First, you will need to click on the tab that is found on the top-right portion of the Device Manager Window which says “View” and after doing so, a set of options will appear as you can see being shown on the screenshot below.
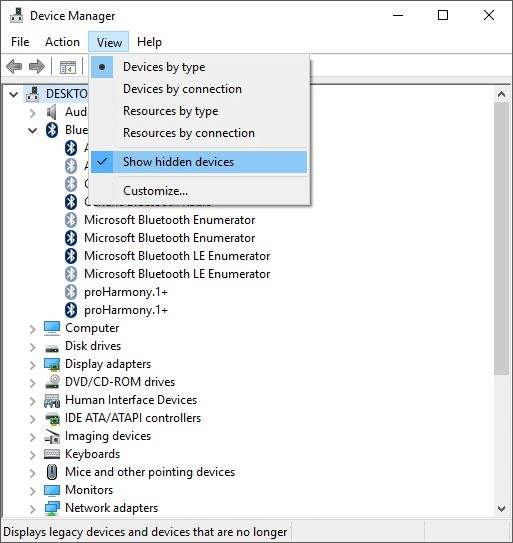
From the set of options that appeared inside a box as you have seen above, all you need to do is click on the “Show hidden devices” option that is found near the bottom of the box and voila! All legacy devices as well as those that are no longer attached to your computer will appear on the list according to where they belong. This is useful trick that you can do especially if you want to trace which device that was recently attached to your computer caused certain problems that suddenly appeared on your machine.
Fixing Hardware Drivers is Made Easier with the Device Manager Tool!
Microsoft has really made sure that every user is capable of fixing even the problems that seem impossible to fix with just average knowledge about the operating system and other software stuff! The Device Manager utility is just one of these tools that were made available even in earlier Windows editions that were released in the past.
Have you ever experienced using the Device Manager tool in your Windows 10 computer? What sort of problem did it fix? If you have some secret tricks in solving common hardware driver problems, please feel free to share them with your fellow readers by posting your experience on the comments section below.