How to Backup and Import a Wireless Network Configuration (Windows 7)
One of the annoying things that a Windows user would ever encounter is setting up a wireless network and remembering the network key after a long time then typing it correctly, without any mistake in order to connect all the other netbooks, laptops, printers and other devices to it. This becomes a bigger problem especially if you are just a novice user who has no knowledge about networking and other stuff that needs to be done in order to make everything work and worst is when you tried finding a way to connect all the other devices but the opposite happened and the router’s configuration now is messed up.
One thing for sure would happen next. You will spend plenty of hours researching and looking for possible solutions over the Internet but in the long run, you’ll end up calling a technician and paying all the charges just to get everything fixed. How can you avoid this disaster from ever happening? Is there something you can do that will make everything work easier? Thankfully, in Windows 7, there is a wizard that will let you save or backup all network settings and configuration into a USB flash drive and use it every time you want to connect a new device running on either (XP, Vista or Windows 7) to an existing network. Sounds great right? In this tutorial, you will learn how to backup your network configuration into a USB memory stick and know the steps in using it on other computers so they too can have access to your network.
Saving Your Wireless Network Settings into a USB Memory Stick
To access the wizard that will guide you with the steps in saving your wireless network settings into a USB flash drive, you first need to click on the wireless network status icon from the system tray an once the list of all available wireless network appears, simply click “Open Network and Sharing Center”.

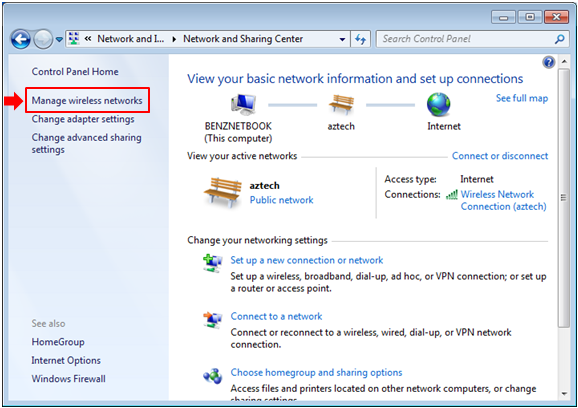
After doing so, the “Network and Sharing Center” Window will appear showing you the current network that your machine is currently connected to and as well as other settings and links that leads to other aspects of your machine’s network, sharing and Internet settings.

Another way of accessing the “Network and Sharing Center” Window is through the “Control Panel”. To do this, simply open the main “Control Panel” Window and click on “Network and Internet” then on the Window that follows, click “Network and Sharing Center”.
Now that you are on the “Network and Sharing Center” Window you need to click on the “Manage wireless networks” link located at the left navigation panel.
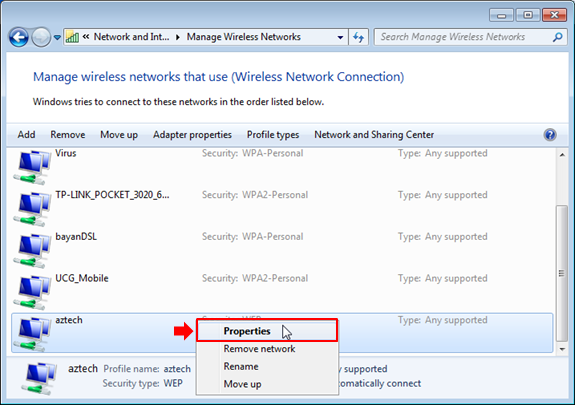
You will then be taken to the list of networks that your machine is able to connect to automatically, simply select the one that you want to create backup for then right-click on it and select “Properties”.
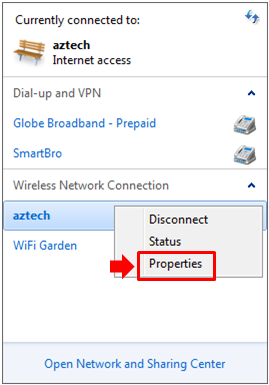
If the wireless network that you want to save backup for is currently broadcasting/available and you are connected to it, you can just simply click on the wireless network icon on the system tray, select the network and right-click on it then hit “Properties” from the options that would appear.
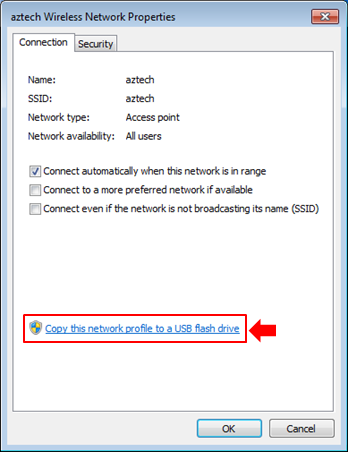
If you did the first method, clicking the “Properties” option will take you directly to the “Connection” tab of the “Wireless Network Properties” Window which is the section where we can find the link that will open the wizard for creating a backup of the wireless network settings.
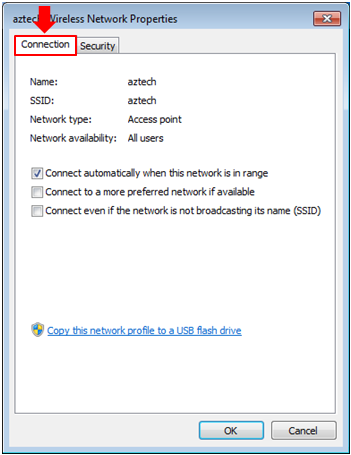
On the other hand, if you chose to do the the second method which is easier, clicking the “Properties” option will take you to the same Window shown above but it will be on the “Security” tab so you need to click the “Connection” tab and once you are on it, simply click the “Copy this network profile to a USB flash drive” link at the bottom.
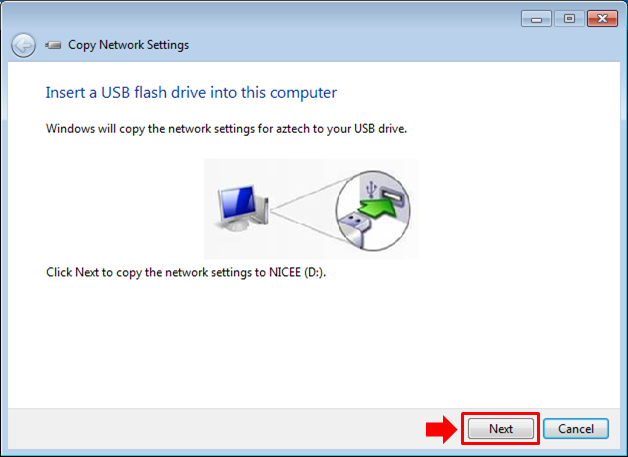
After clicking on the link, the “Copy Network Settings” wizard will appear and on this stage, you already need to plug your USB flash drive into one of your computer’s USB port. Once your USB flash drive gets detected, simply hit the “Next” button at the bottom.
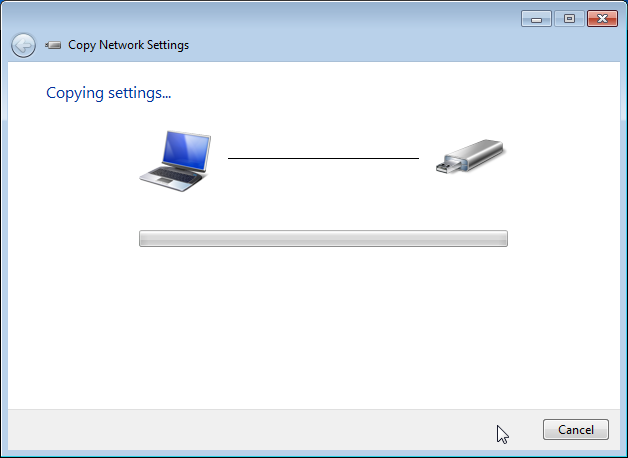
The settings will now be copied to the USB flash drive and the whole process will take just a few seconds.
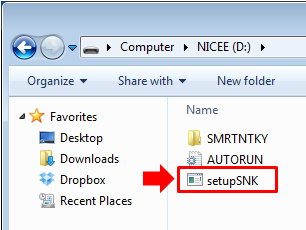
Once the process copying process completes, you’ll see a Window that tells you some instructions on how to use the file that is copied to your USB storage device. Just click the “Close” button from this Window to exit from the wizard. Be sure to look into the flash drive’s contents first to make sure that the files were really copied to it. If the process was successful, you should see the files that are shown on the screenshot below saved inside your USB flash drive.

The files are labeled “SMRTNTKY”, “AUTORUN” and “setupSNK”. The last one on the list, “setupSNK” is the executable file which you will later use to copy the settings on to other computers and devices that you want to connect to the network. Be sure not to delete these files from your USB flash drive.
How to Import the Wireless Network Configuration Backup
The wireless network configuration saved on your USB flashdrive is capable of being used on computers running Windows XP, Windows Vista or Windows 7 operating systems. This means that you can connect as many computers as you want for as long as each one runs on any of these OS versions. To connect a computer to your wireless network, you need to plug the USB flash drive containing the backup of your wireless network configuration so you can start importing the settings to it. Once the flash drive is connected to the computer, simply open its contents and click on the “setupSNK.exe” file.
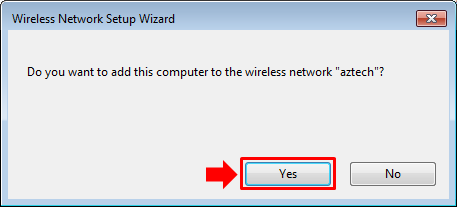
After clicking on it, the “Wireless Network Setup Wizard” will appear asking if you want to add the computer to the wireless network that you’ve saved backup for. If you want to add it, simply click the “Yes” button.
After doing so, the connecting process will happen in just a snap and you will then see the Window shown on the screenshot below informing you that the computer is already added to the wireless network.

From this Window, all you need to do is click on the “OK” button and the wizard will just close. Just repeat this same process on all the other laptops, netbooks and other USB enabled computers that you wish to connect to your wireless network and you’re now connecting everything else the easy way compared to doing the same steps manually.
As you can see, Windows 7 provides a very easy way of connecting all your other devices to a wireless network you’ve set up a long time ago. This helps a lot especially if you’ve already forgotten the network key that you have set for it. Unfortunately, this backup and import process does not work with Microsoft’s latest operating system, Windows 8. If you try to do the same process on a Windows 8 machine, you will not be able to find the link that will start the wizard for backing up the wireless network settings but who needs Windows 8 anyway if Windows 7 already works perfect in doing all your daily tasks.