Blocking Apps from Showing Notifications in Windows 10
Just like the apps that are installed in your Android device, Windows 10 universal apps also display notifications on your computer screen whenever you need to be aware of something that’s going on in them. These notifications can range from updates to offers coming from its developers about other related apps that you can install and enjoy for free.
These app notifications also tend to play a sound whenever they appear on your screen and oftentimes, it becomes annoying especially if you are trying to focus on something that needs to be finished soon. So how are you actually going to turn off apps from displaying notifications and even playing sounds whenever they appear? In this tutorial, we will be teaching you how these tweaks are done so be sure to get your Windows 10 machine fired up and be ready to follow the steps that we are going to show below.
Be Sure You Want to Turn Notifications Off
Before really doing the steps in turning off app notifications on your computer, we will first try to convince you not to do so for the very reason that they are all important in keeping you updated on what’s going on with all the software that are installed on your computer. Yes! They all inform you whenever there are some stuff that needs urgent attention. Aside from that, the apps in your computer also want to make sure that you actually have their latest version installed.
If you have the Facebook app installed, keeping your notifications installed also allows you to be informed of what your friends are up to. It is always nice to be informed of the latest right but it is always a good thing to be able to choose which apps are allowed to display certain notifications on your different devices. For instance, on your work computer, you might want to turn off notifications from social media apps and turn on notifications for scheduler and the other apps that are designed for work such as Slack, Teamwork, Time Doctor, Dropbox and many others.
So how exactly are you going to do this awesome tweak in your Windows 10 machine? That’s exactly what we’re going to show now so be sure to follow all the steps that we are going to show closely to avoid repetitions.
Accessing the Notifications & Action Section in Windows 10
Now that you already have an idea about the app notifications that we’ve been talking about since the start of this tutorial, it is time to access the section where you can find all available tweaks to this feature in Windows 10. First of all, you need to be aware that these tweaks are found only in the modern Settings Window of your computer so in order to find them, you must first launch the Settings Window and you can do so in many ways.
The basic way in launching this feature is done from the Start Menu so go ahead and press the Windows key or click on the Start Button in order to launch the Start Menu which should look exactly like the one shown below.
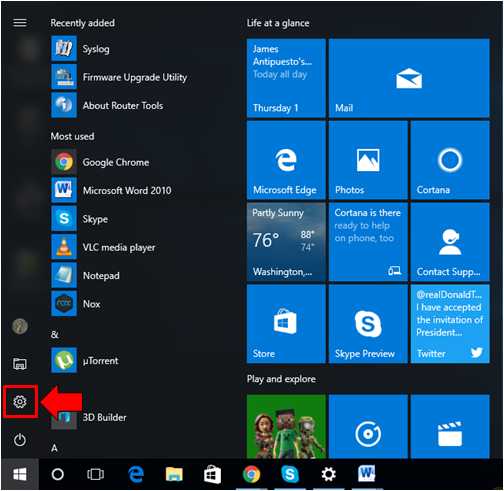
Right after the Start Menu launches, just click on the “Settings” icon that is found on the narrow vertical bar at the left hand portion of the Menu itself as you can see being highlighted on the screenshot above. Doing this should launch the modern Settings Window instantly on your computer screen.
If you want a quicker and easier way in launching the Settings Window they you can use the keyboard shortcut combination that is designed to launch the feature easily. To do this, just press the Windows + I keys as you can see on the screenshot below. We’re pretty sure that you can locate these keys on your machine’s keyboard so go ahead and press them to instantly open the Settings Window!

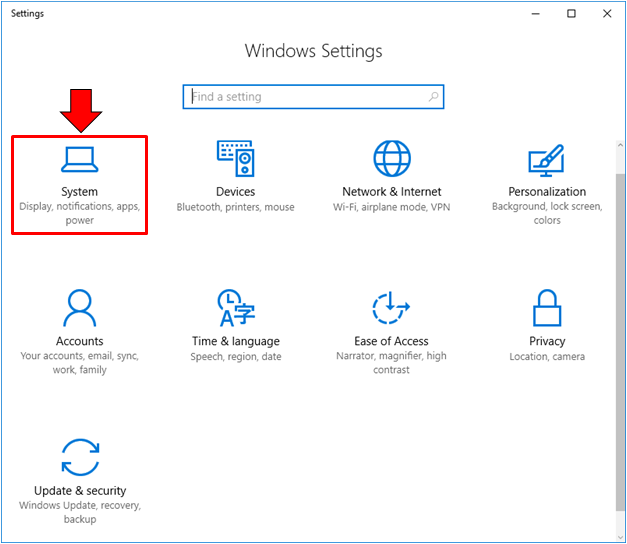
Now that the modern Settings Window is launched, you should be able to see 9 main categories of settings and tweaks in it and in order to access the “Notifications & actions” section in it, all you need to do is click on the “System” category first as you can see being highlighted on the screenshot below.
After clicking on System, you will now be taken to its contents section and from here, you should be able to see a list of different items at the left also known as the “navigation pane”. From this section, just click on the item that says “Notifications & actions” in order to access the tweaks and settings that are available for enabling or disabling app notifications in your Windows 10 machine as shown below.
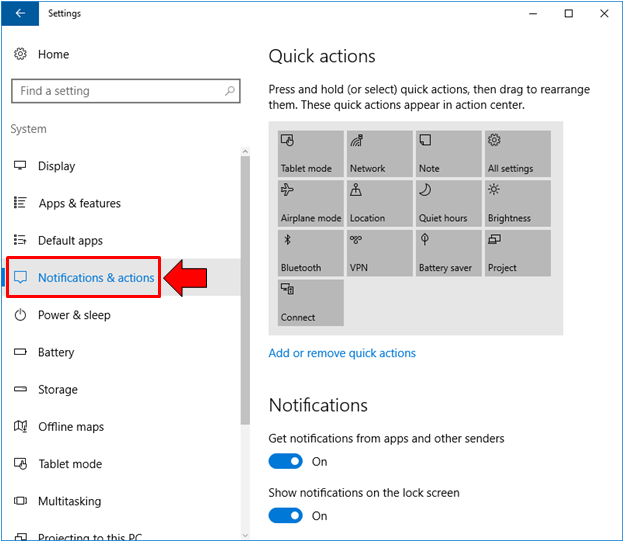
As you can see, accessing the section where the settings and tweaks for your installed Windows 10 universal apps are found is very easy so there should not be any reason why you can make changes on this aspect. Now, let’s go to the next step which is turning off notifications for certain apps.
How to Totally Turn Off Notifications for Certain Apps
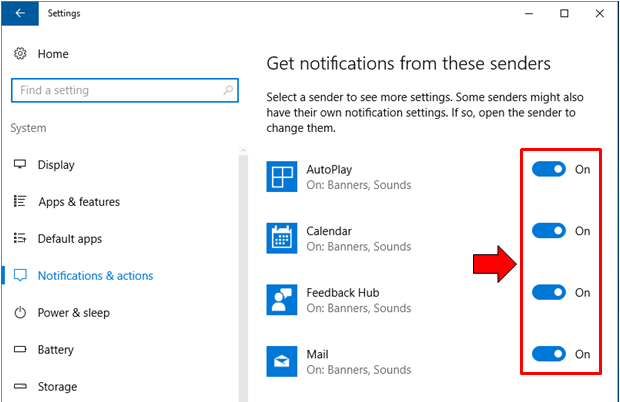
Now that you are already in the “Notifications & actions” section of the modern Settings feature in your Windows 10 machine, it is time to learn how to turn off notifications for certain apps that are built-in and installed on your computer. You can actually choose specific apps to turn off notifications for and in order to do this, you will need to put your focus on the right hand side of the “Notifications & actions” section and from here, you will need to scroll down until you reach the “Get notifications from these senders” list of apps as you can see on the screenshot below.

In order to turn off notifications for a certain app that is built-in or installed on your computer, all you need to do is locate it from this list and after you find it, just flip the switch that is found on its right portion to the off position by clicking on it.
Once the switch is turned off, the app will automatically be disabled from ever showing notifications on your computer screen. These notifications include everything including the sound, system tray banner and everything else that can bother you whenever you are working on something on your Windows 10 computer.
Accessing the Advanced Settings for Certain Apps
Now, you need to be aware that each app which is built-in and installed on your computer has a unique set of advanced notifications setting that you can choose to turn on or off anytime in order to make your computer more silent than ever before. Yes! You can actually tweak how each app behaves in terms of the notifications and sounds that plays whenever a prompt appears on your screen. It is also clearly stated on the “Notifications & actions” section that each app notification settings can actually be tweaked and the good thing about it is that it’s easy as flicking the on/off switch from on to off and the other way around.
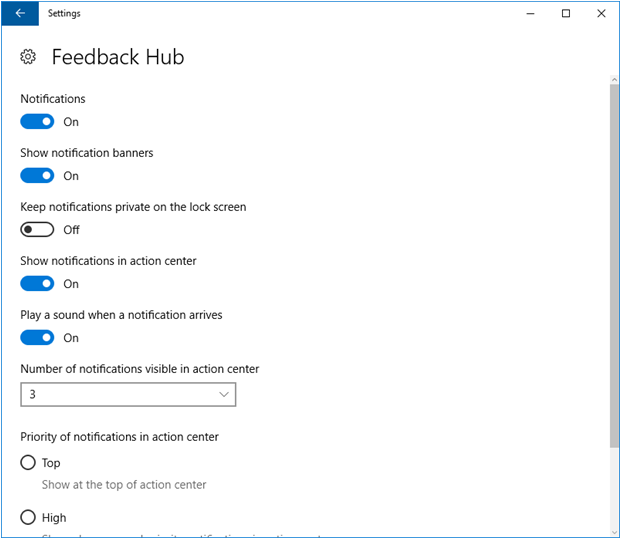
To access the unique set of notification settings for a certain app, all you need to do is click on it from the list that we have shown earlier. For illustration purposes, we will be clicking on the “Feedback Hub” app which is one of the built-in apps in Windows 10 and as you can see on the screenshot below, there really are some other notification settings and their corresponding switches sitting at the right portion.
Turning Notification Banners On or Off
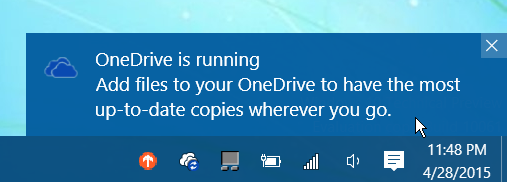
Now that you are on the advanced notifications settings and tweaks for a certain app, you can start tweaking certain aspects on how it shows these important chunks of information that appears occasionally on your computer screen. One of the elements of a notification is called the “Notification banner” and it appears on the bottom-right portion of your computer screen whenever an app informs you of something through a notification as shown on the screenshot below.
If you don’t want notification banners to be displayed on the bottom-right portion of your screen, all you need to do is flip the On/Off switch that is found under the “Show notification banners” setting as seen on the screenshot below.
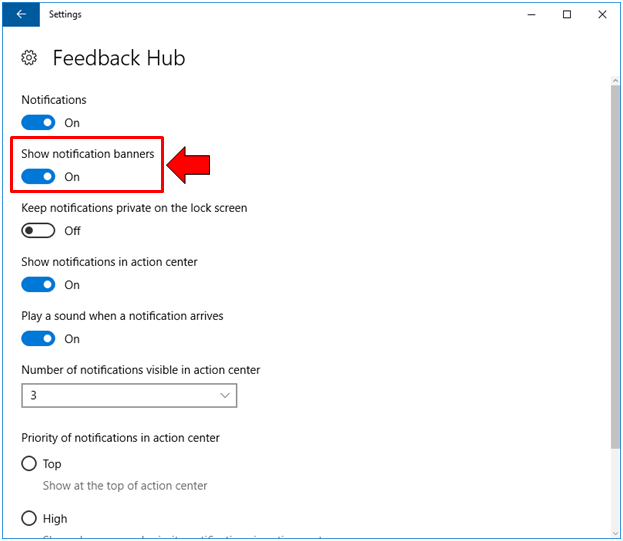
After this switch is turned off, you will no longer see the Notification banner appearing at the bottom-right portion of your computer screen whenever an app alerts you of something that needs your attention. A notification banner looks exactly like the one shown on the screenshot below.
Allowing App Notifications on the Lock Screen
Another great feature that would allow you to control how notifications are displayed on your computer involves the very screen that welcomes you whenever you log on to your computer. We are actually talking about the Lock Screen and if you want to display notifications from apps on this welcome screen then you can do so by flipping the On/Off switch that is found under the “Keep notifications private on the lock screen” settings as you can see being highlighted on the screenshot below. You will need to turn this setting On to enable it and you can do so by clicking on the switch that is found under it.
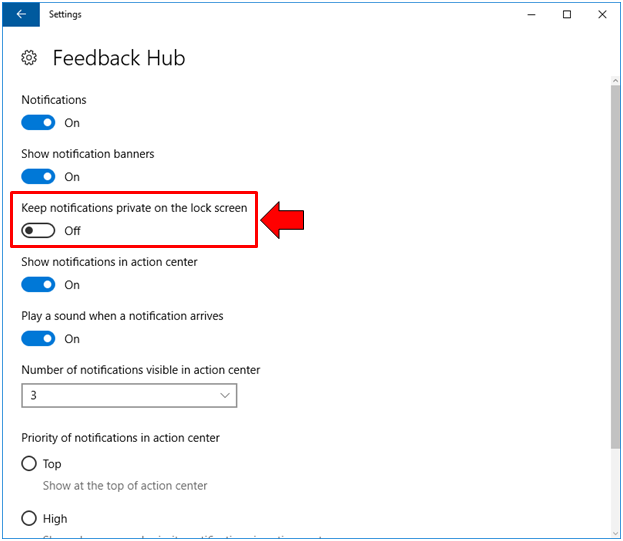
As you can see, this notification setting is turned off by default in all Windows 10 PC so be sure to turn it on if you want to start seeing notifications for a certain app on your Lock Screen and you will know what to do first once you are already logged on to your computer.
Turning Notifications on the Action Center On or Off
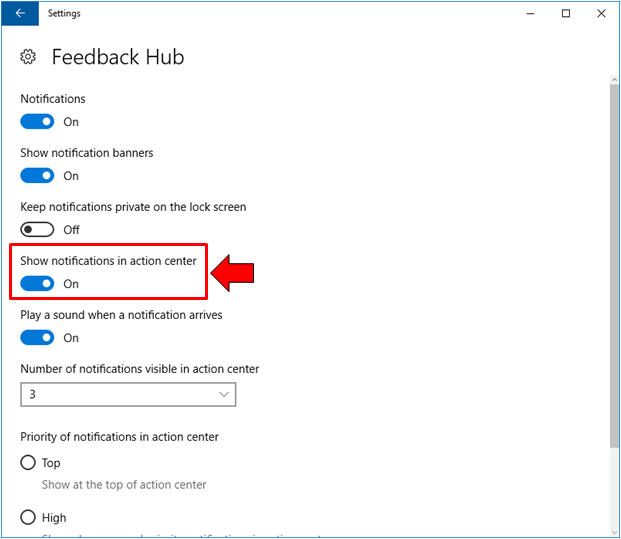
Unlike the previous notification setting, the next one is turned On by default in every Windows computer. It is the “Show notifications in action center” and this allows or disallows notifications from a certain app like the Feedback Hub for instance from displaying notifications on the Action Center.
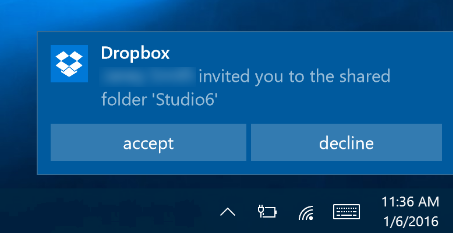
The Action Center screen is the one that lists all notifications from all apps and you can open it simply by clicking on the icon that is found at the extreme-right portion of the Taskbar within the section that is called the System Tray. This icon is shown on the screenshot below.
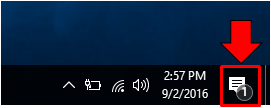
The screenshot above actually shows that there is one available notification from an app in the Action Center. After clicking on the icon, you should be able to see a screen that contains the app and system notifications on top and as well as the quick action tiles/buttons on the bottom portion as you can see on the screenshot below.
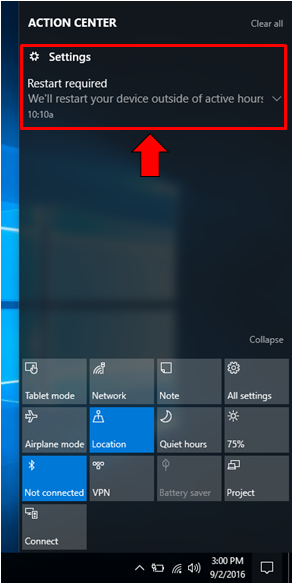
As you can see, the notification that is available in the Action Center screen comes from the Settings app and it tells me to restart my computer so that updates would be applied and if I fail to do so, Windows 10 will automatically restart at a time when it thinks that I am not busy doing something on my computer.
Disable Sounds When a Notification Arrives
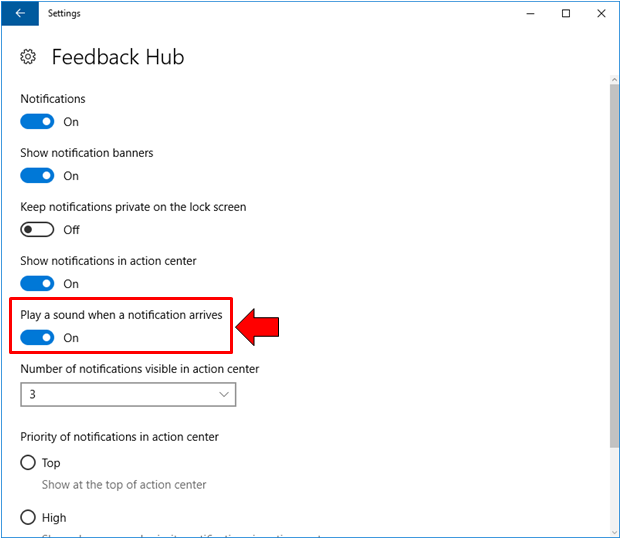
Lastly, we come to the last notification setting that is available in this section which has an On/Off switch and it is the tweak that will allow you to disable the sounds that play whenever a notification arrives on your computer. This oftentimes surprises users especially when the volume is set to maximum. To disable notification sounds, all you need to do flip the switch that is found under the “Play a sound when a notification arrives” to the Off position and you can do so by clicking on the switch itself.
After turning the switch off, you should no longer be able to hear a notification sound whenever your built-in and installed apps show notifications on your computer screen.
How to Set the Maximum Number of Notifications an App Displays in Action Center
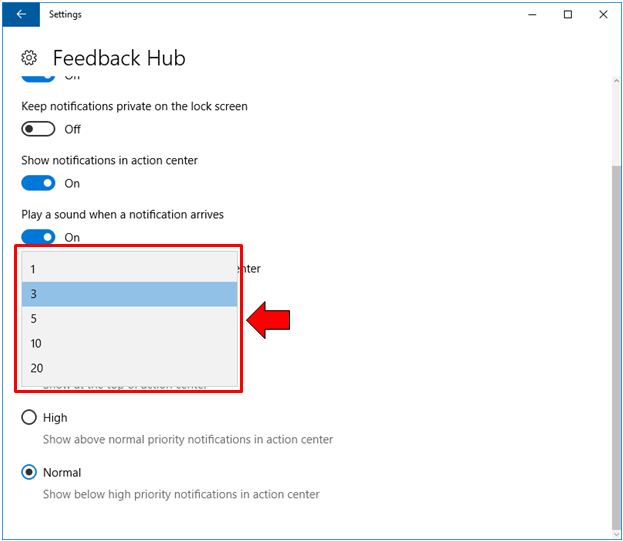
Now, there is also a setting that allows you to set the number of notifications that a certain app is allowed to display in the Action Center screen and the default value that is set for the Feedback Hub app is 3. This tweak prevents overcrowding and flooding of notifications from a single app in the Action Center. To change the current value that is set for a certain app, all you need to do is click inside the box that is found under the “Number of notifications visible in action center” and after you do so, a dropdown options box showing the available numbers you can choose will open as you can see on the screenshot below. From here, just click on your desired number of notifications that you want to allow the app to display in the action center and that’s it. The value you’ve selected will automatically be applied!
Changing the Position of App Notifications in the Action Center
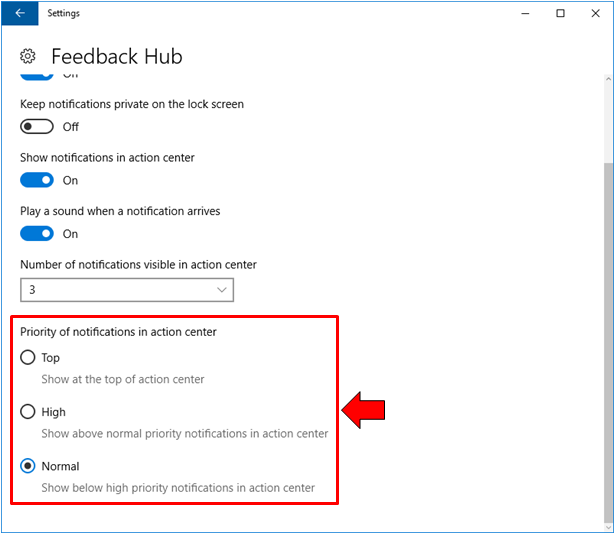
The last tweak that is available for a certain app that is built-in or installed on your computer has something to do with the position of the notification that it displays in the Action Center. Yes! You can actually choose to make a notification from an app to appear at the top of the list or you can also set it at high priority or just normal. To do this tweak, all you need to do is click on the type of position that you want the app notifications to take in the Action Center. There are three selections that are available and they are as follows:
- Top– These notifications will show at the top of the list when you open Action Center,
- High– These notifications will show above the normal priority notifications in the Action Center,
- Normal– These type of notifications will be below the high priority ones in the Action Center screen.
After choosing the priority type for the app notifications on the Action Center Window, you can simply exit from the Window that you did some tweaks on and the changes you’ve made will automatically be applied. You can then proceed to the Advanced settings of the other apps that are built-in and installed on your computer and make tweaks on them as you like so that they will star behaving in a more favorable way depending on the type of computer that you are using. And that’s how you change the notification settings for specific apps in your Windows 10 machine. Hope we were able to help you somehow in making Windows perform better in all instances and situations that you use it in your life!