How to Change Sound Schemes in Windows 10
Sounds and visuals are two of the most important aspects in every Windows 10 machine.These features add some spice to an otherwise boring user experience. Just imagine your computer not having any other theme option for changing its appearance or the color of its Windows at the least.
It would also be a boring thing if the Windows OS didn’t have sounds that play automatically during certain events such as when a prompt or notification appears or when an error suddenly happens and it needs your urgent attention. The good thing about the sounds that automatically play when certain events happen in Windows 10 is that they give users an idea on what’s happening even when the screen is turned off or when the user himself is not looking.
Changing Windows 10’s Sound Scheme
Just like the visual aspect of Windows 10 which can be tweaked by choosing from the available themes that are built within the operating system as well as free themes that can be downloaded from the Internet, the audio aspect can also be tweaked using sound schemes and you can even create your own sound scheme if you wish to.
If you’ve been wanting to change how your Windows 10 machine works in terms of the sounds that it plays during certain events, you’ll find all the steps that are involved in doing this tweak and even more in this tutorial so just read on towards the end to learn how this is done in Microsoft’s latest operating system edition that is installed on your computer.
Accessing the Sound Scheme Settings in Windows 10
Different tools and system settings have varied methods of being accessed in Windows 10 and even in older Windows versions that you might have been able to use in the past. The same is true with the Sound Scheme settings that is found in your computer. There are many ways in accessing the section where these settings are found and we’re going to show them in this tutorial.
Accessing Sound Scheme Settings Using Search
One of the easiest method in accessing anything including the Sound Scheme settings in Windows 10 is by searching for it using the new and improved Search feature. If you don’t have any clue on how this feature in accessed, you don’t need to panic because we’ll show you how it is quickly done here.
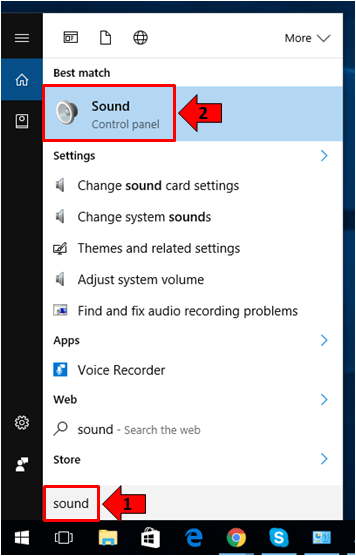
To launch the Search box feature in your computer, you will simply need to press the Windows + S keys and the box should instantly slide up on the bottom-left portion of your screen.

On this Search box, you will simply need to type in the word “sound” into the search input box that is found at the bottom as you can see being highlighted on the screenshot below and right after you do so, simply click on the shortcut that says “Sound” which is found on the list of search results that had appeared just on top of the search box.
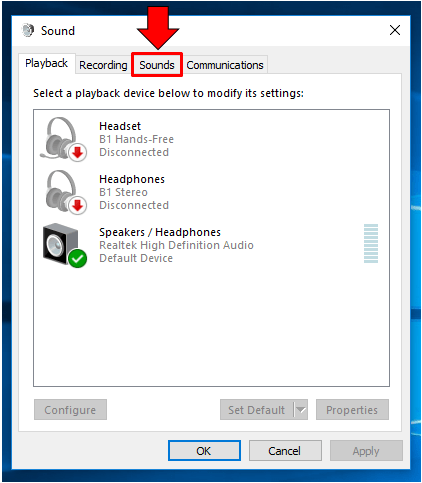
After clicking on the shortcut link that is labeled “Sound”, you should be able to open a small Window which shows different groups of settings for tweaking your computer’s audio/sound aspect. From here, you will simply need to click on the tab that is labeled “Sounds” found on top of the small Window as shown below.
So you’ve now seen and learned the easiest way in accessing the Sound Scheme settings in Windows 10, let’s go to the other available methods in launching this same settings section.
Launching Sound Settings from the Control Panel
Now, let’s go to the traditional method of going into the Sound settings section on your Windows 10 machine. Yes! It is still possible to access settings in Windows 10 from one of the mainstay features that we sure have got acquainted with some time in the past Windows operating system versions which is known as the “Control Panel”.
Launching this traditional in Windows 10 is not like launching it in older Windows OS versions such as Windows Vista or Windows 7. The reason for this is because Microsoft wants users to be more adept with the new interface introduced starting in Windows 8 which is called the Metro environment.
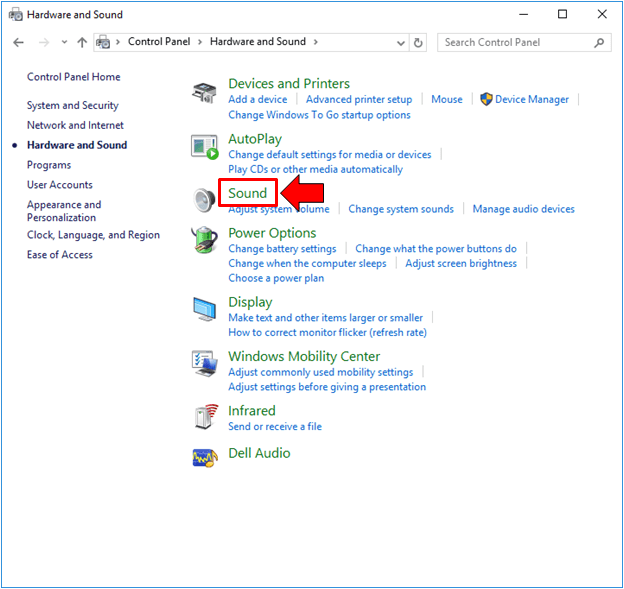
In order to open the Control Panel Window on your Windows 10 machine, you will first need to launch a hidden menu which is also known as the WinX menu or simply the Admin menu. To launch it, you will simply need to press the Windows + X keys then this menu will instantly appear on the bottom-left portion of your computer screen.
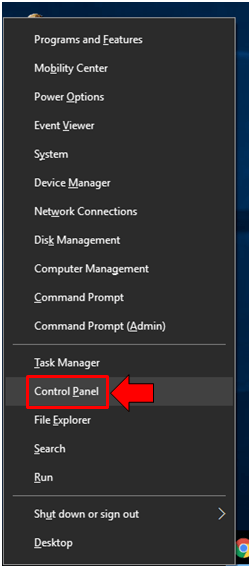
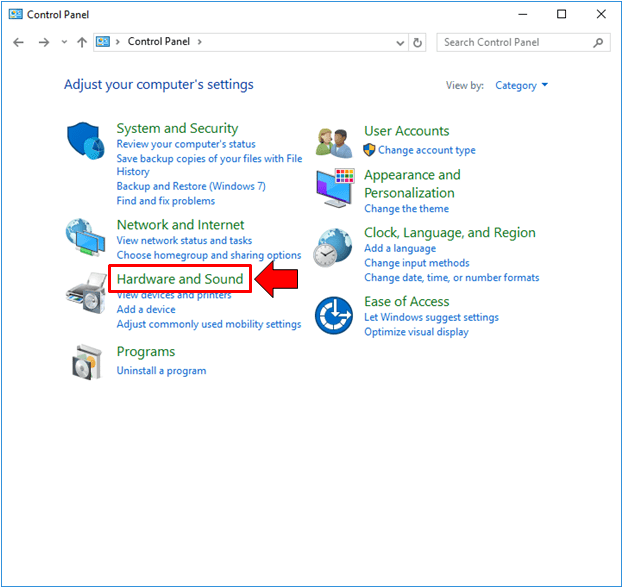
From the WinX menu, you should be able to see different shortcut link that lead to different system locations and tools. From here, just look for the link that says “Control Panel” and you should be able to launch the Control Panel Window in an instant which will automatically take you to its Home screen section. From here, you will need to click on the category that says “Hardware and Sound” as shown on the screenshot below.
On the Control Panel Window that follows, you will need to click on the subcategory that says “Sound” in order to go to the small Window that we’ve shown above which is labeled “Sound”. From here, you will simply need to click on the tab that is found on top which says “Sounds” and the section where the Sound Schemes are found will instantly open.
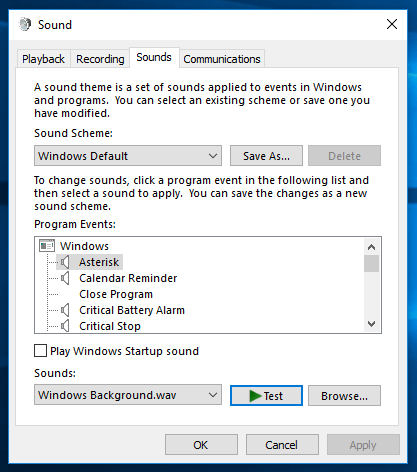
The small Window with the “Sounds” tab opened looks like the screenshot shown below and this is where most of the tweaks that we’re going to show in this tutorial will actually be happening.
Accessing Sound Settings from the Universal Settings App
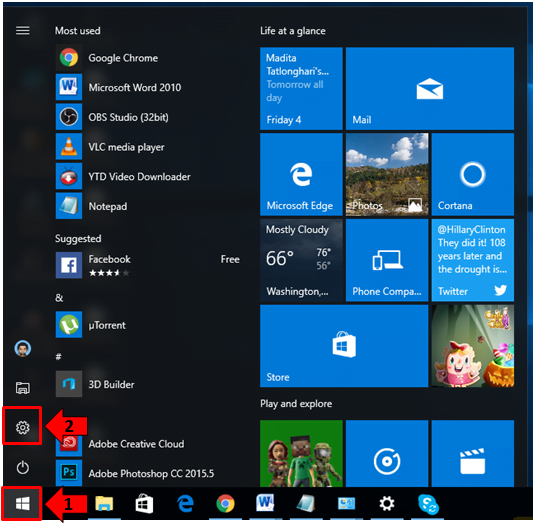
Finally, we will come to the third method in launching the settings for the sounds that are automatically played by your computer during certain events. In order to access these settings from one of the newer features introduced in the modern versions of the Windows operating system which is known as the universal Settings app, you will first need to launch the app itself by pressing the Windows + I keys (if you want the quickest method in launching it) or you can also open the Start Menu first by pressing the Windows key or clicking on the Start Button then once the Start Menu launches, just click on the Settings icon that is found on the narrow bar at the left as you can see being highlighted on the screenshot below.
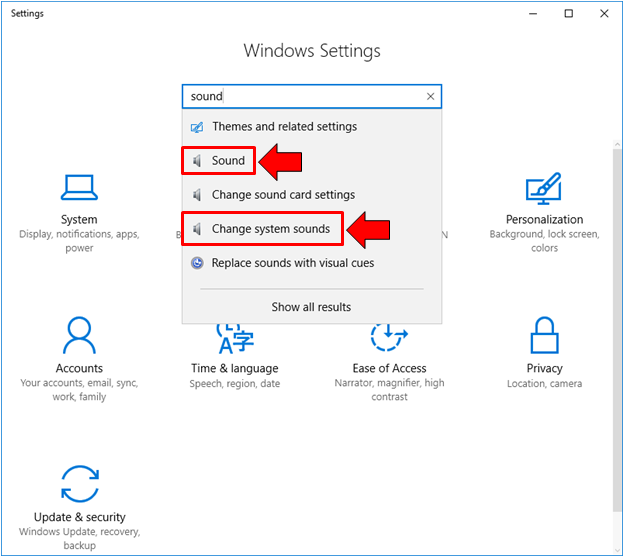
The universal Settings app Window will then open and from here, you will simply need to enter the word “sound” into the search input box that is found on the top-center portion of the Window as shown below and after you do so, a set of search result suggestions will appear just below the box. On this list, you will need to click on the item that says “Sound” in order to launch the small Window that we’ve accessed earlier in the two previous methods which is labeled “Sound” or you can also go directly to the section that contains the Sound Scheme settings by clicking on the item that says “Change system sounds” as shown below.
So those are the three easiest and most obvious methods in launching the Sound settings section in your Windows 10 machine. Now that you are acquainted with them, let’s get to the real thing- tweaking the sound scheme in your Windows computer.
Testing Specific Event Sounds
Now that you are on the Sounds Scheme settings section. You’ll need to get yourself aware of the tweaks that are available here but before making any changes, it would be a good if you first test what each event sound settings sounds like so you can quickly identify which ones you’d like to change. To do this, you will simply need to select the sound from inside the box which is labeled “Program Events” as you can see on the screenshot below.

In order to listen to the sound played on the specific event that you have selected, all you need to do is click on the button that is found towards the bottom-right portion of the screen which says “Test” as you can see being highlighted above. The name of the default sound that is set for the event that you have selected is found under the box which is labeled “Sounds” as shown on the screenshot below. As you can see, the sound format is “.wav” so if you want to set a custom sound for a certain event, you will need to make sure that it is in the “.wav” format.
Changing the Default Sound of a Specific Program Event
After testing the default sound of a program event that you’ve selected from the “Program Events” box and finding it quite boring or hard to recognize, you can choose to change it and you can do this simply by clicking on the box that is found under the “Sounds” section at the bottom of the same Window in order to open the drop-down options box for all available built-in system sounds in your Windows 10 computer as you can see below.
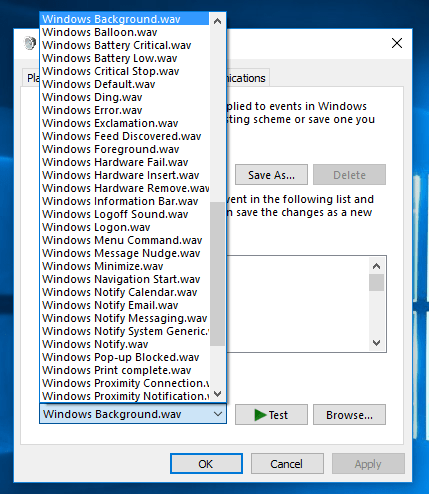
From this list, you can simply click on the new sound that you want to set for the event that you have selected and after doing so, you can listen to it by clicking on the “Test” button that is found just beside the “Sounds” selection box. If you’re already sure that you’ll be using the sound, you can simply click on the “Apply” then the “OK” buttons and the specific event that you have selected will now play the sound whenever the event itself happens.
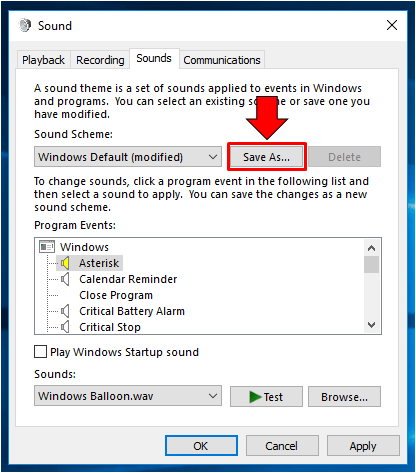
Saving a New Sound Scheme
Finally, if you want to keep the current sound scheme so you can still use it at a later time then you can create a new sound scheme by first changing some Program Event sounds especially the ones that you don’t really like. Once you are done changing them by following the steps that we have shown in the previous step, you should not click on the “Apply” then “OK” buttons right away. What you’ll need to do is click on the “Save As…” button as you can see being highlighted on the screenshot below.
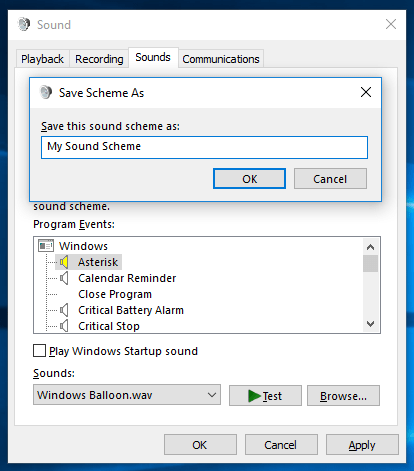
After clicking the button, you should be able to see a new input box which is labeled “Save Scheme As”. From here, you will simply need to type in the name that you want to assign to the new Sound Scheme then hit the “OK” button. The new sound scheme will then be saved and you can change some other Program Even Sounds in it if you wish to.
In case you’d like to delete a sound scheme that you might have created in the past, you can do so simply by clicking on the button that is found beside the “Save As…” button which is labeled “Delete”. Doing this will instantly erase the Sound Scheme then you can just close the “Sound” settings Window once you are done.
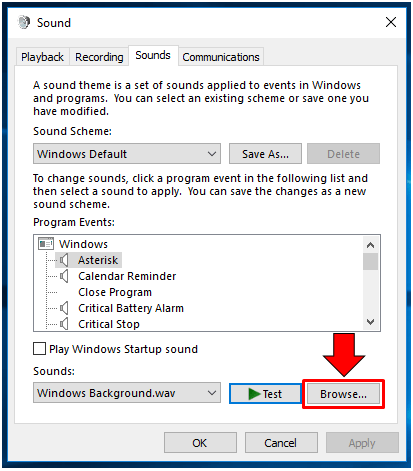
Using Other Custom Sounds for Program Events
Finally, if you want to use your own set of sounds that will play during certain program events. You can do so by clicking on the “Browse…” button that is found just beside (to the right) of the “Test” button as you can see being shown on the screenshot below. Doing this will open another Window where you can navigate towards the location o the sound that you want to use. Just make sure that you have it converted to “.wav” format so it can work smootly for the program event that you selected to customize the sound for.
Once you are done settings a custom sound for a certain Program Event. You can choose to save it as a new sound scheme or you may also just save it as an updated version of the existing one that you might have created in the past then hit the “Apply” then the “OK” buttons to make the changes final.
Make Windows Sound Like You Want it to with Custom Sound Schemes
As you can see, tweaking Windows 10’s sound schemes isn’t really a hard thing to do. It only takes a few minutes to accomplish and with the right set of sounds already saved in an easy to find location within your computer, you can easily create a new and unique sound scheme for your machine to make it sound more personalized.
The “Sound” settings Window that we’ve shown in the steps above also bears the switch for turning the Windows Startup sound on or off. You can turn this sound on by clicking inside the tickbox that is found beside (to the left) of the “Play Windows Startup sound” option located just below the “Program Events” box. Now that you know how to tweak Windows 10’s sound scheme, you can build a better and more personalized Windows machine that doesn’t only match your personality by its looks but also matches you by the way it sounds!