Checking for Outdated Device Drivers (Windows 7 and 8)
Windows computers require hardware and device drivers to make all of its components run properly. When things start behaving slow, chances are some of the components on your computer (hardware and software) are not communicating well because of malware, viruses and other causes that disrupts important processes from working in the way that they should. However, if you already tried disinfecting your machine and doing a system-wide scan with your antivirus software but the same problem persists then you can try disabling startup processes and other useless programs running in the background. After doing these things, you need to reboot your computer and see if it would still behave slow. If it does then it’s time for you to check for outdated drivers that could be causing all these error messages and overall system slowdown.
Hardware and device drivers are common on any Windows machine. These tiny software drives devices and hardware so they can work exactly as your system tells them to do. For instance, a driver for your video card translates all communication coming from other software or your operating system into commands that can be understood by the hardware so it can deliver the right results on your computer screen. If the driver is outdated, some of the advanced games won’t run properly on your screen. Hardware and device manufacturers update drivers as operating systems change to keep up with all the latest features that the new OS version has so if you upgraded to Windows 7 or Windows 8 lately then you need some serious driver updating to do.
To help you with the process, I prepared a tutorial which will run you through the process of identifying outdated drivers on your Windows 7 and Windows 8 machine and later on, I will give a series of tutorials that will give you the steps of manually updating drivers on Windows 7. You can also choose to purchase a “Driver Updater” software which will helps automate the process but if you don’t have the budget for it, you need to go through the manual way which I will cover on my next tutorial. For now, we will be focusing on identifying outdated drivers so get your Windows machine ready and follow the instructions below:
How to Identify Outdated Drivers on Windows 8
As always, the best way to check for outdated drivers on any Windows machine (if you want to do it manually) is by checking its version number, its release date and some other details then have it compared to the latest version number on the manufacture’s website. Windows does not get driver updates from manufacturer’s website so you need to do it by yourself and you’ll also be surprised at how often driver versions change. Driver updates are needed so a device or a hardware can deliver the best performance when they are installed on the latest OS versions and as I have pointed out above, you need to update your device drivers if you upgraded your operating system recently to make your machine perform faster. Here are steps that would help you identify some outdated drivers on Windows 8:
Open the Device Manager Utility
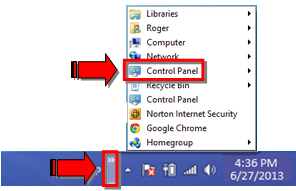
- First, you need to open the Device Manager. There are several ways of doing this on Windows 8 but I’ll show you two easy ways of opening this tool. The first method is by accessing it from the “Control Panel”. To do this, you need to be on the desktop screen then click on the (>>) symbol located on the bottom right corner of the taskbar’s notification area or system tray and on the options that would appear, click on “Control Panel”.
- Once the “Control Panel” Window opens, click on the “Device Manager” shortcut link as shown on the screenshot below.

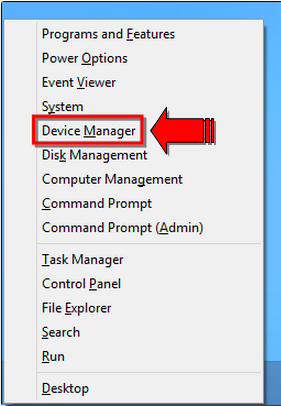
- Another way is by pressing the Windows Key + X simultaneously. Doing this will open an options box where you can click the “Device Manager” link to launch the tool.
- The Device Manager Utility will now open showing you a list of device and hardware categories installed on your computer. From this categories, you need to click on the (>) symbol at the left of each category to expand the list then you can start looking for the device that you want to identify drivers for. If you opened the wrong category, you just need to click again on the (>) symbol to collapse the list and proceed with opening the other categories until you find the device.

- Once you find the right device just right-click or press and hold on it and and click on “Properties” from the right-click menu that appears as shown on the screenshot above.
- The Device Properties Window will then open and from here you need to click on the “Driver” tab on top to see the driver details.

- You can now see the driver’s version number as well as its release date. If you see that the date is close to the one shown above then it means that your device drivers is already ancient and it badly needs to be updated. You can now download the latest driver from the manufacturer’s website. The name of the manufacturer can also be seen on the Driver Properties Window as shown on the screenshot above.
How to Do it on Windows 7
The process of finding out some outdated drivers on Windows 7 is basically the same as the process of doing it on Windows 8 with just minor differences on how the Windows and prompts appear. Accessing the Device Manager on Windows 7 is also a bit different. Just follow the steps below on how to access the Device Manager tool on a Windows 7 computer.
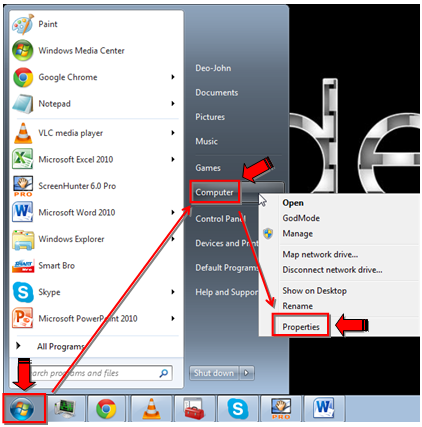
- Click on the “Start” button then right-click on the “Computer” link from the Start Menu and on the right-click options that will appear, click on “Properties”.
- Next, on the System Properties Window, you need to click on the “Device Manager” link on the navigation pane located at the left side of the screen.

- The Device Manager Window will then open showing the list of all devices and hardware installed on your computer. Just click on the arrow (>) symbol at the left side of each device category to expand the list and do it on all categories until you find the device which you want to check the driver version for. Clicking on the arrow (>) symbol ones will expand the list and clicking on it twice will collapse the list.

- Once you find the right device, just right click on it and click on the “Properties” option from the right-click menu that appears.

- The Device Properties Window will then appear and from here, you need to click on the “Driver” tab on top to open the driver details.

- The Window will show you all the details that you need to identify if a driver is outdated or not. Once you learn the driver details, you now need to take note of the details and compare it with the driver version details on the manufacturer’s website.
Updating the driver can be done using the Update Driver Software Wizard from within the Windows Device Manager Utility and that’s what I’ll show you on the next tutorial for this series. If you have questions regarding any of the steps shown above please feel free to share them as comments for this tutorial.