Windows 8.1 Network Connection Basics
The beginning of the twenty-first century has really been marked by a number of technological breakthroughs and advancements that permanently changed how we live our lives in the modern digital age. From social media down to online games and other services like banking on e-commerce, it is really quite hard to resist all of these comforts and entertainment that the Internet and the machines that enable us to access it called computers, tablets and smartphones provide.
Computers and the Internet are two, somewhat inseparable things in our modern world. It is impossible to enjoy owning a computer if it can’t connect to the Internet and in the same way, the Internet would be useless without computers and other devices that can connect to it. This trend is going to continue even towards the future as software giants like Microsoft envision even more innovations for operating systems like Windows to really be found in every device that’s in the market.
All of these undeniable facts makes it an urgent need for each Windows user to learn some basic knowledge about networking and setting up Internet connections in their Windows 8.1 computer. Connecting to a wireless network is quite easy if you’re doing it for the first time but when the password or security key has been changed by its administrator, you might suddenly notice that your machine would show that it is not connected to the network or limited access.
Different problems can also come to the surface which would need urgent attention in order to restore your Internet connection so in this tutorial, we will be teaching you how to troubleshoot your Internet connection, view network properties and do some other tweaks in this very important aspect in your Windows 8.1 machine.
Viewing All Available Wireless Networks
One of the basic things that you need to learn to do is viewing the networks that are available so you can choose the one that you can connect to. To start, you will need to put your attention on the network status icon that is located in the system tray of your computer’s taskbar as highlighted on the screenshot below. You will know that there are available networks because this icon will have an asterisk symbol on its top portion while if your computer does not detect any wireless network, there will be a red “X” overlay on the icon.

Now, if you see that your computer is detecting some wireless network/s which are available, all you need to do is click on the network status icon and a metro screen that shows all available wireless networks will slide in from the right edge of your computer screen as shown below.
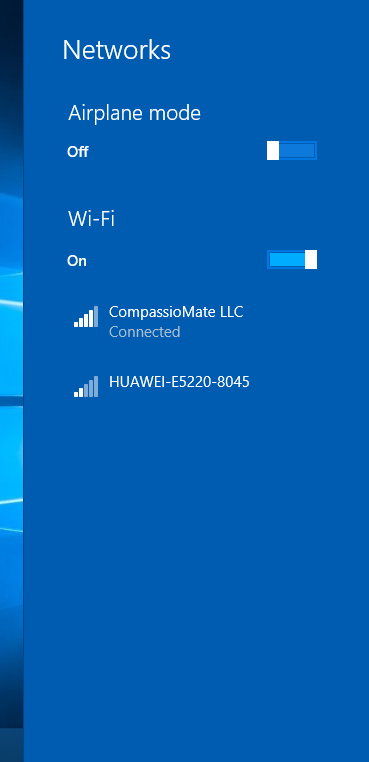
From here, all you need to do is click on the network that you want to connect to and make sure that you have the security key/password so you can connect to it successfully. You will know that a network needs a security key or is just an open network by checking for a “!” symbol on top of it. An unsecured or open wireless network should have that “!” symbol on top of it signal indicator icon.
After clicking on any secure/password protected network from the list, simply click on “Connect” and you will be prompted to enter the password.
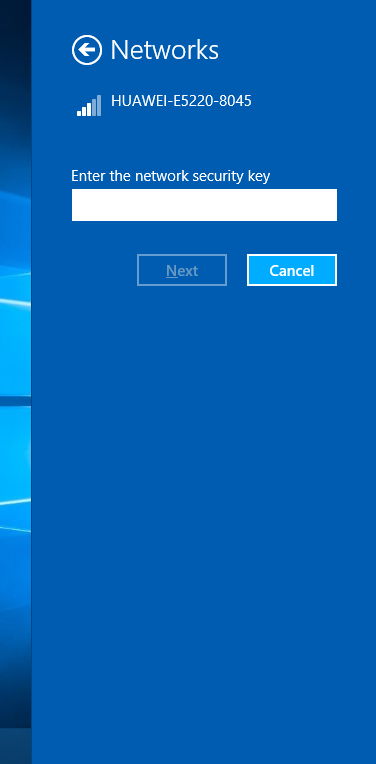
You will also see a checkbox that says “Connect automatically” which you can check if you want your computer to connect to the network automatically after you turn it on. After entering the security key/password into the designated input box, simply click the “Next” button and you will see a message that asks you if you want to find PCs and other devices as well as share files and connect to TVs on the network. This happens especially if there is a HomeGroup that is active on your network. From here, you can select “Yes” or “No”.
NOTE:
Enabling the sharing feature is only recommended on home networks and other networks which you trust like that of your friend or the one that is in your office or workplace. Windows would not recommend that you set this feature active on public networks because it will put your files and other data open to other unknown and anonymous users who are connected to the same network.
How to Troubleshoot Connection Problems
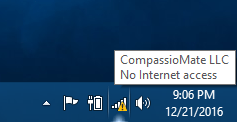
There are times that your internet connection through the network that you have selected may be interrupted because of some certain reasons. You will know that there is no Internet connection connection coming from the network if you see a yellow “!” overlay on the network connection status icon located on the system tray and when you put the mouse pointer on the icon itself, you will see a white box that bears the name of the network and a message that says “No Internet access” as shown on the screenshot below.
Now, when this happens, you will need to check on the connection of the LAN cable towards the WiFi router that you are using. Check on any loose connections that may be present between the devices that you have in your network or you can also unplug its power adapter and leave it off for around 10-15 seconds then plug it back it to see if the problem still persists. After checking on the wires and attempting a power cycle process and the Internet connection still isn’t restored, it is the time to use the network troubleshooting wizard on your Windows 8.1 machine. To start, just right-click on the network status icon that is found on the system tray and a white options box should appear as shown below.
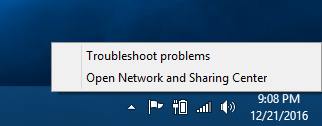
Now, from this box, all you need to do is click on the option that says “Troubleshoot problems” and a wait for a few seconds for the “Windows Network Diagnostics” wizard to initialize. This tool will then look for the problems and attempt to solve it be restoring the settings that worked before. After the wizard is done doing its job, it will show either of these three possible results.
- Show some steps that you need to follow in order to fix the Internet connection. The wizard will display this result if it detects a problem on the router or the source of the connection.
- Ask questions on what type of connection problem you are having. This would be displayed by the wizard if it detects that there is actually an Internet connection and you’re just having trouble connecting to a certain website. In most cases, the problem here is on the website that you are trying to connect to and not on your network.
- In other cases, the wizard will not be able to identify and solve the problem. If this happens, you will need to reset your WiFi router or call your Internet Service Provider (ISP) to help you solve the problem.
Once your Internet connection gets fixed, you can test it by trying to open websites using your favorite browser. If you’re able to connect to open it once again then that means that the problem has already been solved and you’re all set to do your regular browsing routine again. In most cases, Windows Network Diagnostics can solve the problem but just in case things doesn’t get fixed after you try the steps that we’ve shown above, be sure to call your ISP or ask help from a more knowledgeable friend or a technician.