Configuring How the System Restore Tool Works in Windows 10
When things go wrong in your Windows 10 machine, what do you normally do? How do you solve some issues that cause your machine to misbehave? While it is true that a clean install works great in solving irreversible problems in older Windows operating system editions, things have evolved quite fast in the modern ones starting in Windows 8.
Yes! The Windows operating system that we all love now works like a mobile device. It now has a reset option which works in two ways. First, it can delete all third-party programs and apps while keeping your personal files or you can also do a complete factory reset which will wipe out everything!
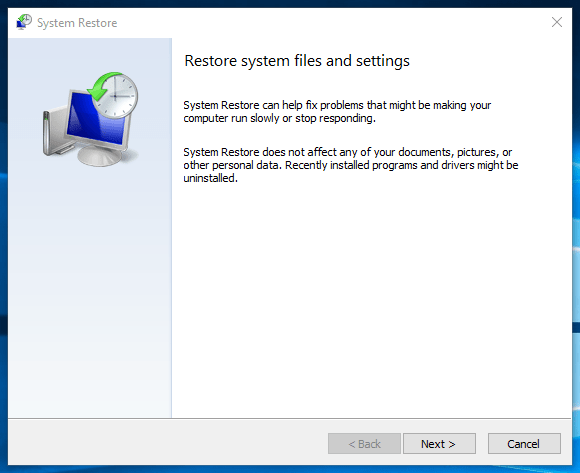
However, most of these solutions starting from the clean install down to the factory reset has their owns set of disadvantages which can make you suffer in most cases! This is the reason why Microsoft created a tool that will help you restore your computer to a previous perfectly working state. The tool is called System Restore and we’ve talked about it in our previous tutorials.
If you want to learn how you can use it to repair your computer even if you can’t login to it anymore then you need to read and follow the steps that are shown in this tutorial. You can also follow the guide that we’ve shown in this most recent tutorial if you are trying to repair your Windows 10 machine using System Restore.
We’ve covered this built-in Windows tool in a handful of tutorials but we haven’t really get to the details in how you can configure it to work automatically so in this tutorial, we’re going to show you the steps in how you can tweak how the System Restore works in Microsoft’s latest operating system version we all know as Windows 10. So without further ado, let’s start by learning how you can launch the tool in your computer.
Different Ways in Launching System Restore
What we like most about Windows 10 and all of the other previous versions of the operating system that has been released before is that it offers different ways in launching some tools and system locations that are found in it. This same rule applies to the System Restore tool and in case you missed our previous tutorial that shows how it can be launched, we’re going to show you the easiest methods here.
First, you can launch the System Restore tool easily using the Search feature in your Windows 10 machine. To launch this tool, all you need to do is press the Windows + S keys and it should slide-up from the bottom-left portion of your computer screen as you can see on the screenshot below.
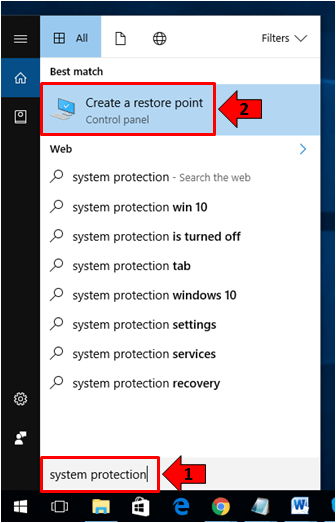
On the Search feature, you will simply need to enter the words “system protection” (excluding the quotation marks) into the search input box that is located on its bottom portion and after doing so, the search results should appear just above the box where you will need to click on the shortcut link which says “Create a restore point” as you can see being highlighted on the screenshot above.
After clicking on the shortcut link, a small Window which shows the “System Protection” section and from here, all you need to do is click on the button that is found at the right-hand section of this small Window which says “System Restore…” as shown below.
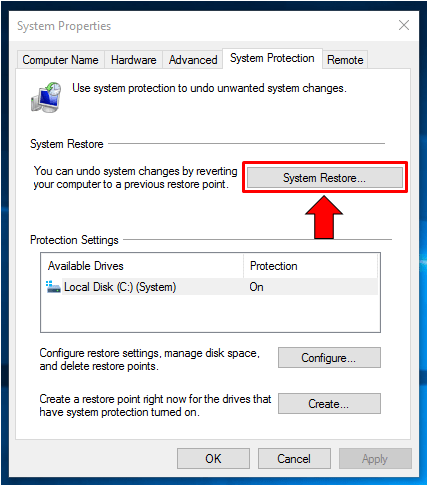
That’s exactly how you can launch the System Restore Wizard using the Search feature in your Windows 10 machine but since we are just trying to configure how System Restore works, we’ll just settle on the System Protection section of the small System Properties Window as shown on the screenshot above.
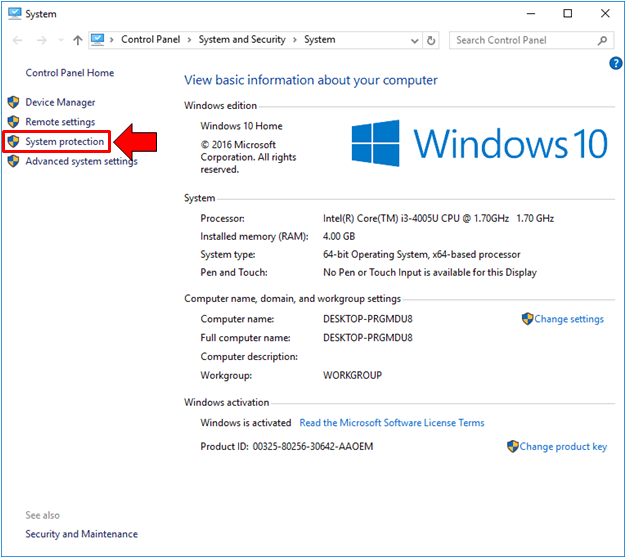
If you want another way in launching this same System Protection section so you can start tweaking the System Restore tool in your Windows 10 machine, you can do so by first launching the System Window of the Control Panel. To quickly get to this section, all you need to do is press the Windows + X keyboard shortcut combination first and after doing so, you will be able to launch the WinX menu where you will need to click on the shortcut link which says “System” as you can see below.
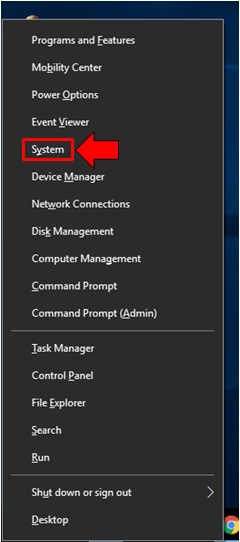
Clicking the “System” link will then launch the System section of the Control Panel and from here, all you need to do is click on the link that is found at the navigation pane on the left hand portion of the Window which says “System protection” as you can see being highlighted below.
After clicking the “System protection” link from the left-hand portion of the System Window, you should be able to launch the same small System Properties Window that we’ve shown above and it should display the contents of the “System Protection” tab where the tweaks for the System Restore tool are found. These are the two quick methods in launching the section where you can find the available tweaks for this tool and now that you are familiar with them, let’s get to the different settings that you can change to make System Restore work as you want it to.
How to Turn System Restore On or Off
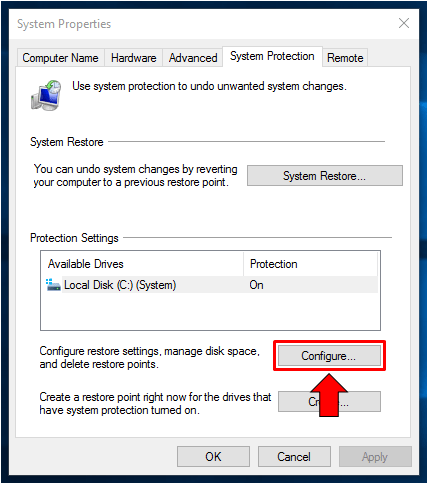
System Restore is embedded within the System Protection feature and if you want your Windows 10 machine to save Restore Points by itself, you will first need to turn on the “System Protection” feature on. In order to do this, all you need to do is click on the “Configure…” button that is found at the bottom-right portion of the “System Protection” tab found on the top portion of the small “System Properties” Window which we have accessed earlier as you can see being highlighted on the screenshot below.
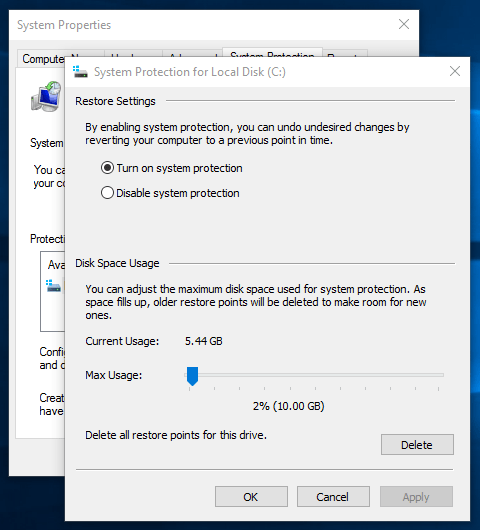
After this button is clicked, you should then be able to open the Window that is labeled “System Protection for Local Disk (C:)” as you can see on the screenshot below. The drive letter that you would see on the label of this Window depends on what has been assigned on the hard drive partition on which you’d like to turn on system protection for. If you haven’t changed drive letters then your hard drive letter should be (C:) since it is the default one for the hard drive partition where Windows is installed.
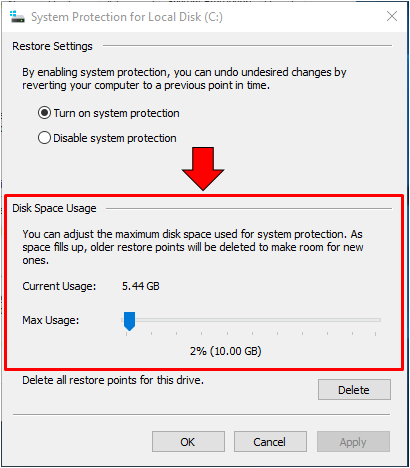
Since we are trying to turn System Protection on or off, all you need to do is to pay attention on the options that are found under the “Restore Settings” section. If you want to turn on the creation of restore points so you can use System Restore at a later time, all you need to do is select the option that says “Turn on system protection” as you can see being highlighted below.
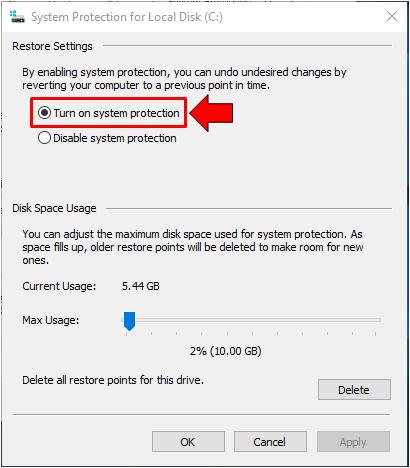
After selecting the option, all you need to do is click on the “Apply” then the “OK” buttons in order to make the changes final.
Tweaking the Hard Disk Space Used for Saving Restore Points
Now, one important fact that you need to be aware of if you want to enable system protection on your Windows 10 machine is that you can actually specify the amount of space that this feature can use when saving restore points and once this space gets consumed, old restore points will actually be deleted to give space for new once. If you want to save as many restore points as possible, you can increase the amount of disk space that the system protection tool can use. Doing this is pretty simple and you can find the section where you can adjust it under the “Disk Space Usage” section as you can see below.
To increase the amount of space that the system protection can use for storing restore points in your Windows 10 machine, all you need to do is click-and-hold on the blue knob that is found on the “Max Usage” option then drag it towards the right to increase the size until you arrive at your desired size. When your desired size is displayed on the size display that is located under this adjustment knob, just release it then click on the “Apply” and the “OK” buttons to save the changes made.
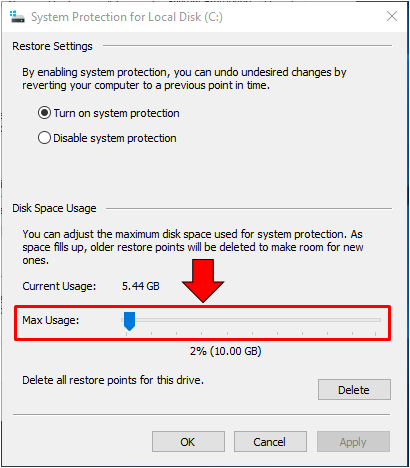
If you want to store as many restore points as possible, you need to increase the “Max Usage” value while if you want to limit it to just two or three restore points saved (which are the most recent ones) then you can decrease the value by dragging the knob to the left. That’s how you tweak the disk space allocation used by the System Protection feature for saving restore points in your Windows 10 machine.
How to Delete All Saved Restore Points
If in case you want to free up some disk space in order to give way for some other stuff to be saved on your Windows machine then you can choose to delete all saved restore points from your computer’s hard drive. Doing this trick is pretty easy and if you really want to do it, you just need to click on the button that is labeled “Delete” which is located at the bottom-right portion of the “System Protection for Local Disk (C:)” Window as you can see being highlighted on the screenshot below.
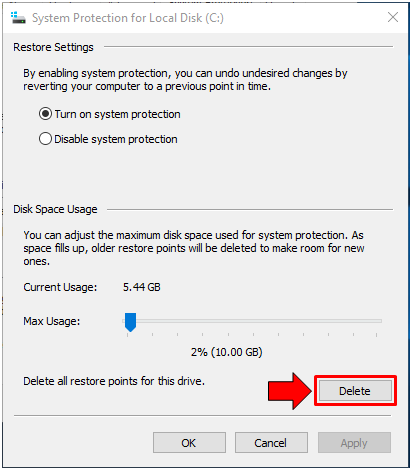
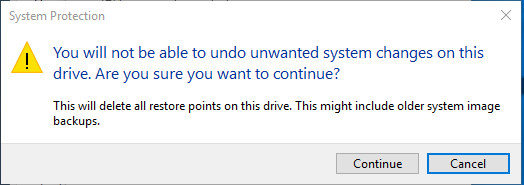
After the “Delete” button is clicked, you will be able to see a prompt that looks exactly like the one that is shown below. It basically tells you that you will not be able to undo system changes on your selected drive where the System Protection feature is turned on since you are going to delete restore points and even system images created before. If you are sure to delete then, just click on the button that says “Continue” and you will be able to clean all restore points and system images after the process is done.
How to Create a New Restore Point Manually
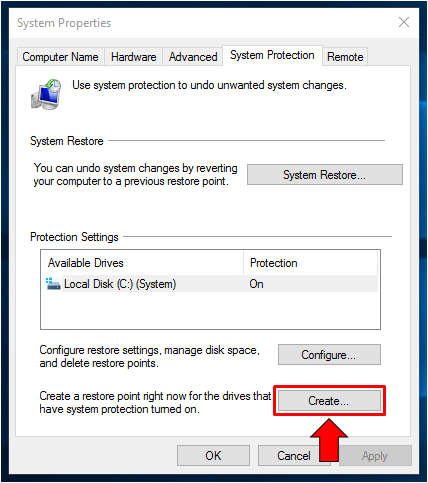
Finally, if you want to create your own Restore Point manually especially after a very important update on your machine or a software has just been installed which made your computer work even better and you want to preserve an image of this point so you can have it in case your computer gets into serious trouble, all you need to do is get back to the “System Protection” section of the “System Properties” Window once again and from here, just click on the button that is found at the bottom-right portion which says “Create…” as you can see below.
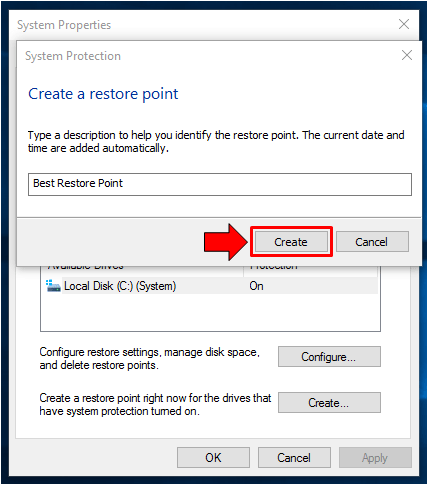
After clicking on the “Create…” button, a small Window that asks for a name that you want to assign for the Restore Point that you want to create will appear. From here, just enter your desired name into the input box that is provided and after doing so, simply click on the button that says “Create” as you can see on the screenshot below.
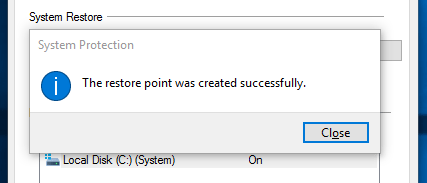
After clicking on the “Create” button, the restore point creation process will then initiate and all you need to do is to wait until it is done. Once the restore point is created successfully, you should be able to see a prompt that tells you about the success of the process as you can see below. After seeing this prompt, you can simply click on the button that says “Close” then close all the other Windows and that’s it! You’ve now been able to tweak the System Restore/System Protection feature to work exactly as you want it to!
Secure Your Windows 10 Machine with System Restore
In our time where viruses and other threats are found in almost every corner of the web and others even lurk within storage devices and other peripheral devices, it is always a good thing to have something that can protect our Windows 10 computer from getting the worst damage of all which is losing everything that has been saved in it.
System Restore is one of those features that are included in every Windows 10 machine which you definitely need to use in order to safeguard your computer from the harmful effects of viruses and malware that can attack anytime. Be sure to take advantage of this life-saving tool and you’re sure to get your device to a working state no matter what kind of problem you might face in the future.
Have you tried using System Restore before? How did it save you from sure trouble? Let us know your experiences by sharing them on the comments section below.