Creating a Hard Drive Partition in Windows 10
Securing your files is always of utmost importance especially in today’s modern world of evolving threats coming from different sources all over the Internet. Through the years, companies and hardware developers have created ways in helping users secure data and keep them safe. We see mobile storage devices like flashdrives, portable hard drives and many other hardware devices that are designed to store data. In the software side, there are also tools that help encrypt data or even services that provide free storage for important files so that the user can simply log in to his/her online account and get access to their stored files in an instant. However, all of these require time and if you are a person who doesn’t have much time to wait just to copy files from a portable storage device to your computer or logging in to a cloud storage account just to get some stuff downloaded then creating a hard drive partition where you can store and secure your important files would be one of the best alternatives!
Hard Drives Can Be Divided!
If you’ve been using computers for a long time now then the idea of creating partitions or dividing your hard drive into different sections so that there is one that has your operating system installed on and another one where your important files are stored isn’t new for sure. 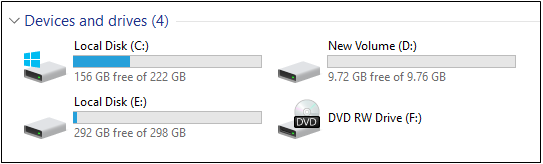 This method has been available even in Windows XP and has since been carried over to the Windows editions that followed like Vista, Windows 7 and even towards Windows 8, Windows 8.1 and now in the latest Windows operating system edition available called Windows 10. But how much of the process has changed and what are the methods involved in doing this on Windows 10? That’s exactly what we’re going to find out in this tutorial so if you’ve been thinking to purchase a portable storage device just to get your important files stored somewhere else then you need to learn how to partition your drive so you can have yourself spared from shelling off some money which could be used for something more important.
Weighing the Advantages and Disadvantages
We know that there would be others who will feel skeptical about creating partition and storing important files in it so in order to really make a wise decision between purchasing a portable storage device or storing files in a cloud as opposed to just storing them in a separate partition on your computer’s hard drive, we’ve listed down some advantages and disadvantages here and it’s up to you to weigh and identify which one is the perfect fit for your need.
Portable Storage Devices
Devices that can store your important files can come in different storage memory sizes. If you have just a few files to store then you can get a USB flashdrive but for larger files, you will need something that can handle more like portable hard drives which can range from 60GB to 2TB in memory capacity. Below are the advantages and disadvantages of using portable storage devices for keeping your files. 
ADVANTAGES
- It allows users to choose the memory storage capacity that they need
- It can be carried anywhere separate from the physical laptop
- Stores more files (depending on the memory storage capacity)
- Can be encrypted (to make files more secure)
- Can be connected to other computers and devices through USB interface
DISADVANTAGES
- Can be easily lost somewhere (because of its portable nature)
- Files can be accessed by others if not encrypted
- Prone to physical damage since it is separate from laptop/computer
- Takes time to connect to computer or can’t even be connected in the absence of USB cable
Cloud Storage
Microsoft has “OneDrive”, Google has “Google Drive” and other companies have “Dropbox”, “Stack”, “Box” and many others. Cloud Storage has become a trend in the age of mobile devices that has limited storage capacity. Services like this offer gigabytes of free storage for users but the amount of celebrities and ordinary users experiencing privacy breaches like their account being hacked is not lacking. Just imagine entrusting all your private stuff to a company.  It’s good if they focus only on a selected few but imagine having millions of users storing billions of content in the cloud? It surely is a hard task guarding all of them thus the breaches as well as other security and privacy issues that we see. But just like the other types of storage, this too has some advantages and they are as follows:
ADVANTAGES
- Not easily lost
- Files are safe from physical damage
- Files can be accessed from different devices simply by logging in to cloud storage account.
- Expandable storage
DISADVANTAGES
- Good until company changes something in the user agreement
- Prone to being hacked
- Charges money for additional storage
- Can be annoying because of the messages and prompts that keeps popping-up on computer or smartphone screen.
Hard Drive Partition
Now, let’s talk about the real meat of this tutorial which is a hard drive partition. While it is true that hard drives can be divided so that you have some space for important files which is separate from the partition where your operating system is installed, the decision to create one would still depend on the remaining free space on your hard drive.  Typically, if there is less than 20GB free space then you shouldn’t create any other partition since this is close to critical available storage space. The advantages and disadvantages of using a hard drive partition is as follows:
ADVANTAGES
- Does not require USB cables or account username and password since it is built within your computer
- It stays with you as long as you have your computer
- Saving files into it is quick and easy
- Space can be expanded anytime depending on the available space of your hard drive
DISADVANTAGES
- Space that can be used is largely dependent on the space available in your computer’s hard drive
- Could also be affected by virus and other forms of malware since it is part of the hard drive
- If you lose your computer, you will also lose your files
- Damage on hard drive will also cause damage on the files stored in it.
How to Create a Hard Drive Partition
Now that your know some advantages and disadvantages of the common types of file and data storage methods that are easily available to end users, let’s now learn how to create the third type as we have discussed above. How to create a partition on your Windows computer. Since this is just a demonstration, we will try to create a partition with 10GB of storage space in a Windows 10 computer so if you want to have a safer location where you can store your files then just follow the steps below.
Open the Disk Management Tool
First thing that you need to do is to open the Disk Management Tool which is found in the Control Panel. To open Control Panel, simply press the “Windows + X” keys or right-click on the Start Button in order to access the “WinX menu” which looks exactly like the one shown on the screenshot below.  Once this menu appears, all you need to do is click on the link that says “Control Panel” then simply wait until the Control Panel Window opens. From the main Control Panel Window, all you need to do is click on the “System and Security” category and under it, you will see a sub-category that says “Administrative Tools”.
  Under “Administrative Tools”, you will be able to see some links to advanced options and tweaks that will allow you to manage certain aspects of your computer. From here, just click on the link that says “Create and format disk partitions” as highlighted below.
  After clicking on this link, you will then be able to open the “Disk Management Tool” where we will now be doing most of the steps in so just keep following the steps that we’re going to show below.
Working With the Disk Management Tool
Now that you were able to open the tool which will help in creating a new disk partition in your computer, it is time to start dividing your machine’s memory so you can set aside a space for important files. To start, you will need to put your attention at the bottom section of the tool itself and look for your hard drive. From here, you will need to right-click on the main partition then hit “Shrink Volume…” from the right-click menu that will appear as you can see below.  After hitting the “Shrink Volume…” option, the disk management tool will then do its work and check how much space you can actually use for your new partition. After checking the amount of space to shrink, all you need to do is enter your desired space for the new partition inside the “Enter the amount of space to shrink in MB” portion. Take note that this is in MB so if you want to set 10GB as the memory for your new partition then you will need to type in 10000 since 1GB is equal to 1000MB.
  After placing your desired space into the designated box, you will simply need to click on the “Shrink” button which is found at the bottom-right portion of the Window itself as shown below so that the partition creation process would start.
  Just wait for a minute or two and the disk management tool will then create a new blank partition with the size you have specified. If you placed 10000 MB, it will appear as 9.77GB once created since a little part of that space is used by the system.
Create the New Partition!
Now that you already have taken a slice from your hard drive’s available storage space, the next step would involve naming it as an official partition. As you can see on the screenshot below, the space that we’ve taken earlier from the main partition is still labeled as “Free space”. In order to name it, you will simple need to right-click on it and a right-click menu will appear as you can see below.  From this right-click menu, you will need to click on the option that says “New Simple Volume…” as highlighted on the screenshot above. After you do this, the “New Simple Volume Wizard” will appear which will guide you in the creation of your new partition. From this wizard, you will need to click on the “Next >” button.
  After hitting “Next >” the step that would follow will ask you to input your desired space. The default amount of space that you can specify for the drive is already in the box so just don’t change it and hit the “Next >” button once again.
  Next, you will be asked what drive letter would you like to assign to the new partition. The default is Drive “D” and your computer’s hard drive is Drive “C”. If you don’t want to assign another letter to the new drive then just hit the “Next >” button once again and Drive “D” is what’s going to be assigned as its label.
  On the next step, just click on the “Next >” button again in order to format the new partition properly. This is needed so that the newly created drive will be ready for usage once it is created. There are of course other options but we will just stick with the defaults that the “New Simple Volume Wizard” is guiding us through.
  Finally, after going through this format step. You will now be taken to the final step in the creation of your new hard drive partition and from this Window, all you need to do is click on the button which is found at the bottom which says “Finish” as highlighted on the screenshot below.
  The newly created hard drive will then appear under the “This PC” section of the File Explorer tool. Just open File Explorer then click on “This PC” from the navigation pane at the left and you should be able to see the newly created partition on the contents pane as shown below.
  The partition will again have lesser storage space since the system has used a little part of it in formatting and getting the partition ready. In our next tutorials, we will be showing how creating and merging partitions is done easily using a third party software so be sure to stay tuned in with us to learn all the latest tips and tricks that you can do to your Windows 10 machine!