Creating a New User Account from the Desktop Screen
Aside from being able to create a new user account of any type (Microsoft account, Local account and a Child’s account) from the Metro environment, Windows 8.1 also allows users to create an account from the Desktop screen which used to be the only way in doing it on previous Windows editions such as Vista and Windows 7. Windows 8.1 might look and feel like it’s leaning more towards the mobile side and most of its features and settings are located in the Metro screen but as a Windows user, you should also get acquainted of the other world that exists in the same operating system and master doing things in the very familiar Desktop environment. In this tutorial, we will be taking you through the steps in creating an account from the Control Panel Window of your Windows 8.1 machine and see how different it is from doing the same process in the Metro screen.
Accessing the Control Panel Window
Windows 8.1 provides different ways in accessing some of its tools, features and even system settings and just like its predecessors, you can use keyboard shortcuts in order to get to different places faster than the normal method. Since we will be learning how to create different user accounts in your Windows 8.1 machine from the Control Panel, we’ll first learn how to access this very important section of the Windows operating system.
Getting to the Control Panel from a Hidden Menu
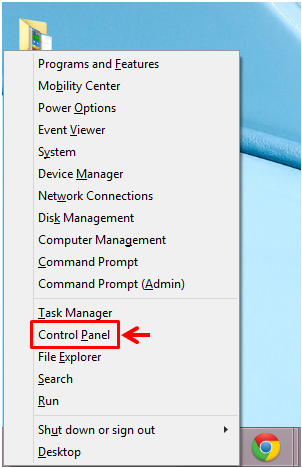
One of the fastest way in accessing the Control Panel is by taking advantage of a hidden menu that appears at the bottom-left portion of the screen. To summon this menu, all that you need to do is press on the Windows+X keys on your machine’s keyboard and the menu should appear after you do so. From here, just look for a link that says “Control Panel” and simply click on it once you find it. The Control Panel will open right after you click on the said link.
Using the Search Feature
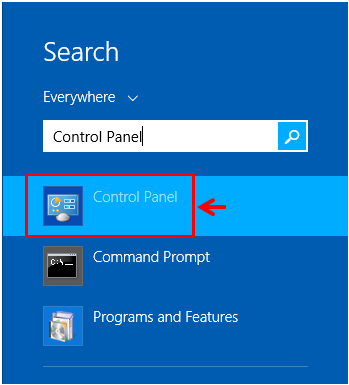
Another easy way in accessing the Control Panel Window is by using the search feature that is perfectly integrated with the Windows 8.1 operating system. To take advantage of this awesome tool, all you need to do is press on the Windows+S keys and after you do so, you will see the search screen that will appear from the right edge. From here, just enter the words “Control Panel” into the input box provided and wait until the “Control Panel” shortcut appears on the search results that will appear underneath the input box.
Getting to the Control Panel from the Apps View
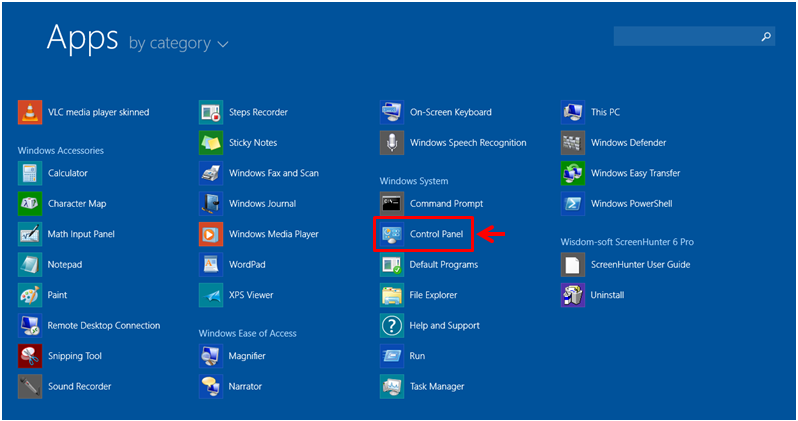
Another way in accessing the Control Panel Window is from the Apps view screen. To do this, simply access the Start Screen first and after you do so, just move the mouse pointer over the same screen until a round button containing an arrow down icon in it appears at the bottom-left corner of the screen. Once you see this button, you will need to click on it to open the Apps view screen and from here, just scroll to the right and look for the “Control Panel” shortcut which should be located under the “Windows System” category.
Now that you learned three different ways in accessing the Control Panel in your Windows 8.1 machine, it is time to go to the real meat of this tutorial which is creating a user account from this important section of the Windows operating system.
Accessing the User Accounts Section of the Control Panel
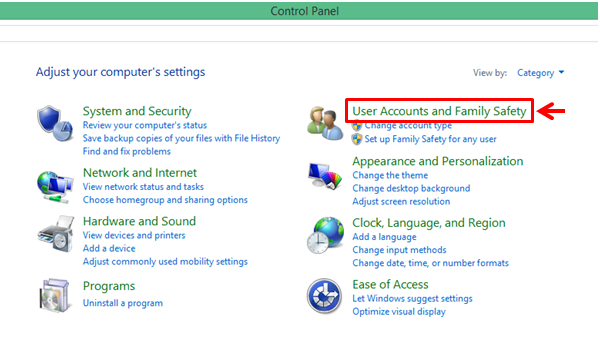
To most of us who have been using the older Windows versions, it would definitely be easier to do things within the desktop screen instead of doing it in the quite confusing Metro screen. However, the process in creating a new user in the Control Panel section still jumps to the Metro screen somewhere in the middle. Moving on, once you arrive on the main Control Panel Window, you will need to click on the “User Accounts and Family Safety” link that you’ll find at the right-hand portion so you can finally access the section where you can start adding an account to your Windows 8.1 computer.
Now, on the Window that follows, simply click on the link that says “User Accounts”. Under this link, you will find your account picture and some other information about the user account that you are currently using on your computer. To add a new account, you will need to click on the link that says “Manage another account”.

On the page that follows, you will see all of the existing accounts that are registered to your Windows 8.1 machine and links that will lead you to different sections which will allow you to manage the accounts in your computer. From these links, simply click on the one that says “Add a new user in PC settings”.

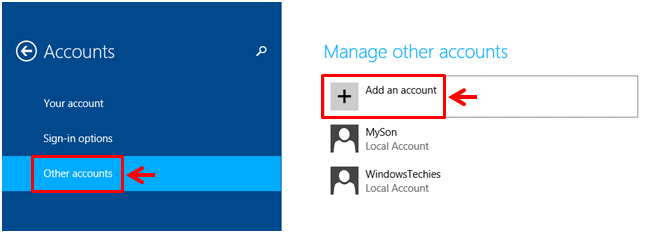
After clicking on the link, the “Accounts” section of then PC settings metro screen will open and from here, you will need to click on the link from the left hand portion that says “Other account”. When its contents appears on the main page, simply click the button that says “Add an account”.
Now, you will see another screen asking you to enter an email. You will need to enter the Microsoft email of the person that you’re trying to make a Microsoft account for and in case he/she does not have one yet, all you need to do is click on the link that says “Sign up for a new email address” which is located just below the email input box.
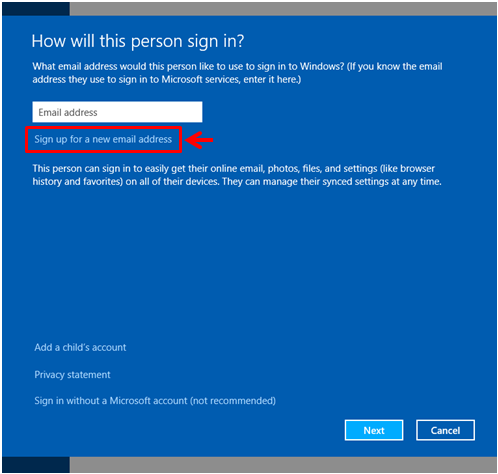
If you entered an email address into the input box provided, just click on the “Next” button at the bottom-right portion of the screen to continue on with the account creation process and follow all the steps that would come next. On the other hand, if you clicked on the link that says “Sign up for a new email address”, you will be taken to a different screen where you will need to enter some relevant information about the person who’s going to own it. If the person is around, just let him/her fill out all the needed information and follow all the steps that comes after to complete the creation of a new Microsoft email which will be used to create a new Microsoft account.
Creating a Child’s Account
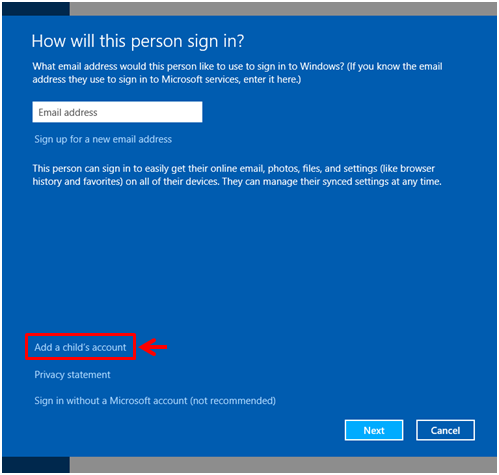
In this same screen, you can also initiate the creation of a new account for your child which will allow you to create some website access restrictions, set time limits and even monitor your child’s PC usage. To do this, just click on the link found towards the bottom of the screen that says “Add a child’s account” and in case you really want to learn all the details in setting up restrictions and other controls for this type of account, you will need to watch out for our tutorial that follows this one to find out all the needed steps in greater detail.
Creating a Local Account
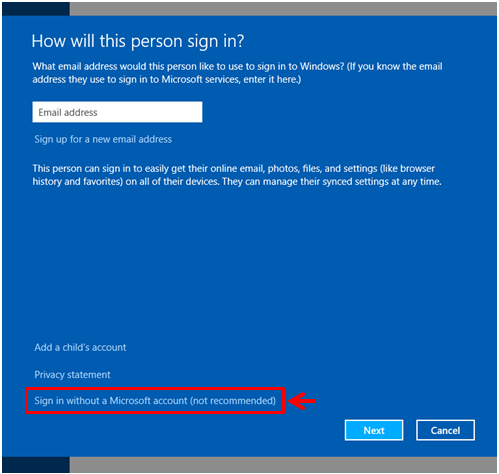
Finally, if you want to create a Local account in your Windows 8.1 machine, all you need to do is click on the link that also located towards the bottom of the screen which says “Sign in without a Microsoft account (not recommended)”. A local account only gives local access to files and all the other stuff that are saved in your computer just like the traditional user accounts that we’ve all got accustomed with in previous Windows versions.
After you click on the link, you will then be taken to a screen which tells you the differences between a Local account and a Microsoft account. From here, all you need to do is click on the “Local account” button found at the bottom portion and in the next screen, simply enter the Username, Password and Password hint that you want to assign to the new Local account. After doing these things, just follow all the other succeeding steps until it’s done!