A Detailed View on Jump Lists
Windows 8 is packed with all the features that you would need in managing all the stuff that are saved in your machine but no other feature will help you take full control of your files than the “Jump List”. These lists are geared towards providing easy access to your important files in just a few simple clicks and spare you from the long process of searching for specific documents and folders which you need to get access to right away. Aside from just being a great time saver, the “Jump Lists” also has even more clever uses which are taken advantage by power users making it a more powerful tool in providing accessibility to the different locations and stuff stored in your hard drive. In this tutorial, I will be showing you some ways of exploiting the “Jump List” using a free application which can be downloaded from the internet called “Jumplist Launcher” and later on, we will be learning how to create custom lists and play around with some other things to maximize the “Jump List” feature in Windows 8.
Master The Jump List
You might think that you already know everything of what Windows 8 has to offer but there are still more that you need to learn especially with the “Jump list” feature which will really help you get ahead in managing and doing some other things with all the files and other types of contents saved on your computer.
Pin Apps and Shortcuts to the Taskbar
One important thing that you really need to learn if you want to get easy access to programs, apps, settings and files is how to pin them to the taskbar. This section is what you see at the bottom of your screen which holds all the active apps and programs on your computer.
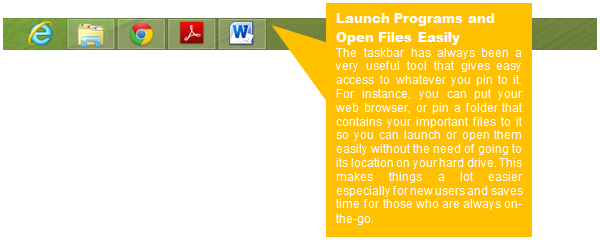
Pin Programs and Files on the Taskbar
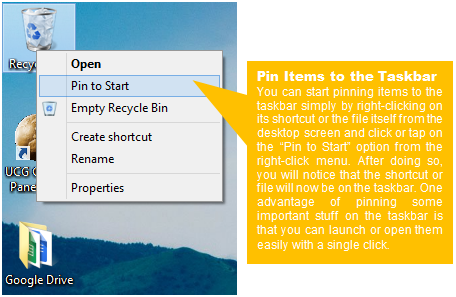
There could be a lot of shortcuts and files on your computer’s desktop screen which are very important to you but are starting to become cluttered and crowded. When this happens, you can actually pin the very important ones to the taskbar simply by right-clicking on each one of them and choosing the “Pin to Taskbar” option by clicking or tapping it from the right-click menu that appears.
The Jump Lists
There are programs and applications in Windows 8 both the built-in and the third party ones that actually has a “Jump List” functionality and accessing it is very simple.

Pin a Certain File on the Jump List
In time as you open more and more files associated with a certain application like Microsoft Word for instance, you’ll notice that all of them will be on the jump list and the older ones will automatically be taken away from the list itself to be replaced by newer ones. If you want an old item to remain on the jump list even if you open lots of files, just follow the steps below.

Get the Most Out of the Jump Lists
Aside from just being a list of items that will allow you to access files related to a program easily and quickly, the Jump List can also be tweaked so it can do even more things in different ways.
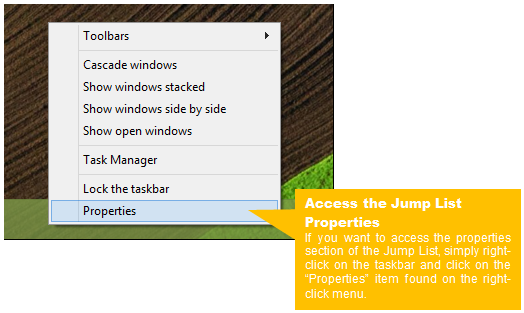
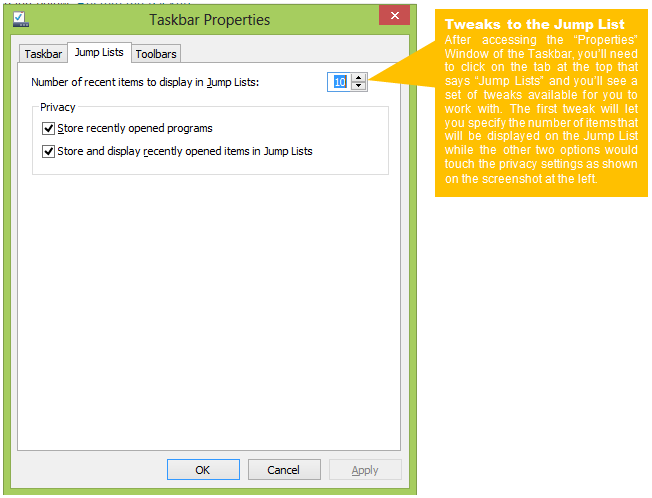
The “Jump List” properties Window will then appear after you click on the “Properties” item found on the right-click menu. From here, all you need to do is click on the “Jump List” tab on top to open all the tweaks that you can do to the items that appears on the list.
Create a Custom Jump List with Jumplist-Launcher
The Jump List feature in Windows 8 already works well for the basic easy access stuff that you would need every now and then but if you want to get more out of it then you’ll need to download a free software called “Jumplist-Launcher“. This software allows you to create a custom jump list on your Windows machine and is also available in 32 and 64-bit versions. After installing the software version that is compatible to your computer, simply launch it and start the drag and drop process for all the items that you want to pin on your custom jump list. You’ll also need to pin “Jumplist-Launcher” on the taskbar so you can easily click on it anytime you want to access the jump list that you created with it. To do this, simply right-click on the “Jumplist-Launcher” icon on the desktop then hit “Pin to Taskbar” on the right-click menu that appears.
Easy Launch Made Better!
Now that you already learned about the Jump List feature and installed a software that would improve its functionality, it is time to start using it simply by right-clicking the “Jumplist-Launcher” icon every time you open your computer. Try this improved feature or install the free software offered in this tutorial and you’ll surely enjoy working with your Windows 8 machine and have easy access to all the important stuff saved in your hard disk.