Enabling or Disabling Family Safety on Windows 8
On our modern age, it seems like everyone including our children knows how to use computers and access the Internet and this poses a great deal of threats to young minds. The Internet is no doubt a good source of information but it is also a conglomeration of other risks like viruses and other content that can potentially harm your child’s mind. No matter how hard you try in protecting our kids from any harm brought by the Internet, they would still be directed to something that is not that friendly that’s why you need to impose some rules on your machine that will help you protect your child from the harms that the Internet can cause.
Thankfully, Microsoft’s latest operating system, Windows 8 has a brand new feature called “Family Safety”. This features gives you control over the length of time that your child spends on the computer and the Internet, what hours of the day can he/she use the computer and as well as monitoring their usage and blocking websites that may contain harmful content. On this tutorial, you will learn the prerequisites of setting up “Family Safety” and as well as how to activate or deactivate it.
The Prerequisites
Before setting up “Family Safety” on your Windows 8 machine, you need to make sure that your computer and the users registered to it are all configured to do the activation. To enable the feature, you need to create a Microsoft account with the privileges of an administrator which will now serve as the “parent’s account”. Your computer surely has a user that is already enrolled to it so what you can do is to make sure that it already is an administrator account with access to Microsoft services. To check whether your account has an administrator privilege, simply follow the steps below:
- Open Control Panel by pressing the “Windows + X” keyboard shortcut combination then on the main Control Panel Window, click “User Accounts and Family Safety” and on the Window that follows, click on “User Accounts”.

- On the “User Accounts” Window, you will see your account with your photo (if you already assigned one or an icon if not) and all the other details about it. You should see the word “Administrator” on the account details. If not, you need to click on the “Change your account type” link at the left and choose “Administrator”. After doing so, click or tap on the “Change Account Type” button at the bottom.

NOTE:
If you don’t know how to set up a Microsoft account, read our tutorial on “Creating a New User Account (Windows 8)”. A Microsoft account with administrator privileges is recommended so you can take advantage of the monitoring features that the “Family Safety” feature offers.
Setting Up an Account for Your Child
Next, you need to setup your child’s account and it should be a standard account since Family Safety would not work with a fellow administrator account. If you already created a user account for your child before, make sure that it is a standard type and to be sure about this, just change the account type in Control Panel as I have shown above and choose “Standard” instead of “Administrator”.
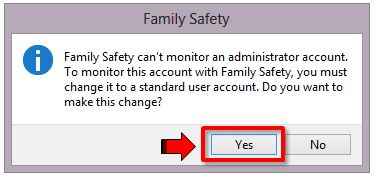
When trying to activate “Family Safety” for an existing administrator account, you’ll get a prompt that looks like the screenshot below. You can also change the account type to “Standard” just by pressing the “Yes” button on this prompt.
Now, you already have two accounts (your’s as a parent and your child’s account) which are needed so “Family Safety” would work on your computer. Next step is activating the “Family Safety” feature for your child’s account.
Activating the Family Safety Feature on a New Account
The “Family Safety” feature is not set active by default on Windows 8 which is why you would need to set it up so you can use all the security stuff that it has. To setup this feature for a new user account (which could be the account of your child or anyone else’s account that you want to monitor), simply create a new user on your computer as described in our article on “Creating a New User Account (Windows 8)“ and on the last step, be sure to check the option that says “Is this a child’s account? Turn on Family Safety to get reports on their PC use” before hitting “Finish”.
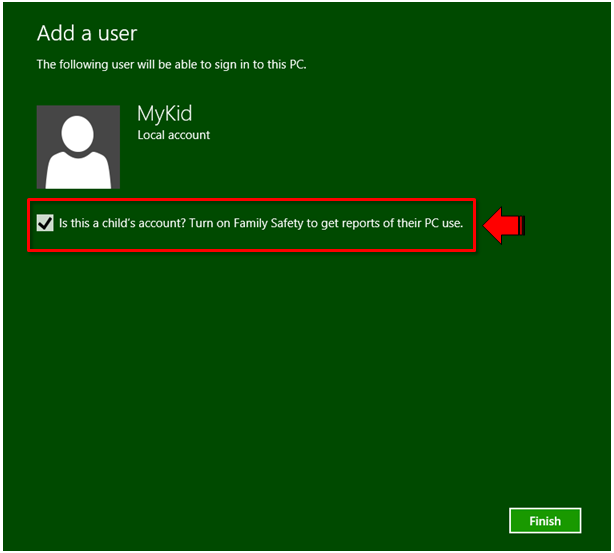
You can create either a Local account or a Microsoft account for your child but be sure that it is a “Standard” type account with the “Family Safety” feature turned on.
Activating Family Safety for an Existing Account
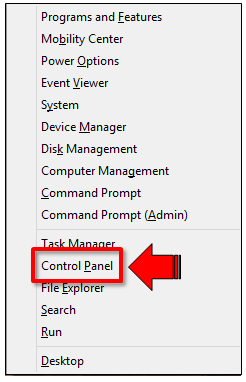
If you followed the first steps I gave at the start in creating a parent’s/your account and your child’s account then it means that there’s already an existing account that we can enable “Family Safety” for and if so, you can simply enable the feature by accessing the “Family Safety” section on the Control Panel. To get to this section, you need to open the Control Panel Window by pressing the “Windows + X” keys and a menu will appear. From this menu, click on “Control Panel”.
On the Window that follows, click on the “User Accounts and Family Safety” then on the next Window, click on “Family Safety”.

The “Family Safety” Window will then open and show all the registered users on your computer.

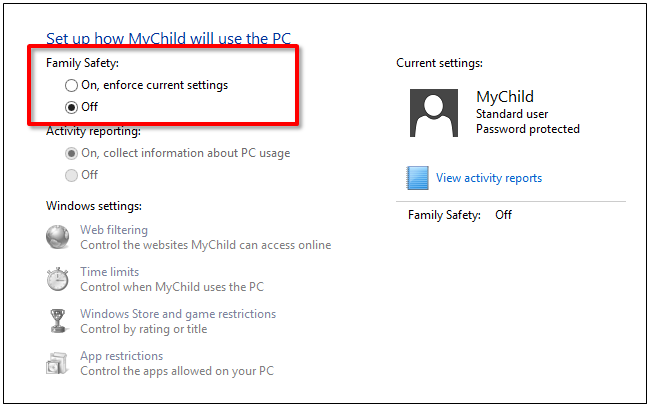
From this list, simply select the user account of your child and on the Window that follows, click “On” for the “Family Safety” and the “Activity reporting” options.
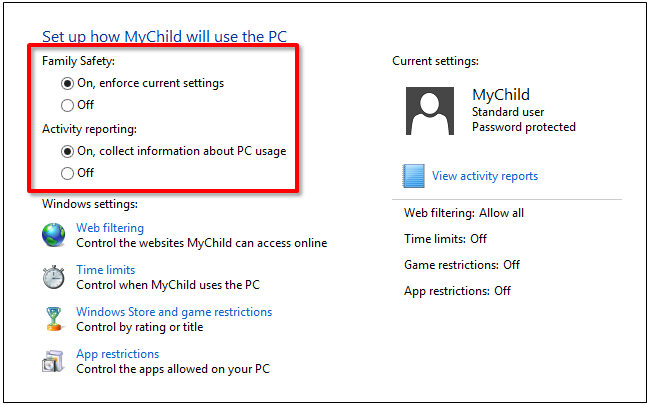
The bottom part of this Window also contains the “Windows settings” section where you can set restrictions for harmful websites, create time limits and curfews, control gaming and as well as set App restrictions. All of these options work together in setting security and safety rules for your family especially if your computer is used by your children. To learn how to set time limits and curfews for your child using the “Family Safety” feature, just read “Setting Time Limits for Your Child (Windows 8)“.
Disabling the Family Safety Feature
Turning off the “Family Safety” feature involves the same process that you’ve done in activating it. Simply access the Control Panel -> User Accounts and Family Safety -> Family Safety section and select your child’s user account. The options and settings for the account will then appear. From this Window, simply select “Off” for the “Family Safety” option and you’ll see that all the other options and settings will be grayed out. This means that they are not clickable anymore and the “Family Safety” feature is already turned off for the account. Simply click the “Back” arrow on top of the Window and all the changes will automatically be saved.
Keep You Child Safe
As you can see, Windows 8 is equipped with all the tools and features that you need in controlling your child’s PC use and Internet access. We recommend that you turn this on especially if your child is starting to grow up and become curious of many things. It always pays to be careful when it comes to the entertainment and leisure activities that our children gets involved with. Tell us your view regarding this matter. How old is too young to use the PC and access the Internet? We would like to hear from you. Please feel free to post your opinions and reactions on the comments section below