Exploring the Quick Access Section in Windows 10’s File Explorer
One of the most used feature in every Windows computer is its file management system which is called Windows Explorer back in older Windows editions such as Windows XP, Vista and Windows 7 and was later renamed to File Explorer in Windows 8, Windows 8.1 and now, in Windows 10!
But how much do you really know about this frequently used tool in your Windows machine? While it is certain that all of us use Windows/File Explorer in our Windows machine, there are only a few who really know what it really has to offer and most of the productivity features in it are often ignored.
We have already discussed in great detail about the ribbon-based options that are found on top of the File Explorer Window in Windows 8/8.1 and we’re going to explore what has been added to it in Windows 10 but before we talk about that aspect of the File Explorer tool in Microsoft’s latest OS edition, let’s first tackle about the “Quick Access” section which is designed to improve productivity and ease of access in your newly upgraded computer so if you want to take advantage of this new feature, just follow the steps that we will be showing below.
How to Access the File Explorer Tool
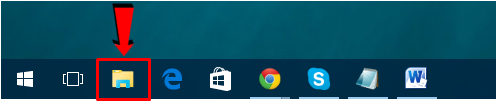
File Explorer is very easy to launch if your Windows computer has just been upgraded to Windows 10 because the File Explorer icon is pinned on the Taskbar by default as you can see on the screenshot below. To open File Explorer from the Taskbar, all you need to do is click on its icon and its Window will instantly open.
Now, if you don’t find the File Explorer icon on the Taskbar maybe because it has been removed or unpinned from it then you can try other methods in launching it and thankfully, since the Start Menu is now back in Windows 10, you can simply click on the Start Button or press the Windows key and once the Start Menu opens, just click on the File Explorer link that is located at the bottom-left portion as highlighted on the screenshot below.
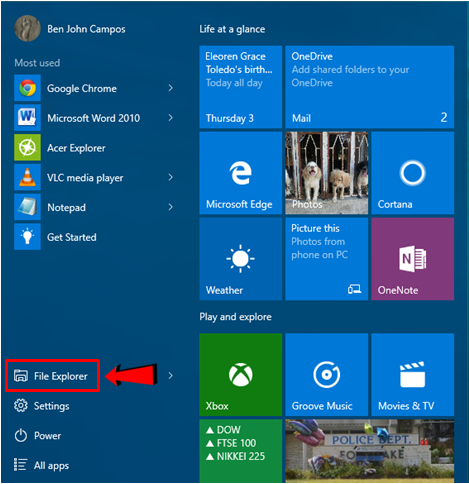
After clicking on the link, the File Explorer Window should open instantly and if you’ve been using your Windows 10 machine for quite a long time, there should already be some items listed under the “Quick access” section.
The Easiest Way to Launch File Explorer
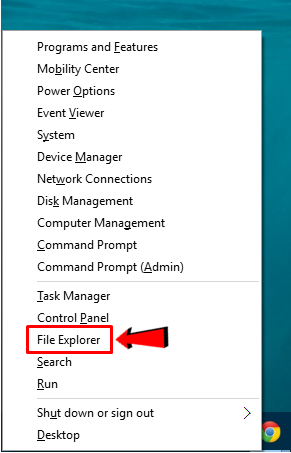
One last method in launching the File Explorer tool which is also the easiest one is done with the use of a keyboard shortcut. To do this, simply press the Windows + X keys in order to open the WinX menu also known as the “Admin menu”. This new feature will appear at the bottom-left portion of the screen and once it opens, just look for the “File Explorer” link in it as highlighted on the screenshot below then click on it in order to launch the File Explorer Window.
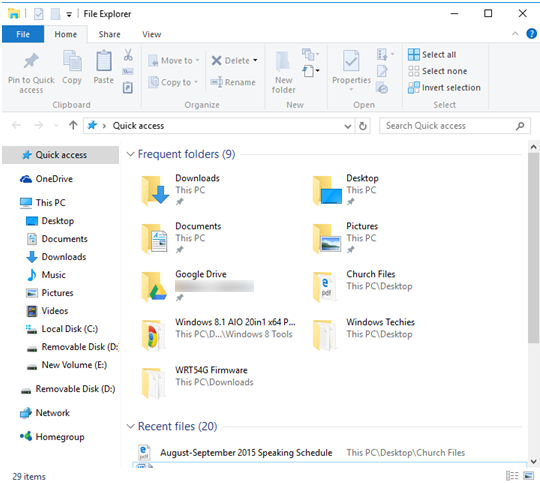
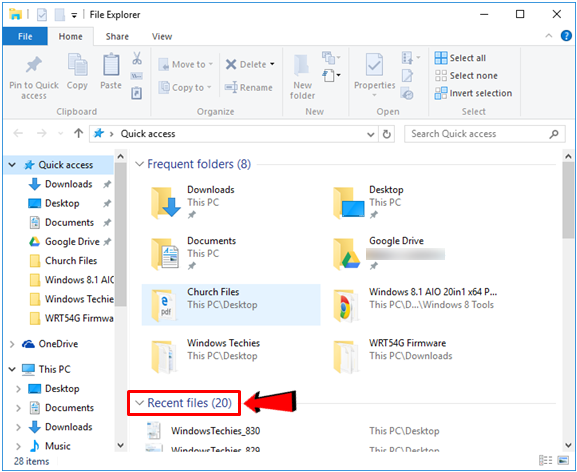
When the File Explorer Window opens, you should be able to see the Quick access section which includes a list of all your “Recent files”.
What’s New in the Quick Access Section?
The renamed and improved File Explorer tool looks similar to its predecessor, called Windows Explorer with the all-useful ribbon-based options and the “Quick access” section which is composed of the “Frequent folders” and “Recent files” list. Others comment that these features resemble the “Favorites” section in Windows Explorer but as you will see later, it is actually and improved version which can be tweaked in many ways so it can perform according to your purpose. The following are some of the new capabilities of the “Quick access” feature in your Windows 10 machine.
Tracks and Displays a List of Frequently Used Folders and Files
The very first feature of the Quick access list is that it is capable of tracking the folders and files that you often access. It is an intelligent assistant that doesn’t need to be told to record anything that you open which is a very good tool for improving productivity and providing easy access to the stuff that you need most.
Adding and Removing Stuff That are Supported
Another awesome thing about the Quick access feature of the File Explorer tool is its fully customizable list! This means that you can remove or add any folder or file to it in case you suddenly find something that doesn’t deserve to be appearing on it anymore and find another item that is worthy to be on this list.
Adding or Pinning Folders/Libraries to the Quick Access List
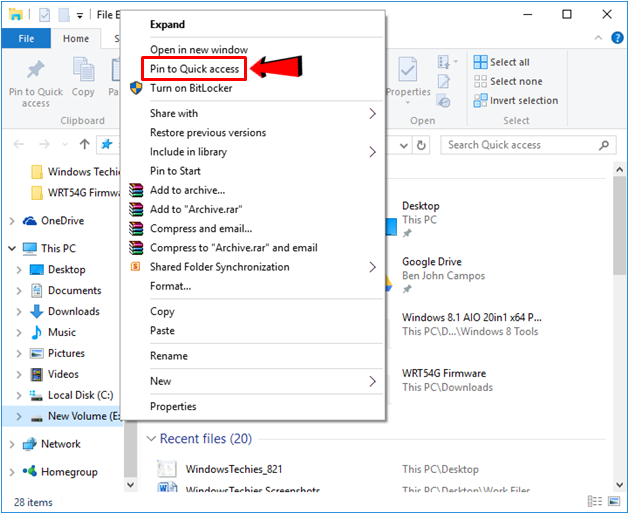
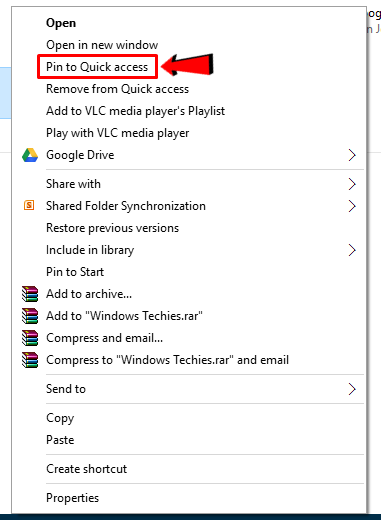
As we have been mentioning since the start of this tutorial, the “Quick access” list of the new and improved File Explorer tool in Windows 10 also supports adding, removing and even rearranging the items that are appearing in it but let’s first see how to add some items to it. First, let’s try to add libraries to this list and in order to do this, you will first need to locate the library that you want to add to the Quick access list and once you find it, just right-click on it in order to summon a contextual/right-click menu that looks like the one shown below.
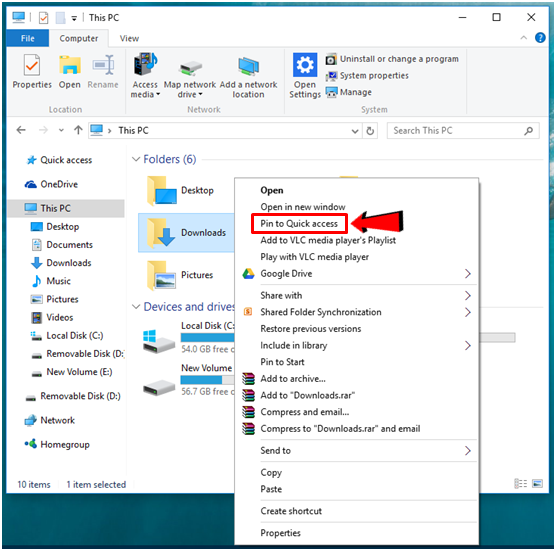
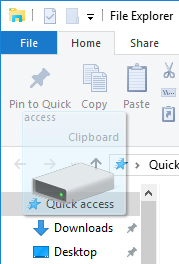
If you are using a computer that has a touch-enabled screen, you can simply tap on the library that you want to add to the Quick access list until the same right-click menu appears. Once you see the menu, all you need to do is click on the option that says “Pin to Quick access” after doing so, the item will automatically be added to the “Frequent folders” section.
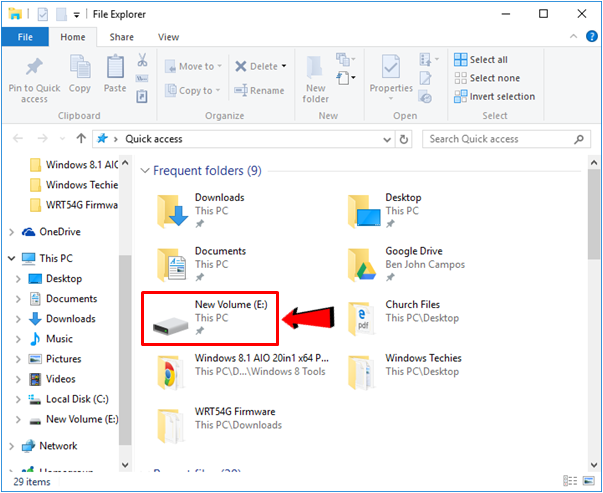
We’ve tried to add the “Downloads” library earlier and we’ve successfully done so which is why on the screenshot above, you can already see the “Downloads” library already added to the “Frequent folders” section of the “Quick access” feature.
A Faster Way
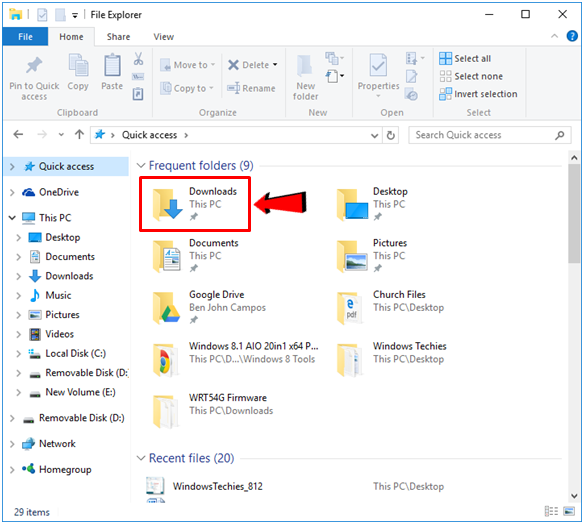
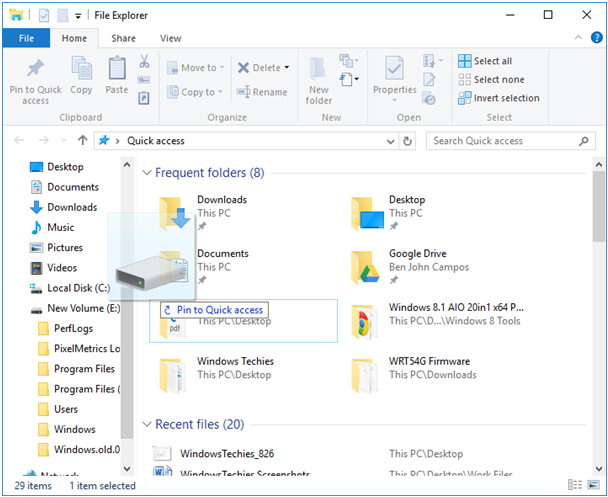
If you want a faster way in doing this, you can simply click-and-hold on a certain library that appears at the navigation pane on the left-hand portion of the File Explorer Window then drag-and-drop it to the “Frequent folders” section of the “Quick access” list that is being displayed on the right.
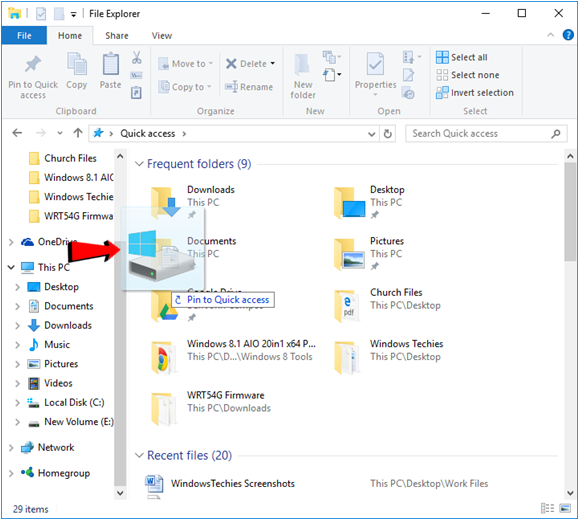
Another method in doing this is similar to the first one that we have shown above but this time, instead of dragging the library that you want to pin towards the right, you will need to drag it upwards toward the “Quick access” link which is found at the top portion of the navigation pane. Once the library/folder is there, simply drop it by releasing the left-click button and the folder/library that you have selected, dragged and dropped to it will automatically be stored in the “Frequent folders” section if the “Quick access” list. It’s really pretty simple and a lot easier than the previous steps that we have shown earlier.
After doing this, the folder/library that you have selected and dragged towards the Quick access link on top of the navigation pane at the left will automatically be added to the “Frequent folders” section of the File Explorer Window.
Adding or Pinning Drives to the Quick Access List
Aside from being able to pin folders and libraries, Windows’ new feature called the “Quick access” list also allows users to pin drives like your “C:” drive or even your removable storage drive. Doing this is also quite simple. First, you will simply need to locate the drive or right click on it from the navigation pane at the left in order to summon a right-click menu as you can see on the screenshot below.
Now, from this right-click menu that appeared after you have right-clicked on the drive that you want to pin to the Quick access section, simply click on the option that says “Pin to Quick access” as highlighted on the screenshot above. After that option is clicked, you will be able to see the drive on the Quick access list as shown below. Just do this to all of the other drive partitions or even removable media that you want to have quick access for.
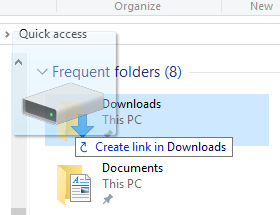
Another way in doing this same trick of adding a drive to the Quick access list is by dragging and dropping it from the navigation pane at the left towards the contents pane at the right. To do this, simply click-and-hold on the drive that you want to add to the Quick access section then drag it towards the right and once you see a prompt that has some blue letters in it saying “Pin to Quick access” as shown on the screenshot below.
NOTE:
When trying to drag a drive towards the Quick access list, be sure to watch out for the “Pin to Quick access” prompt as you can see on the screenshot above especially when there are already a number of folders that are pinned on the Quick access section. If you see a prompt that says “Create link in <Folder/Library name>” as shown on the screenshot below, don’t release the left-click button or drop the drive yet because you will end up creating something else into a specific folder, just move upwards or downwards slowly while holding the drive until the prompt turns into “Pin to Quick access” before finally releasing or dropping the drive.
An Easier Way
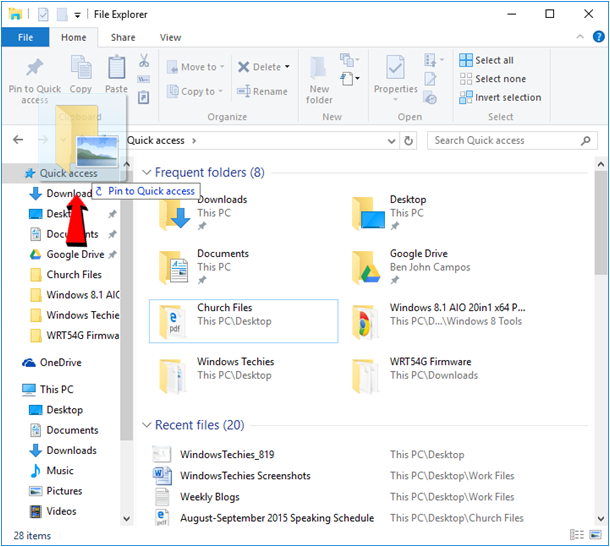
Just like pinning folders and libraries into the Quick access list of the File Explorer Window, you can also use an easier way in moving a drive towards the Quick access section by still clicking-and-hold on it but this time, you will not drag it towards the right portion of the screen but instead, you will drag it upward until you see the “Quick access” link which should be located on the top portion of all the items that are listed on the navigation pane at the left of the File Explorer Window. Once you see this link, just place the drive that you have dragged on top of it then drop it by releasing the left-click button and voila! You will now see the drive on the Quick access list!
Why Can’t Files be Pinned to the Quick Access List
If you look into the Quick access list on the File Explorer Window, you will see that there are actually two groups of stuff in it that are labeled “Frequent folders” and “Recent files” but you might be wondering why files can’t be pinned to this list if there’s a “Recent files” section as you can see on the screenshot below.
Well, the simple answer is that “Recent files” section only displays the files from the folders and libraries that already appear on the “Frequent folders” list. This means that adding or pinning a file to the Quick access section would be redundant in this case so Microsoft only included a “Recent files” list for the purpose of just displaying the files that you have just opened and not pinning them into it since this task is already offered by the items that are pinned on the “Frequent folders” list.
How to Unpin Items from the Quick Access List
After learning how to pin items into the Quick access section of the File Explorer Window and finding out why certain stuff like individual files can’t be pinned to it, let’s now learn how you can remove items from this section. If you already know how to unpin shortcuts and tiles from other locations like the Start Menu or the Taskbar then removing items from the Quick access section should be easy.
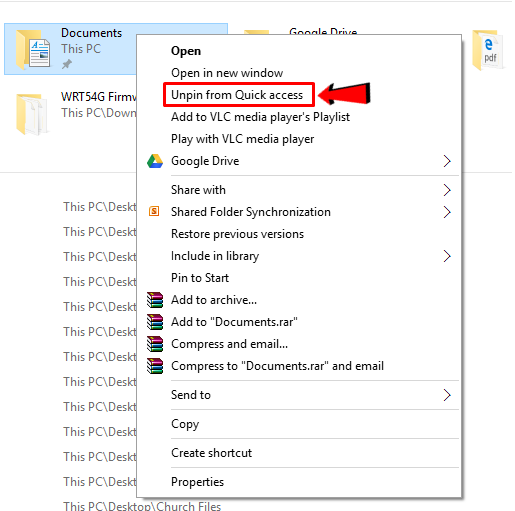
To start, you will simply need to locate the item that you would like to remove from the Quick access list and once you find it, all you need to do is right-click on it in order to open a right-click menu that looks like the one shown below.
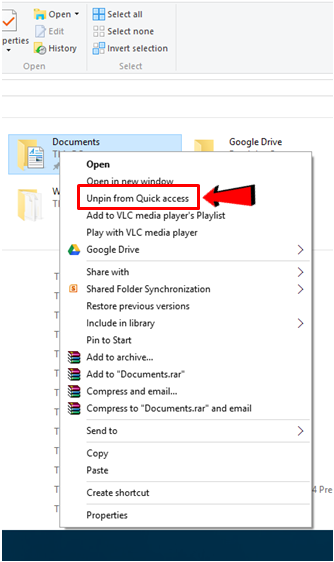
From this right-click menu, all you need to do is click on the option that says “Unpin from Quick access” and after doing so, the selected folder, library or drive will instantly disappear from where it was pinned.
Identifying Which Items Are Pinned and Which Ones Are Not
Now, while scrolling though the items that are found on the “Quick access” section of your computer’s File Explorer tool, you might notice that there are folders/libraries under the “Frequent folders” list which you have not pinned to it but are already appearing in this section.
This is because the “Frequent folders” section does not only show the folders and libraries that yo have already pinned to the Quick access list but also all of the others that you open most of the time which is why it is called “Frequent folders” and not “Pinned folders”. But how can you tell if a folder or library is already pinned or not? Well, the answer is simple! On the “Frequent folders” section, notice some items in it that has a small pin icon just below its name as highlighted on the screenshot below.
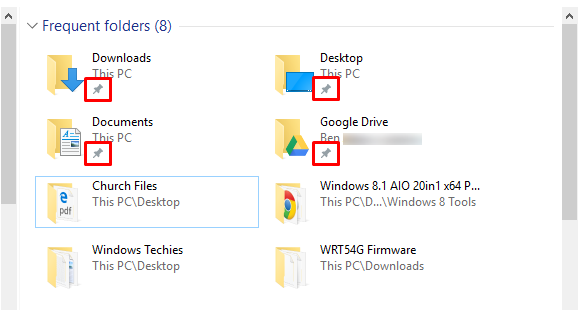
All of the folders and libraries having this small pin icon below its name are the ones that are pinned on the Quick access section of your computer. To confirm that an item is really pinned, you can also right-click on it and on the right-click menu that will appear, an option that says “Unpin from Quick access” should appear for any pinned folder or library as you can see below.
For any folder or library that is not yet pinned but is already appearing on the Frequent folders list of the Quick access section in File Explorer, you should be able to see “Pin to Quick access” on the right-click menu instead of seeing “Unpin from Quick access”.
Use Quick Access for Improved Productivity
As you can see, the new Quick access feature which works like the Favorites section in older Windows editions really has awesome tools to offer. It is capable of providing the shortcuts that you need for any stuff that is saved in your computer. Take time to use this awesome feature in your Windows machine and you’ll surely improve your productivity many times over!