Get Back in Time with Windows 8’s File History
Most of Windows 8’s new features are relatively famous but the ones that really helps users in many useful ways lack the attention that they really deserve. One of these features is Windows 8’s “File History”. It might sound like it’s just a very simple tool but if used properly and with the right knowledge, it can become a real file saver. Windows 8 periodically takes a snapshot of the files that you are working on. In case a big change caused it to be corrupted or become inaccessible, you can use “File History” to restore it to a previous working condition and just like any other tool in Windows 8, File History is powerful, works smooth and is guaranteed easy to use.
Working with the File History Tool
Windows 8’s “File History” is turned off by default so if you want to turn it on, you’ll need to access the Start Screen and start typing the word “backup”. Once the “Search” screen appears on the right. You’ll need to click the “Settings” category just below the search input box then you’ll see its contents on the left portion of your computer screen.

Now, on the “File History” Window, you’ll need to click on the button that says “Turn on” to activate the tool. Be sure that the device you are planning to use in storing copies of your files is properly attached to your machine so it can easily be detected once the “File History” Window opens.

Select Your Desired Drive
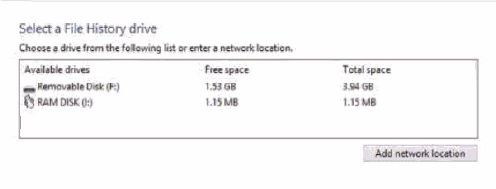
If there are multiple storage devices attached to your machine, you’ll be able to see every one of them listed on the “File History” Window. If this is the case then you need to select only one of them and be sure that you are picking the right one. “File History” can save backup copies of your files on external hard drives, USB flash drives and even NAS devices. When asked to select a “File History” drive, simply choose the one that you want to use then hit “OK”.
Save Backup Files to a Network Folder/Drive
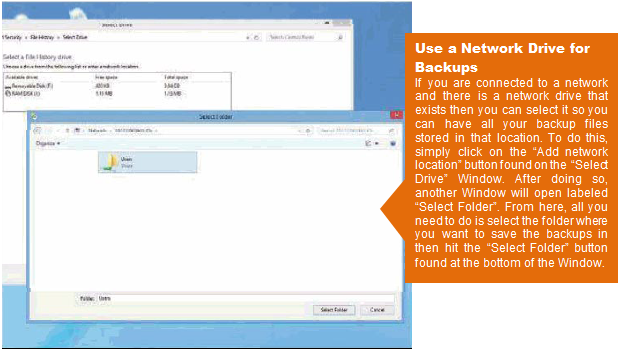
Another great thing about the “File History” tool is it allows you to save backup files on NAS devices or even on USB flash drive that is attached to your router. This gives all other users joined to your network an access to it and they can also save backups of their files on to the location you specified. It is even possible to save your backup files to a separate PC on your network. Sounds great? Well that’s not everything yet.
Exclude Other Folders
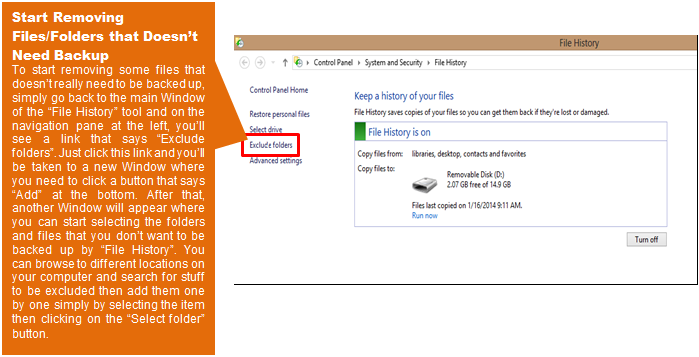
When you decide to backup your files, you need to first identify which ones really need to be included. Backing up all your files would be unwise because not all of your files really need to be backed up and doing this will tend to consume space and take more time to complete. Once you’ve identified which ones to exclude from the list of files that would be backed up, it’s time time to start removing them.
Make Tweaks on Advanced Settings
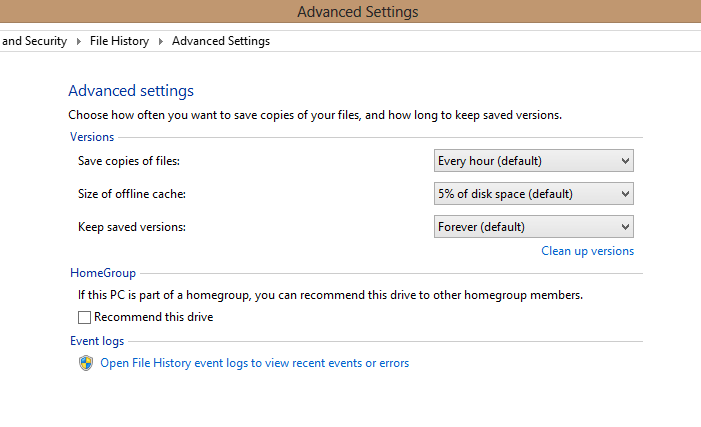
Just below the “Exclude folders” link found at the left navigation pane of “File History’s” main Window is a link that says “Advanced settings”. Clicking on it will open the advance settings where you can change how regular copies are saved, how often they are saved and how long they are kept in the drive you selected as well as additional settings which include changing the size of the offline cache which limits the disk space taken by “File History” from your disk.
Start Using the Tool
If in case something bad happens and the latest version of files that you backed up are already inaccessible, all you need to do is access the main Window of the “File History” and on the left navigation pane, simply click the link that says “Restore personal files” and a Window will then open that contains previous versions of the files you backed up. Just select the one that you want to start off with (preferably the latest one that was saved by File History) and you’ll then have it straight on your screen.
By following the steps I have shown above, you’ll be able to secure your files from permanent loss. If you want to do the same on all your Windows 8 devices, simply connect them all to a HomeGroup and share the backup drive simply by accessing the “Advanced Settings” section and ticking on the “Recommend this drive” option.