Getting a Closer Look on Windows 10’s Universal Apps and Enabling the Dark Theme Tweak
Microsoft calls Windows 10 as “the best one yet” among their line of Desktop operating systems that have been released in the past and indeed, it has some great improvements when compared to Windows 8 and Windows 8.1 but if you ask some long time Windows users, you would surely hear varied opinions and if it happened to be a power user then you’ll get a not so positive response.
But why is this so and is it true that the final Free upgrade release of Windows 10 is still buggy even after those many months that Microsoft has been developing it with the help of user opinion collected from the Windows Insider Program? Of course, we can thrown as many negative accusations as we would like to but let’s try to be objective in drawing conclusions here.
In our previous tutorial, we have shown something that seems to be a bug of some sort with how Windows 10 designates a color for title bars on Desktop program Windows which is always white all over and we also demonstrated the solution in how it can be customized into other colors just like how it was done back in Windows 8 and Windows 8.1 but again, that tweak only applied to title bars and Windows of Desktop programs and along with the changing of color for these portions of active Windows, the Taskbar and even the new Start Menu and the Action Center screen also follows the same color theme.

After doing the tweak, the title bars for modern apps also known as “Universal apps” in Windows 10 will still remain white and if you don’t like this then there must be a way to change the color for the Windows that handle these apps. The sad answer is there isn’t but you can change the color for title bars of these Universal apps from white to dark and in this tutorial, we will be demonstrating how this is done in your newly upgraded Windows 10 machine so be sure to have it fired up and get ready to follow the steps that we will be demonstrating below but before going into the details, let’s first learn what changes were made to Universal apps in the new Windows 10 operating system edition and what features actually remained.
Some Changes with Universal Apps in Windows 10
New Location for Tiles
Back in Windows 8 and Windows 8.1, the tiles that represent all modern apps which are now called Universal apps used to be the full screen feature called the Start Screen. This feature that started in Windows 8 sparked a lot of online debate among user forums on whether it is really needed or the traditional Start Menu is far better than it but eventually, the same feature with only very few modifications was carried over to Windows 8.1 and this has caused disappointment to many.
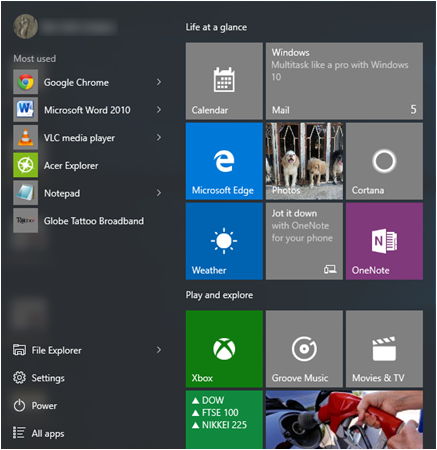
However, in Windows 10, the tiles representing all Universal apps are now in a new location and instead of being mainstays of the Start Screen which took the whole Desktop screen, they are now located on the right side of the new-and-improved Start Menu as you can see on the screenshot above.
Skype Universal App Removed for Good
If you’ve been using the Universal app version of Skype back in Windows 8 and Windows 8.1 then you might wonder why you suddenly can’t access it in Windows 10. You might also have tried downloading it from the Windows Store but what it downloads is only the desktop version of the program.
Well, the reason for this is because Microsoft already removed the universal app version of Skype from Windows 10 so you won’t really be able to download it from the Windows Store.
New Apps Introduced; Other Apps Received Updates and Improvements
Aside from the improvements that are pointed out above, there are no major changes with how universal apps are accessed or how they appear on the screen but some of them especially those that are built-in with Windows 10 like the Windows Store has been redesigned and its layout has also been changed.
Aside from that, you will also find a “Phone Companion” app and as well as a “Cortana” app that are both nowhere to be found in previous Windows editions. You will also find the new browser called “Microsoft Edge” and as well as an app called “Movies and TV” which are also new additions to this operating system edition. Windows 10 is still on its very young stage and we still don’t know what Microsoft would add to it as months and years pass but as users from around the world give feedback to make Windows better, we can only expect the best to come out from this latest Windows edition which Microsoft calls as “the best one yet”.
Universal App Features That Remained Unchanged
We’ve already seen the changes with the built-in universal apps in Windows 10 and as you can see, there are ones that have been removed while others stayed and were improved to work even better. There are also others that have been added and we will be discussing how they work in our future tutorials so this time, let us discover what features of these universal apps actually remained.
Minimize, Maximize and Close/Exit Buttons Still Existing
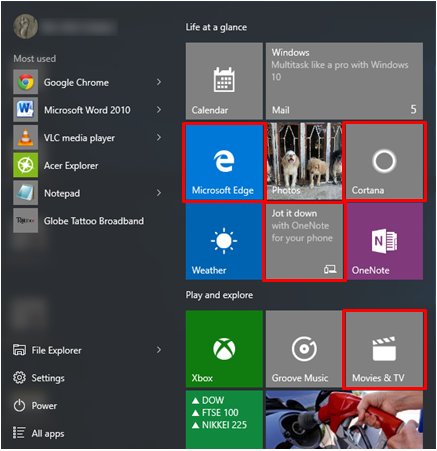
The minimize, maximize and close buttons that are located on the top-right portion of each universal apps Windows is probably one of the best improvement that Microsoft has ever done to Windows 8.1 and thankfully, this feature has also been carried over to Windows 10 as you can see being highlighted on the screenshot below which shows the new Microsoft Edge universal app Window.
Having these buttons make it a lot easier to manage universal apps that are currently active on your Desktop computer and since they already work just like all the other traditional Desktop program Window, you can easily minimize and hide them into the Taskbar and maximize them whenever you need to by clicking on their icons still from the Taskbar itself. You can also close them instantly without the need of clicking and holding on their title bars and dragging them towards the bottom because simply by clicking on the close/exit button which is located at the extreme-right portion of the universal app Window itself, you will be able to have it closed without any hassle.
Changing a Universal App’s Window Size Still Possible
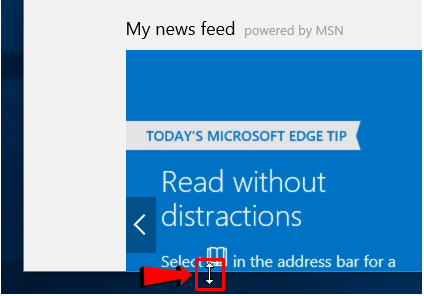
Now, if a certain universal app Window is just “Restored down” on your computer screen and you feel like its Window size is too small to have all of its contents viewed just enough, you can quickly change its size according to how you want it to appear. To do this, just point the mouse on to the edge that you want to drag in order to change the size of the Window and once the pointer transforms into a left and right pointing arrow as shown on the screenshot below, just press and hold the left-click button and drag it towards the direction where you want to move.
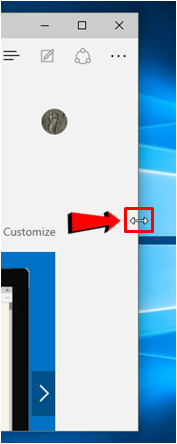
The screenshot above shows that I pointed on the left edge of a universal app’s Window but the same thing would happen to the mouse pointer if you point on the left edge of a universal app’s Window. However, if you point on the top or the bottom edge of an app Window, you should be able to see that the mouse pointer will also change in appearance but this time not into a left and right pointing arrow but into an up and down pointing one as shown on the screenshot below.
The golden rule is that whatever the directions that the indicator arrows point to are also the directions where you can drag the edge of the Window that you pointed on to make it larger or smaller according to what you desire to do with the universal app Window.
Pinning of Universal App Tiles to the Taskbar Still Possible
There’s really nothing else that feels so good than having a place where shortcuts and icons can be pinned for faster access to them no matter where you are within the Windows operating system. Now this is the case for the Taskbar! If you’ve been a Windows user for a very long time then you should already know what I am talking about.
The Taskbar stays on the screen even if you open plenty of apps and programs in your computer except of course if you’re watching a movie or video in full screen mode or when you’re browsing in the same mode. Back in Windows Vista, Windows 7 and even in Windows 8 and Windows 8.1, pinning program icons to the Taskbar was possible and thankfully in Windows 10, this is still possible and what’s great about it is that it can also be done even on universal apps and the process is very simple.
To start, just launch the Start Menu by clicking on the Start Button or pressing the Windows key and once it opens, simply look for the tile that represents the app that you want to pin to the Taskbar.
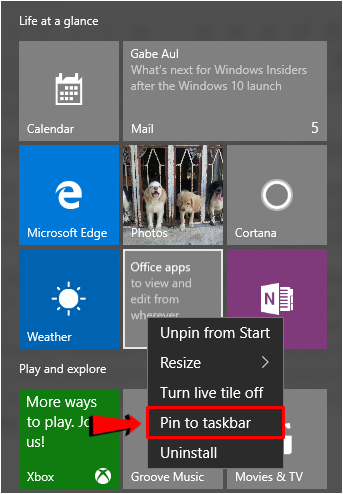
Once you find the tile, just right-click on it and from the menu that would appear, simply click on the “Pin to taskbar” option in order to have the tile pinned into your machine’s Taskbar. In case the tile for the universal app doesn’t readily appear on the right portion of the new Start Menu, you will need to click on the “All apps” link which is located at the bottom-left portion and once the list of all the installed apps and programs in your Windows 10 computer appears, just look for the app that you want to pin icon to the Taskbar for, right-click on it then hit “Pin to taskbar” from the menu that would appear the same as what we’ve done on the screenshot above.
As you can see, the universal apps in Windows 10 still retained most of their features that have been introduced in Windows 8.1 and as Microsoft develops more and more features for this latest Windows OS version, we can only expect the best to come for Windows 10.
How to Enable the Dark Them for Windows Including Universal Apps
There’s a tweak that will help you set custom colors for the title bars in Windows 10 instead of just getting them all white but it only involves the traditional Desktop program Windows. The title bar for the universal app Windows still remain white all over and if you don’t want this then you can try this tweak that will make the title bars become dark.
To start, you will need to open Registry Editor and create the registry key values that are shown below under the “AppsUseLightTheme” registry folder:
- Browse to this registry location: “HKEY_LOCAL_MACHINESOFTWAREMicrosoftWindowsCurrentVersionThemesPersonalize” and under it, create a new DWORD value and name it “AppsUseLightTheme” (excluding the quotation marks) item and set its value as “0”.
- Browse to this registry location: “HKEY_CURRENT_USERSOFTWAREMicrosoftWindowsCurrentVersionThemesPersonalize” and under it, create a new DWORD value and name it “AppsUseLightTheme” (excluding the quotation marks) item and set its value as “0”.
After doing so, just log out from the account that you are using then restart or reboot your computer. If you want to get back to the light or all white theme, just delete these values that you have created or set their values to “1” and everything will turn back to its normal appearance. If the dark theme is enabled on your computer, the universal apps such as the modern “Settings” app will now appear like the one shown below.
Enabling Dark Theme for Traditional Desktop Programs
The tweak that we have shown above would only apply to the universal apps which are also known as modern apps. It would not affect the Window for traditional Desktop programs so they would still remain as white all over but if you want to enable this same theme for these Desktop apps then you will need to follow the steps below:
1. Open the Modern Settings Window
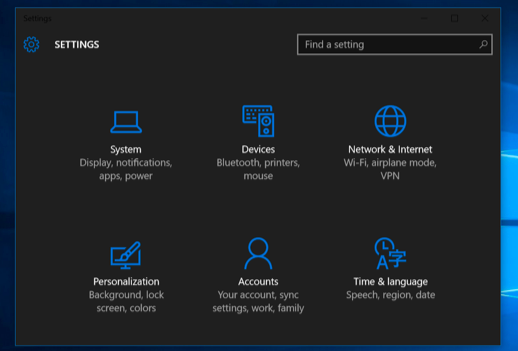
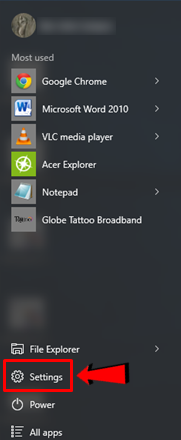
The first step is to open the Settings Window and you can do this simply by clicking on the Start Button or pressing on the Windows key and once the Start Menu launches, just click on the “Settings” link that is located on its bottom-left portion as highlighted on the screenshot below.
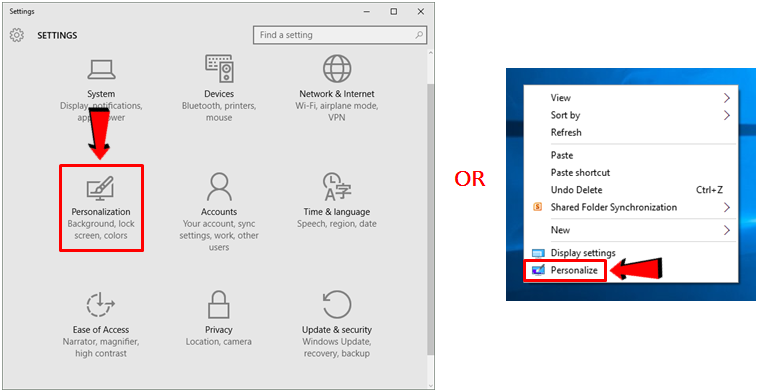
Now, once the modern Setting Window opens, you will need to click on the “Personalization” category that is the fourth one on the list as shown below. You can also access this section directly from your Desktop screen simply by right-clicking an empty space on it and on the right-click menu that would appear, simply click on the “Personalize” option.
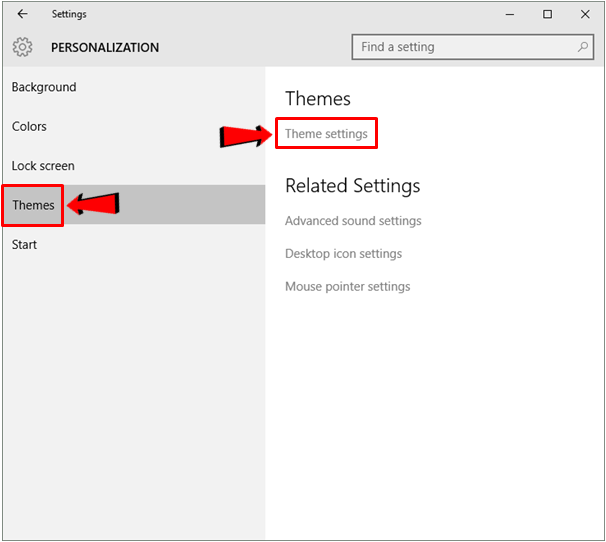
Once the Personalization section of the Modern Settings Window opens, simply look for the “Themes” link from the navigation pane at the left and once it opens, simply look for the link that says “Theme settings” on the right portion this time which are both highlighted on the screenshot below.
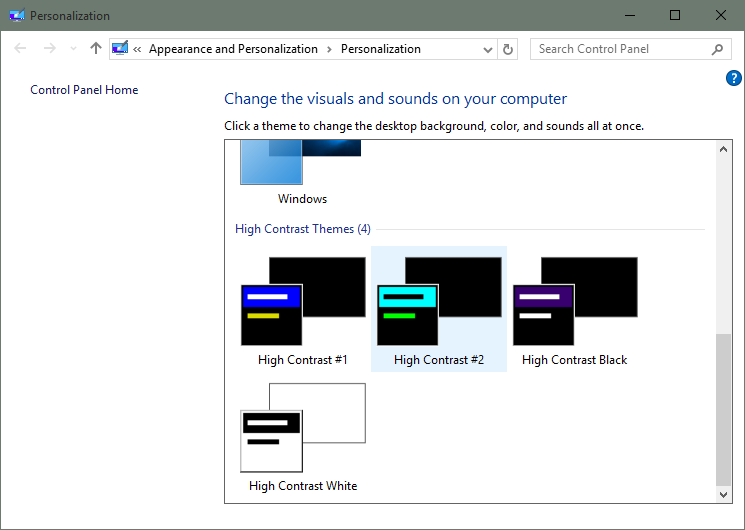
After the “Theme settings” is clicked, you will then be able to open the “Personalization” section of the Control Panel Window and from here, just scroll down until you see the “High Contrast Themes” portion. Under this section, you will now see the dark themes that are available for you to choose from and once you find the one that you want to set for the Desktop program Windows and after doing so, the theme will be applied automatically.
Once the dark theme is applied for the first time, Windows 10 will ask you to install an extension that will fix some flaws in the icons and other aspects of the dark theme interface so just follow any instructions from the Windows 10 system in order to make things look better in your Windows 10 computer.
Still a Long Way to Go for Windows 10
As you can see, enabling the dark theme for Windows 10 is quite easy and if you followed the steps that we have given above, you should be able to have your machine tweaked without getting into any problems. This dark theme settings in Windows 10 seems to be a work in progress for Microsoft and as newer updates are installed, we can only expect the best for this latest Windows OS version that is now heading to its second month since the release of its final FREE Upgrade build.