Getting More Familiar with File Explorer’s Quick Access Toolbar
Windows 8.1 has made some modifications in how its built-in file management system works which has been known as Windows Explorer back in the days of the older Windows editions. The sudden change of name to File Explorer has quite created a buzz among loyal users but Microsoft seemed to make this change in line with the brand new features that was added to it which is called the “ribbon-based” options. Taking a closer look at the File Explorer’s main Window won’t instantly reveal the changes that has been made but a more objective look would really make a big difference especially if you’ve been using the older Windows editions for quite a long time. In this tutorial, we will be talking about these newly introduced changes and improvements so you can start using File Explorer according to what these recent improvements are really intended for.
The Ribbon-Based Options
“Windows Explorer” which is the name of the file management system in previous Windows editions made options for working with the files and folders in it available using a right-click gesture on the mouse but this can be a lengthy process compared to just doing left-clicks all the way from selecting a file or folder down to executing a certain command which is the way things are done in the brand new Windows 8.1 operating system. This is the reason why the “Ribbon-based” options were introduced in the new file management system that exists in Windows 8.1. To see what these options look like, you will need to first open the File Explorer Window using these methods.
1. Hidden Menu Method
The easiest way in accessing the File Explorer Window is through a hidden menu which can be accessed using the Windows+X keyboard shortcut. To do this, just press the keys and you should be able to see a menu box that will appear at the bottom-left portion of the screen. From here, all you need to do is click on the link that says “File Explorer” and you will be able to open the File Explorer Window.

2. The Search Method
Another way in accessing the File Explorer Window is by using the search feature that is perfectly integrated with the Windows 8.1 system itself. To access this tool, you can either press on the Windows+S keys or click on the Search button which is found at the top-right corner of the Start Screen. After doing any of these steps, you will be able to access the Search screen which will appear at the right edge. From here, simply enter the words “File Explorer” into the search input box and wait until the File Explorer shortcut appears on the search results.
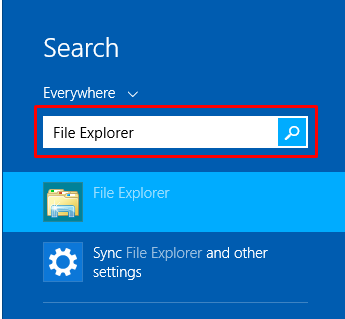
When you see the File Explorer shortcut, all you need to do is click or tap on it and you will be able to open the File Explorer Window. To learn even more methods in accessing the File Explorer Window from your Windows 8.1 machine, you can read our previous tutorial that shows the steps in how you can access this all important tool that is bundled with the Microsoft’s brand new operating system.
What’s New in File Explorer’s Navigation Pane
Just like its older version called Windows Explorer, the new File Explorer still has the very familiar navigation pane that is found at the left hand portion of the screen. From this section, you will find different libraries, folders and system locations which you can easily jump into whenever you’re working within the File Explorer environment. For your comfort, the navigation pane is designed to always show up on File Explorer’s main screen so you can always use it each time you browse through the different files, folders and locations in your Windows 8.1 machine.
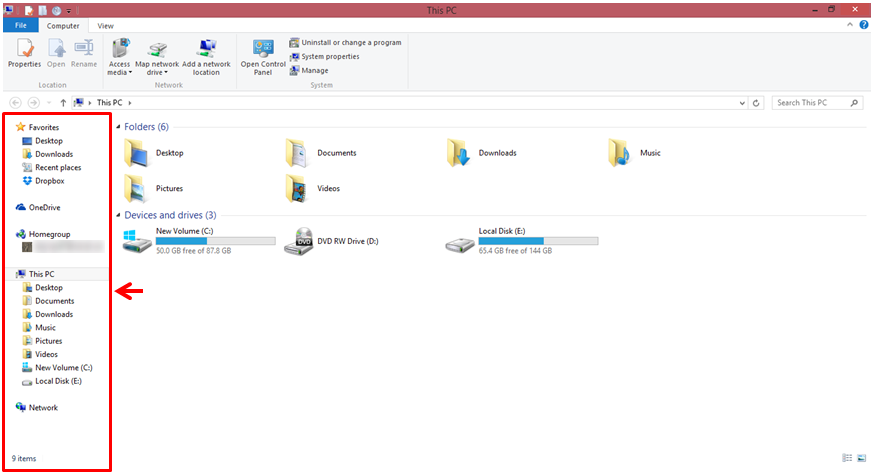
If there’s one new item that you might notice in the navigation pane then it would surely be the one that is labeled “OneDrive”. This represents Microsoft’s online cloud storage feature that helps Windows 8.1 users to save their important files and have it synced to their other Windows 8 or Windows 8.1-based devices. Back in Windows 8, users still had to install SkyDrive (old name for OneDrive) into their computers just to get this item appear on the navigation pane of the File Explorer Window and enable saving of files directly to it without really having to get into OneDrive from a web browser but in Windows 8.1, there’s no need of any install process because the OneDrive feature is readily found both in the Desktop as a folder in File Explorer and as an modern app which can be fund in the Metro environment.
The Quick Access Toolbar
Since we are exploring File Explorer’s main Window, we will be starting with the items that are found at the top-left portion of the screen. This section is called the “Quick Access Toolbar” and making the best use of it means that you will first need to get familiar with every button that can be made available and as well as the ones that are already available on this bar.
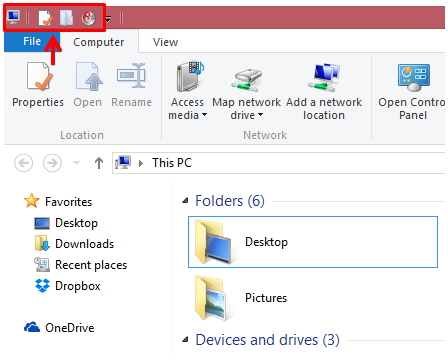
What’s Displays on the Quick Access Toolbar by Default
At the left-most end of the Quick Access Toolbar is an icon that looks like a PC monitor. This icon is actually clickable and is very useful in managing or controlling the File Explorer Window itself. For instance, you can “Restore”, “Move” or even change the “Size” of the File Explorer Window using the options that appears in a box when you click on the icon. There are also options for “Minimize”, “Maximize” and “Close” which are available on this box so you can use them for a change instead of using the buttons which are available on the other end of the bar.

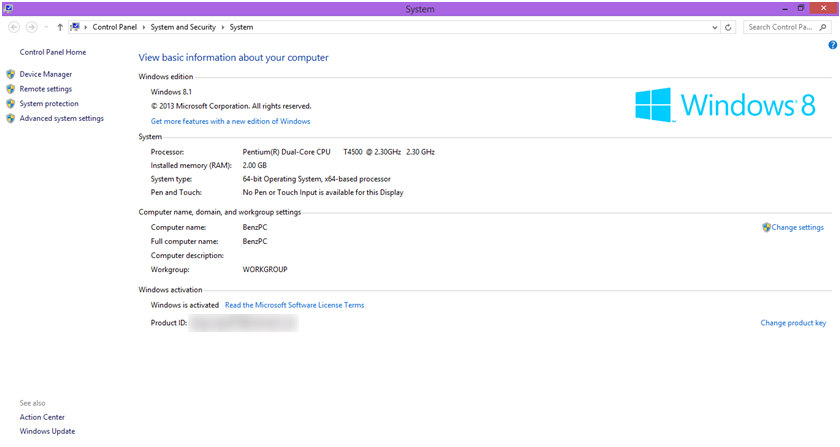
Viewing Information About Your Computer
The next icon on the Quick Access Toolbar is one that is labeled “Properties”. Try clicking on it and you will be able to open a Control Panel Window that is labeled “System” which contains some basic information about your computer such as the memory capacity of the RAM installed, processor type, system type and many others. This is also the section where you will see if your version of Windows is activated or not and in case you don’t know yet what your PC’s name is, this is also the place where you can learn this information.
Next to the “Properties” icon is another one that will help you create a new folder once clicked. You can use this button if you want to create a new folder instantly in your Windows 8.1 machine.
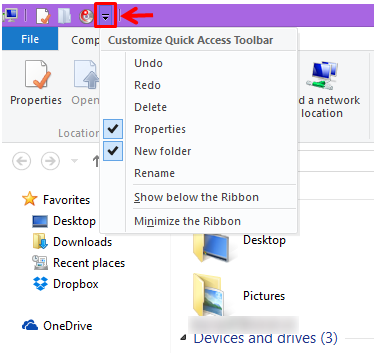
Adding Other Icons to the Quick Access Toolbar
Finally, the last item to the right is an arrow down icon which when clicked will show some other items which you can add to the toolbar itself. All icons that has already been added to the Quick Access Toolbar will have a check mark at their left and if you want to add other icons, all you need to do is click on the ones to be added from the box and you’ll see that they will be added right away.
That’s all there is to this tutorial. Take time to experiment on the Quick Access Toolbar and be sure to add the icons that you really need often. In our next article, we will be delving deeper into the ribbon-based options so be sure to stay tuned with us here in windowstechies.loc to learn even more about the newest Windows operating system edition.