How to Burn Discs Using the New and Improved File Explorer (Part 1)
CDs and DVDs belong to the most used and most popular storage media at present. It has replaced the meager storage space provided by floppy discs and while USB flash drive provide more storage space, its price compared to DVDs is really many times higher.
But how are files copied into CDs and DVDs? Have you ever asked your self how easy or complicated the process could be? In the past, burning data into discs was done using third-party software such as Roxio, Power2Go or Nero which are offered for free or with a certain amount of fee but if you’re using Windows 7, Windows 8 or Windows 8.1, you actually have a readily accessible tool in your Windows machine that does this same thing.
Yes! Your Windows computer has a disc burning tool that can write data into CDs, DVDs and Blu-Rays and in this tutorial, we will be learning more about it so you can start using this free tool in dealing with all those stuff in your computer that you want to burn into a disc.
How to Access the Disc Burning Feature in Your Computer
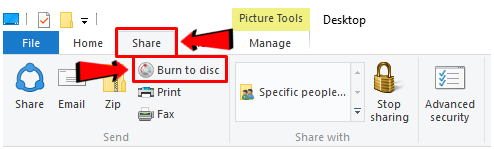
Depending on the Windows version that you are using, accessing the “Burn files to disc” or the “Burn to disc” feature would be a little bit different. For instance, in Windows 8 and Windows 8.1, you can access this feature from the new ribbon-based options which are found under the “Share” tab as highlighted on the screenshot below.
If you already have a blank CD or DVD, you can simply turn on the “AutoPlay” feature in your Windows 7 or Windows 8 computer and afterwards, you can insert the blank CD or DVD into your machine’s disc drive. After doing so, the AutoPlay Window will then appear on the screen and if you’re using Windows 7, it should look exactly like the one shown on the screenshot below.

If your computer is on Windows 8, the box that will appear is a little bit different but it will show all available software and tools that can actually do the disc-burning job as you can see below.
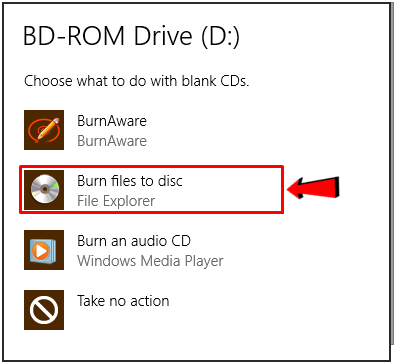
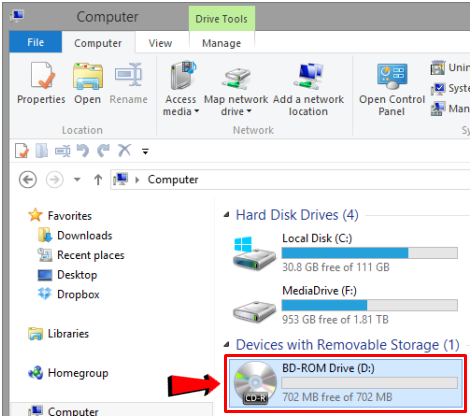
Again, since we are trying to use the disc-burning tool that is built within your Windows 7, Windows 8 or Windows 8.1 computer, the “Burn files to disc” feature is the one that needs to be clicked in order to launch the tool. In case “AutoPlay” is not turned on in your computer, you can just insert the disc, open File Explorer then double click on your disc drive from the “Devices and drives” list of the “This PC” or “Computer” section.
After double-clicking it, you’ll be able to see the “Burn a Disc” wizard which will now give you two options on how you’d like to burn files into the blank disc that you have inserted as you can see on the screenshot shown below.
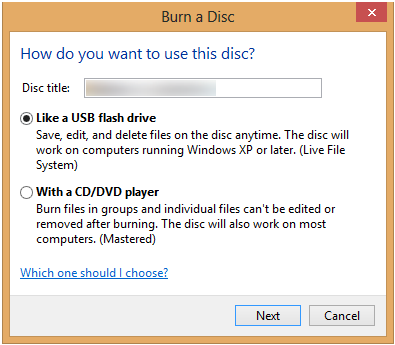
From here, you can assign a name to the disc that you want to burn files and any other stuff into by entering it inside the box that is labeled “Disc title” then just select how you’d like these files to be burned into the blank disc that you have. If you’re quite confused on which one to choose, here are clearer explanations of the two options that you can see above.
- Like a USB flash drive- This option burns files, folders and any other data into a disc using the “Live File System” which enables you to add, remove or edit the files whenever you want. Discs that are burned in this way are only readable using computers that run on Window XP or higher including the most recent Windows OS versions like Windows 8 and Windows 8.1 but they can never be read by CD or DVD players.
- With a CD/DVD player- This second option burns the files into the disc and once the process is done, the media can never be edited and the files in it can’t be removed. It also allows the CD or DVD to be played using CD/DVD players on even on any computer that has a disc drive. You can still add files to the disc but once added, they can never be removed any longer.
Burning Discs Like a USB Flash Drive
CDs and DVDs are flexible storage devices and just like USB flash drive, it can handle files for safe-keeping and you can store any other stuff into it to serve as a back up just in case something wrong happens to your computer and all the files in it gets lost.
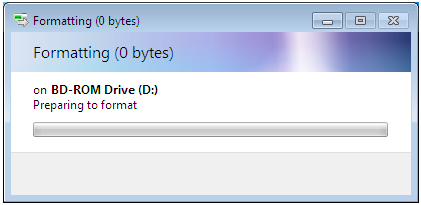
If you want to use a disc as a storage device where you can edit its contents such as adding or removing them at will then you need to select the “Like a USB flash drive” option from the small Window that we’ve shown above. The duration of the burning process depends on the type of disc that you are using and the overall size of the data that’s going to be written to it. After you click on the “Like a USB flash drive” option, Windows will format the disc as you can see on the screenshot below.
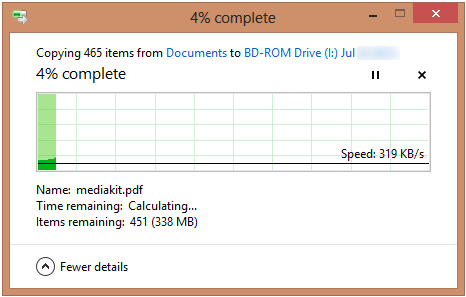
Once the format process is done, you can simply use File Explorer to open the disc under the list of “Devices and drives” in the “This PC” or “Computer” section then you can start copying and pasting all the files that you’d like to save into the disc. You can also use the simple drag-and-drop gesture in saving the files into the disc and while files are copied, a small Window that shows the overall process of the process will appear.
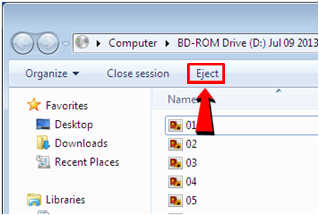
Once the burning process is done, you will be able to see all the files that you have burned in the disc if you open it from File Explorer and as we have mentioned earlier, you can add or remove files from it. If you want to remove a file, you can simply select it then right-click on it and select “Delete” from the right-click options that would appear. You can also select the file to be removed then hit the “Del” button on your machine’s keyboard and no matter which method you use, you’ll see a prompt that looks like the one shown below asking you to confirm the deletion.
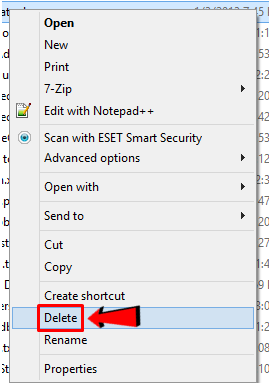
On this prompt, all you need to do is click on the “Yes” button then the deletion process will automatically start.
How to End the Disc Burning Session in Windows 8/8.1
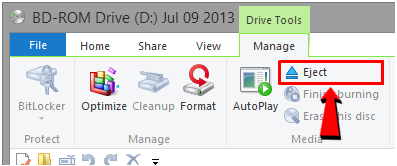
Now, if you are using Windows 8 or Windows 8.1 and you’re already done with the burning session. All you need to do is click on the “Manage” tab located at the top portion of the File Explorer Window then from the options that would appear, simply hit the one that says “Finish burning” as highlighted on the screenshot below.
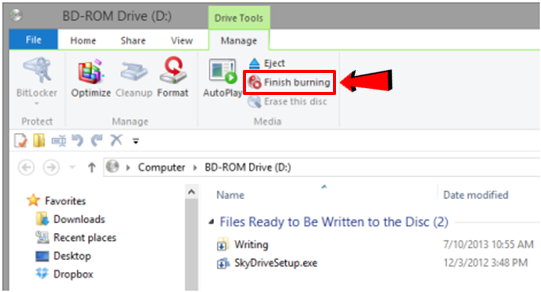
After doing so, you can simply eject the disc from your computer’s disc drive by hitting the “Eject” button still under the “Manage” tab just above the “Finish burning” option as shown below.
Ending the Burning Session in Windows 7
If you’re using a computer that runs on Windows 7, you can end the burning session simply by clicking on the “Close session” button located at the top portion of Windows Explorer. Doing this will just stop the burning session but the disc will just stay in the disc drive.
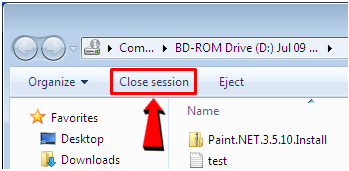
Now, if you want to get the disc from the disc drive after ending/closing the burn session, simply hit the “Eject” button located just beside the “Close session” button and your computer’s disc drive will automatically open.
Burning CDs and DVDs Just Got Easier
As you can see, the disc-burning feature that is built-in with Windows 7, Windows 8 and Windows 8.1 really works great in storing files into discs in the same manner as you do it on flash drives but there’s still one more option that you need to learn about and we’ll discuss it in the second part of this tutorial.