How to Disable Bing Search in Windows 8.1 and Windows 10
The days of local Desktop searches has been over when Windows 8 and Windows 8.1 were released. If you can still remember, the search feature worked a lot better especially in the days of older Windows editions like Windows XP, Vista and Windows 7 just by displaying results from your computer such as files, folders, system locations and tools that matches your search query. However, Microsoft seem to have been discontented about the way search works in their flagship operating system that they decided to make some changes with it. They essentially added more to it that resulted to changes which other users dislike. 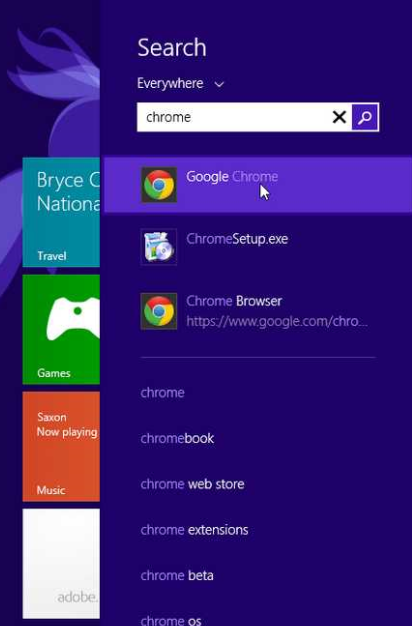 One of these changes is making Bing search results appear together with local search in both Windows 8.1 and Windows 10. Yes! The simple search results that we all have been so familiar with now became longer and shall I say confusing because of all the additional results being displayed whenever you do a search on your Windows 8.1 or Windows 10 machine. But thankfully, just like the other newly introduced changes in Windows these operating system versions, there is actually a way to tweak this and make it work just like before- to display only local search results just as how everything worked back in previous Windows editions like Windows XP, Vista and Windows 7. In this tutorial, we will be teaching you how to do this tweak and see what other settings are actually available for the search feature in both Windows 8.1 and Windows 10 so you can start making more sense of the search results that are being displayed by getting rid of all the Bing search results that make things a little bit complicated. To start, be sure to have your Windows machine ready and follow the steps that we will be showing below.
How the Search Results Look Like in Windows 8.1
Before going into the details on how the Bing search results can be disabled from your Windows 8.1 computer, let’s first get familiar with how it really looks like in this Windows operating system edition. To access the Search feature in Windows 8.1, you will simply need to press on the Windows + S keys and the Search screen will appear instantly on the right edge of your computer screen as shown on the screenshot below. 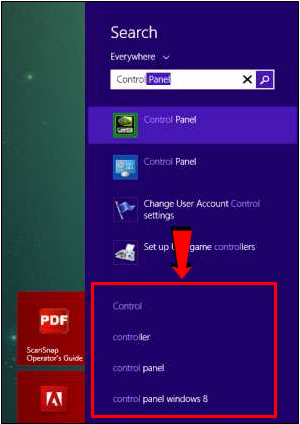 Now, the Bing search appear just below the local search results as being highlighted on the screenshot above and in other instances, these results would also appear at the top portion before the local search results which could be quite a hassle especially if you are doing a quick search for an item that is saved in your computer’s hard drive. This is the reason why others are annoyed with this Bing search feature being incorporated with the Search tool in Windows 8.1.
Getting Rid of the Nuisance
As we have mentioned earlier, there really are other users who consider this newly-added Bing search feature as an annoying one. Some even think that it is not needed at all and thankfully, Microsoft did not set it as a permanent feature that can never be removed in any way even through more advanced methods like editing the registry and others. The Bing search feature in Windows 8.1’s search can be removed in a very easy way but if you are not yet familiar with the ins and outs in this operating system then it might be a little bit challenging. To guide you though the steps in disabling Bing from Windows 8.1’s search feature, just follow the steps that are shown below.
1. Open the Settings Window
The very first thing that you would need to do in order to tweak how the Search feature works is to first access the modern Settings screen and just like any other feature in the Windows operating system, there are plenty of ways in getting into it. One easy way is by first clicking on the Windows + C keys and once the Charms appear, simply hit the Settings icon that is found on its bottom portion as shown on the screenshot below.  After the Settings charm is clicked from the Charms bar which appeared on the right edge of your computer screen, you will be able to open another modern section which contains quick links to the commonly tweaked settings on your Windows computer. From here, you will need to put your attention on the bottom portion where you will find a link that says “Change PC settings” as shown on the screenshot below.
 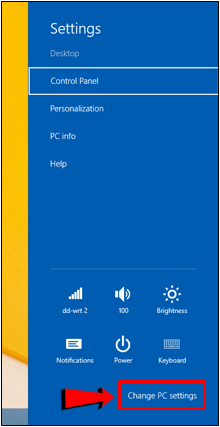 If you wish to quickly access this section rather than first going through the Settings charm, you can do so simply by pressing the Windows + I keyboard shortcut combination and after doing so, the contents of the Settings charm will open instantly where you can click on the “Change PC settings” link right away in order to open the modern PC Settings screen on your Windows 8.1 computer.
2. Click Search & Apps From the Left Navigation Pane
Now that the modern PC settings Window is already open, it is time to get into the section where the tweaks for the Search feature are located. To do this, you will first need to put your attention into the navigation pane that is found at the left and from here, simply click on the link that says “Search & apps” as highlighted on the screenshot below. 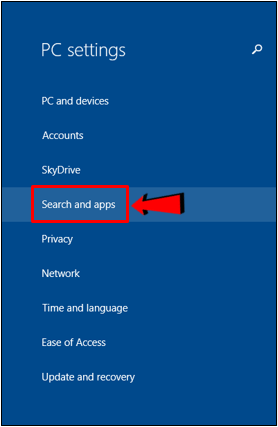 After this link is clicked, you will now be able to open another modern Window where you will need to click on the On/Off switch that is found under the “Get search suggestions and web results from Bing” as highlighted below in order to turn it off.
 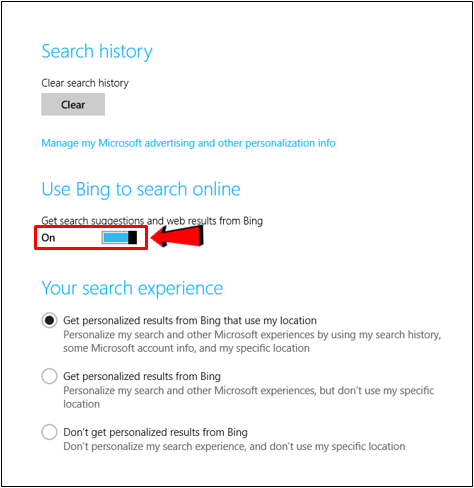 Once the feature is turned off, you should now be able to do smoother local searches and better results for every query that you type into the search box by getting rid of all the annoying Bing search results that really pop out on the list whenever you’re looking for some stuff that are saved in your Windows 8.1 machine. A very useful tweak indeed especially to those who are looking for quick search results without the impurities that are thrown in by the changes that Microsoft has implemented in Windows 8.1.
Getting Rid of it in Windows 10
After learning how to tweak the Search feature in the Windows operating system version that preceded the latest one called Windows 10, it is now time to take a look at how Search works in Microsoft’s latest masterpiece which they call as the “best one yet”! Unlike Windows 8.1, Windows 10 now has a built-in virtual assistant which Microsoft calls Cortana and this too influences the Search feature in many ways. For instance, Cortana provides suggestions and as well as weather updates based on your previous searches. It is a project that still under development even as of writing this tutorial but it really works quite well even on its current state.
Search in Windows 10
Unlike Windows 8.1, the Search feature in Windows 10 is already incorporated with the new and improved Start Menu so when you try to press on the Windows + S keyboard shortcut combination. What will appear is the Start Menu which will pop-out of the bottom-left portion of your computer screen as shown on the screenshot below.  As you can see, the first items that would appear after pressing the Windows + S keys which is the keyboard shortcut combination used to access the Search feature are icons of headlines on the news which are actually coming from Bing. This is also the “Home” section of then new Search feature that is included in every Windows 10 computer and on its bottom portion, you will find an input box which has a label that says “Search the web and Windows”. Now, you surely would not want to see these stuff on the Search screen whenever you do a local search and thankfully, removing it is made a lot more simple than how it was done back in Windows 8.1. But before getting into the details in getting rid of this Bing stuff in Windows 10’s Start Menu, let’s first see what really changed in this otherwise mainstay feature of the Windows operating system!
Improvements in the New Search Feature
In their effort to make Windows 10 better than the rest of the previous Windows OS combined, Microsoft has made changes and improvements in many aspects of this latest operating system edition. Changes that are all designed to welcome newer features that has already been introduced and as well as those that are still going to be introduced as updates are made every now and then. In the case of the Search feature, here are some changes that were made in how it appears and as well as how it works.
Local Search and Bing Search Now has Dedicated Buttons
One of the newest improvements in the Search feature found on Windows 10 is the availability of the “My Stuff” and “Web” buttons just above the Search input box as shown on the screenshot below. 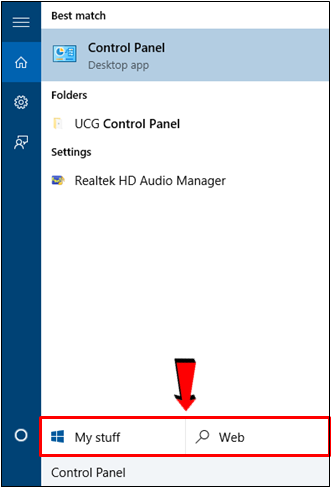 So instead of displaying the results for the local search and the Bing search in one list, you can now choose specific type of search and the items that the search feature is able to pick based on your search query are also displayed instantly after the query itself is entered into the input box located at the bottom. On the screenshot that is shown above, you can see that I have typed-in “Control Panel” into the input box found at the bottom of the search feature and after a few seconds, there were already results that appeared on top which are grouped into “Best match”, “Folders” and “Settings” category. If you already see the item that you are looking for from this list they you can simply click on it and it should open instantly.
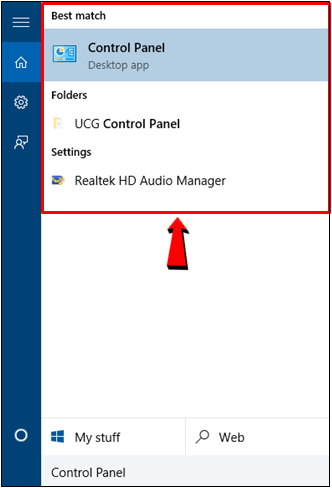
Searching for More Specific Stuff in Your Computer
Now, if the item that you are looking for still doesn’t appear on the list that we have shown on the screenshot above, you will now need to make use of one of the buttons that is located just on top of the Search input box which is labeled “My stuff”. To be able to use this button, you will first need to type in your Search query into the input box at the bottom and after doing so, simply click on the button itself and you will see that the Search screen will now become wider as shown on the screenshot below.  As you can see, a more comprehensive list of search results has now appeared and it included more sections of your computer system including Music, Files, Settings, This Device and many others. You can also sort the search results in order to find some items a lot easier than its default sorting rule.
What Happens When the Web Button is Clicked?
So you now have seen what happens when the “My stuff” button is clicked but what about if the other button on its right labeled “Web” is clicked? What would happen to your search if this one is clicked. Let’s see by first entering a Search query into the input box and after doing so, let’s click on the “Web” button. If you already tried it on your computer then you should have been redirected to your default browser where Bing would display a list of Search results about the word that you typed into the Search input box as shown below.  As you can see, the Search feature in Windows 10 basically works a lot better compared to the version of the Search feature found in Windows 8.1. By putting dedicated buttons for local and as well as web search, users can now easily choose which Search to execute and in case both the deep local search and the web search isn’t really needed, the quick search results that appear on the top portion of the Search feature after a query is entered into the Search input box also proves to be very handy. However, if you still want to really disable Bing from the Search feature then here’s how it is done in Microsoft’s latest operating system edition.
How to Disable Bing from the Search Feature in Windows 10
Finally, we now come to the real meat of this tutorial which is disabling Bing from Windows 10’s Search feature which is now incorporated with the Start Menu. To start, you will first need to press the Windows + S keys in order to summon the Search screen which will appear at the bottom-left portion of your computer screen as shown below. 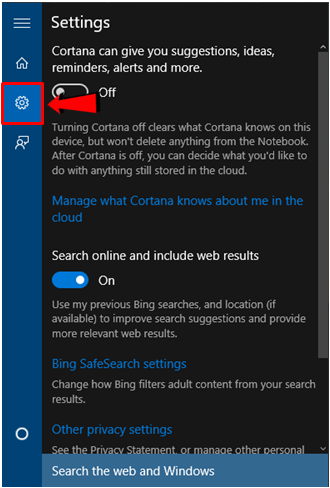 Now, from this Search screen, you will simply need to click on the “Settings” icon that is found on its upper-left portion as being highlighted on the screenshot above and after doing so, the Settings section of the Search feature will display on the main screen. From here, you will see that the “Search online and include web results” feature is actually turned on which is why you keep on seeing Bing search results when you do some search so in order to disable it, all you need to do is click on the switch located under the said option in order to have it turned off.
 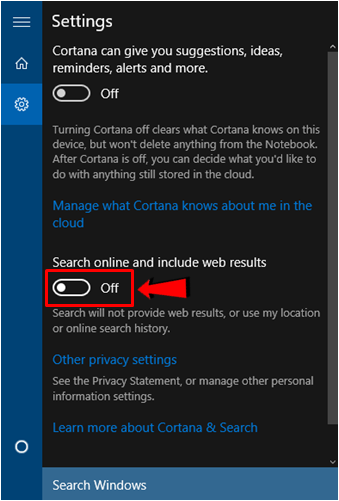 From this section, you will also find the switch for enabling or disabling Cortana, Windows 10’s virtual assistant feature but since we are already running out of space in this tutorial, we will just talk about this newly added feature in Windows 10 in one of our future tutorials. As you can see, the Search feature has really undergone some tremendous changes in both Windows 8.1 and Windows 10 but tweaking it so it can work a lot closer to how its base version found in previous Windows editions worked is easy. If you have closely followed each of the steps that we have shown in this tutorial then you should have been able to turn off the Bing integration easily but if you encountered problems along the process then please feel free to let us know by taking advantage of the comments section below.