How to Use Narrator in Your Windows 8.1 Machine
Previously, we’ve talked about one of the Ease of Access features in Windows 8.1 but everything does not end there. Windows 8.1 still has even more features that you need to get familiar with and this time, we will be talking about the one that makes Windows a lot easier to use for people having problems with eyesight. Yes! This awesome operating system edition from Microsoft (and even the previous editions that came before it) actually has a tool that is capable of narrating all the stuff that is currently happening on the screen.
This feature is made for the ones who are really having a hard time seeing things on the screen making it even harder to do the simplest of things on a Windows machine. Windows isn’t only made for the common people but even for the special ones and in this tutorial, we will be looking at the steps in using the “Narrator” tool so you can use it whenever the need arises.
Possible Uses of the Narrator Tool
One very obvious use of the Narrator tool is helping people having disabilities in their eyesight to still use a Windows machine. With the use of a headset or a speaker that is capable of emitting sound large enough to be heard clearly, Narrator helps guide anyone suffering from poor eyesight to use different features or do many other tasks in a Windows computer.
In other cases, Narrator can also be of great use even to people who don’t have any problems related to eyesight. For instance, if your computer or laptop screen stops working for some reasons but everything continues to work normal, you can use narrator to guide you provided that you know some quick shortcuts in going to different sections of the Windows operating system where you can do the troubleshooting in order to fix the problem. This might sound a bit weird or “out-of-this-world” but it could be possible especially to some power users.
Accessing Narrator in Windows Vista and Windows 7
The steps involved in accessing Narrator in Windows Vista and as well as Windows 7 are essentially the same. To start, you will need to access the Start Menu then type in the words “narrator” into the input box that is located at the bottom. After doing so, you will need to wait a few seconds and the search results will appear at the top portion of the screen as shown on the screenshot below.

From the search results, you will need to click on the “Narrator” shortcut that is located under the “Programs” search result category. After doing so, you should be able to open the narrator Window and from then on, you will be able to hear everything that’s happening on your computer screen.
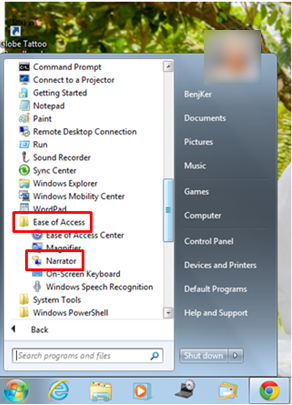
Another way in accessing “Narrator” is by clicking on the “All Programs” link located just above the search input box of the Start Menu. After you do so, you will see a list that contains all the built-in as well as the installed programs on your computer. From here, simply browse to the folder that says “Accessories” then click on it.

When the Accessories folder expands and reveals its contents, you will again need to click on another folder that is labeled “Ease of Access” and after doing so, you should be able to see the “Narrator” shortcut under it which you will need to click in order to open the “Narrator” settings Window.
Accessing Narrator in Windows 8.1
The brand new Windows 8.1 operating system from Microsoft offers some new ways in accessing all the features that are available in the operating system itself. This is because most of the features that we all got very familiar with were now taken away and were replaced by even better features such as the Start Screen, the Charms and many others. To access “Narrator” in your Windows 8.1 machine, all you need to do is click on the Start Button or press the Windows Key in order to access the Start Screen. Once the said screen opens, you will need to start typing the word “narrator” on your computer’s keyboard and you will notice that the Search screen will appear from the right edge and the word which you have typed will automatically be entered into the search input box that is located on top of the Search screen as you can see on the screenshot below.

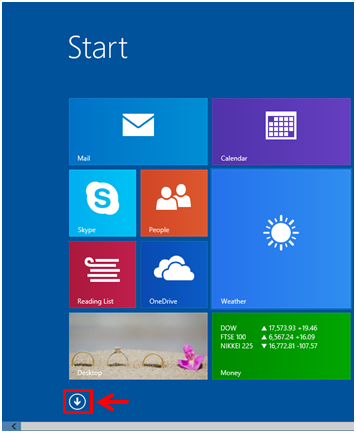
Next, the search results will start appearing just below the input box of the Search screen and from here, all you need to do is click on the “Narrator” shortcut in order to open the “Narrator” Window. If you want to learn another method in accessing Narrator in your Windows 8.1 machine, you will need to stay on the Start Screen and move the mouse on it. After doing so, you will be able to see a round button that bears an arrow-down icon in it which will appear on the bottom-left portion of the screen. You will need to click on this button in order to access the “Apps view” screen.
On the “Apps view” screen, all you need to do is scroll towards the right by pressing the arrow-right key on your computer’s keyboard and look for the “Windows Ease of Access” apps category. When you find it, simply search for the “Narrator” shortcut which should be located under it and once you find the shortcut, you will need to click on it in order to open the “Narrator” Window.
Changing Narrator Settings
Now that you have learned how to access Narrator on your computer, you will now need to learn how to change some of its settings. There are no serious settings that need to be changed under the “General”, “Navigation”, “Commands” and as well as the “Minimize” sections but feel free to check out what it contains and experiment with the settings that are found in them.

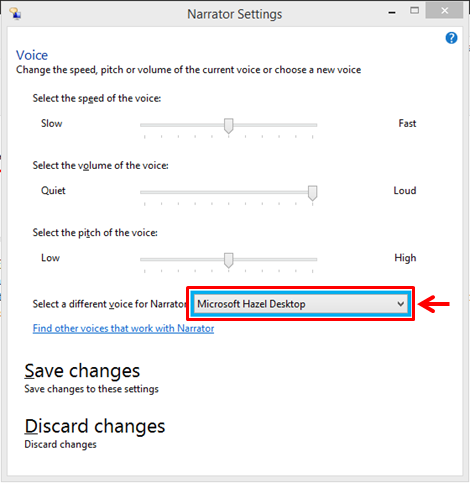
Now, click on the “Voice” section of the Narrator Settings Window and you will see some adjustment knobs in it for adjusting the speed of the voice that talks whenever you do something or you can also make the pitch of the voice higher or lower. Lastly, you can also change the voice that is speaking when you are using the “Narrator tool” in your Windows machine. There are three voices which are available (1 male and 2 females) and these voices are listed as follows:
- Microsoft David Desktop
- Microsoft Hazel Desktop
- Microsoft Zira Desktop
To access the list of these voices, all you need to do is click on the arrow down icon that is located at the extreme-right end of the box which is labeled “Select a different voice for Narrator” as shown on the screenshot below.
Once you are done making changes on any “Narrator” settings, you will need to click on the “Save changes” link at the bottom of the Window in order to make all the changes final and that’s it! You now learned all the basics in using the “Narrator” tool in your Windows computer!