6 Steps in Using Windows Upgrade Assistant
After checking on your computer’s available hard drive space, its installed memory or RAM and as well as its processor capacity and finding out that it is capable of handling the requirements of Microsoft’s latest operating system dubbed as Windows 8.1, there could still be problems before you can really do the upgrade.
One problem could be some desktop applications which are not really compatible with the new operating system as well as hardware devices which would not work smoothly with the newly installed operating system because the manufacturer has not provided any update for the device driver and some other issues which are quite out of a user’s control.
This is the reason why you need to keep a list of all the installed programs in your previous Windows edition so you can manually check from the developer’s website if it already supports Microsoft’s latest operating system called Windows 8.1. However, this can still be a tedious task that would require too much time and effort on your part.
If you don’t have that much time to spare for all of these steps and processes then Microsoft has something to offer that will surely make upgrading to Windows 8.1 a lot more comfortable making your carry even your favorite programs to it by automatically checking if they are compatible with this latest Windows operating system.
Yes! You can do this with a tool called Windows Upgrade Assistant and in this tutorial, we will be taking you through the steps that are involved in using this piece of very useful utility from Microsoft so if you’ve been planning to make an upgrade from your old Windows operating system to the latest one but you’re a bit hesitant because you don’t know some of the basics about checking for compatibility between programs then this tutorial will surely be of great help to you!
Accessing the Windows Upgrade Assistant Utility
One problem that users had in the earlier days of Windows 8 and Windows 8.1’s release is that most third-party programs have not released an update yet that is compatible to these latest operating systems but as months passed, software developers has since released an edition of their software that would work with it.
However, just to be sure that you will not be getting any problem with your installed programs before finally making the upgrade, you can use Windows Upgrade Assistant to check for any program that is not compatible with Microsoft’s latest operating system. To be able to use this utility, it needs to be downloaded first and you will need to have a connection to the Internet. Here are the steps:
1. Be sure to get a good connection to the Internet and once you have it, you will need to open your favorite web browser (Google, Internet Explorer or Mozilla Firefox) and access the Windows Upgrade Assistant download page from Microsoft’s official website. Just type “Windows Update Assistant download” into the Search input box and some search results will start appearing just below it. From these results, all you need to do is click on the Windows Upgrade Assistant link that will work on your version of Windows then on the Window that follows, you will need to click on the link that says “Click to download Upgrade Assistant”.

If you are trying to upgrade to Windows 8.1 from Windows 8, you will need to enter this URL (http://windows.microsoft.com/en-ph/windows-8/update-from-windows-8-tutorial) into your browser’s web address input box. If you are upgrading from Windows 7, use this URL (http://windows.microsoft.com/en-ph/windows-8/upgrade-from-windows-7-tutorial) and lastly, if you’re trying to upgrade from Vista or Windows XP, here’s the URL that you should use (http://windows.microsoft.com/en-ph/windows-8/upgrade-from-windows-7-tutorial). Downloading speed depends on the Internet connection that you are connected to. The faster the connection is, the quicker the download process would be.
2. Now, when you are prompted by you browser, you will need to click either “Open”, “Save” or “Run”. The command that will appear depends on the browser that you are using. If you have selected “Save”, make sure that you have selected a location that is easy to find like the default “Downloads” folder or the “Desktop” folder.
3. Once the download process is done, you will need to open the setup file and run it. Follow all the on-screen instructions that will appear and Windows Upgrade Assistant will automatically scan your PC or laptop to make sure that all the system requirements are met. The utility also checks if all the programs and apps that are currently installed on your machine is compatible with Windows 8.1.
4. After Windows Upgrade Assistant scans your machine, you will be shown the results together with a report if your machine can run Windows 8.1 or not. A list of compatibility report will also be included which includes current programs and devices that will work in the new operating system as well as those that will not as well as recommendations on what you can do to make them work again.
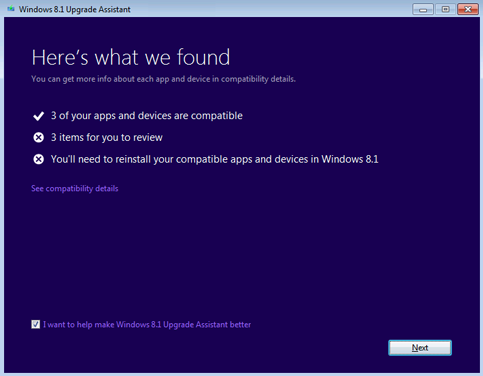
Most of the programs and other software that works with Windows 7 would surely work in Windows 8.1 but there could be other devices and drivers that Microsoft might still not have information about.
5. After you are shown the compatibility list and other reports which needs your attention before upgrading, you will need to decide which ones should you like to retain on your PC. You will not be able to keep your programs and settings when you do an upgrade so be sure to secure your program installation disks and downloaded setup files as well as confirmation emails from a software purchase that you did online. It will also be a good idea if you save some backup of your files this time.
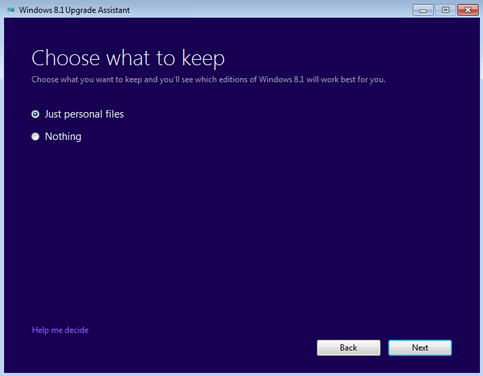
If you want to keep your personal files such as documents, photos, music, movies and other files that you have saved in your computer, you can choose the “Just personal files” option while if you don’t want to leave anything for a clean start, simply select “Nothing”. However, we would recommend that you save a backup of your important files on a portable hard drive or other storage device like a USB flashdrive or DVD disk that has enough space.
If you have selected to leave nothing before upgrading, all of your files will not be moved to the newly installed operating system but will be saved in a folder that is labeled “Windows.old”. You can retrieve your files from this folder but it will only be in there for 28 days so be sure to retrieve the ones that you want to keep after your machine is done upgrading!
6. Finally, the last step will now let you either purchase Windows 8.1, download it for free from the Windows store or purchase and download it from the Microsoft website. If you are upgrading from Windows 8 then the update to Windows 8.1 is free but if you are moving to Windows 8.1 from an older Windows edition then you have two choices, you can either purchase a Windows 8.1 DVD installer or purchase and download it from Microsoft. If you have a relatively slow Internet connection then we would recommend that you choose the former to eliminate any hassle.