Identifying the Version of Windows Installed on Your Machine
What if you get a prompt that suddenly asks you to identify the version of Windows that you have on your computer before you can go on and proceed with an installation process? What will you do? Most of us, at least those who are average to expert in using any Windows version are familiar with how this is done but what about those people who are new to it let’s say the ones who would really wake up their teenage son or daughter late at night or early in the morning just to ask how this is done? Knowing the version of Windows installed on your computer is a crucial thing to learn especially in times that you want to install a third party software that works only on specific versions of Windows.
But first, let us face the issue squarely and know what version of Windows are you familiar with before we proceed with the steps and methods that is used in identifying this information. Older power users would know Windows 98/2000/NT/ME/XP/Vista and the newer releases like Windows 7 and Windows 8 which areused by most people at present. But is it enough to know just this piece of information? The answer is no! Some programs and third party software at present are specific to whether you have a 32-bit or a 64-bit system and that’s what we will teach you on this tutorial. After reading this article, I expect that you will be able to identify whether your computer is running a 32-bit or a 64-bit type of Windows Operating system. I’ll teach you three ways of doing this. just read on and learn how this is done.
Method # 1- Using the “System” Information Section of the Control Panel
This is probably the most familiar way of knowing this piece of information to most power users at present but if you are new to Windows then this might be your first time to discover how to do it. This step will provide you with all the information you need about your system which will be very useful in many scenarios.
All of your machine’s specifications including the Windows version, the system file format and a lot of others are found in the “System” section of a very valuable area of the Windows system called the “Control Panel”. But first, you need to learn how to access the Control Panel. Here’s how:
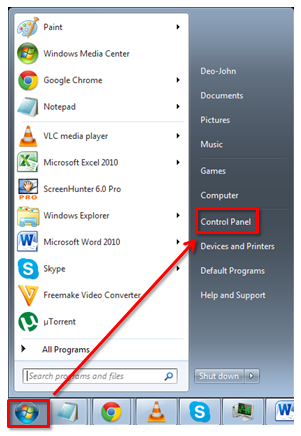
- On the bottom-left corner of the screen, you will see a “Start” button or a “Windows Orb”. Click on it to open the “Start Menu” then select “Control Panel” by clicking on it.
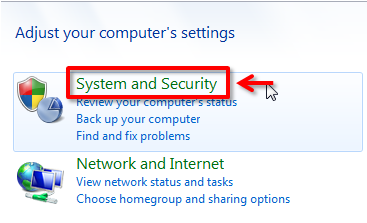
- You will then arrive at the main Window of the Control Panel, from this section, select “System and Security”.
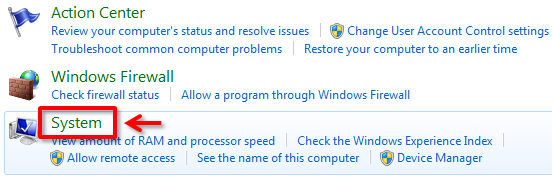
- On the next Window, you need to click on the “System” link.
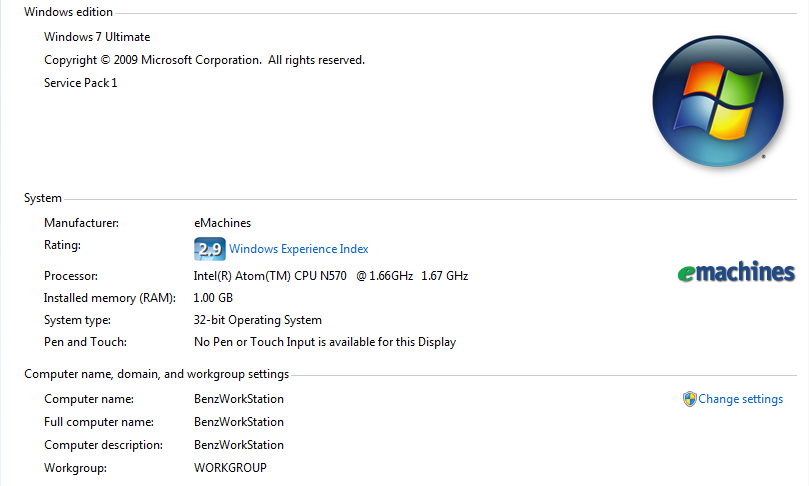
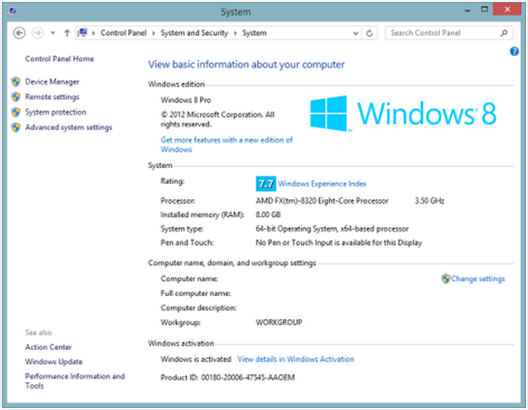
- The Window that follows will then show you all the things that you needs to learn about your computer’s Operating System which includes the system type (whether it is 32-bit or 64-bit) and the exact version of Windows that is installed.
On the screenshot above, you see how it all appears on Windows 7 while the one below is how everything looks like on Windows 8. You’ll notice just a few differences in the icon/logo shown but the contents therein are basically the same.
Another easier way of accessing the same Window on your Windows computer is by right-clicking on the “Computer” shortcut on the desktop or even the one found on the Start Menu and click on the “Properties” option.
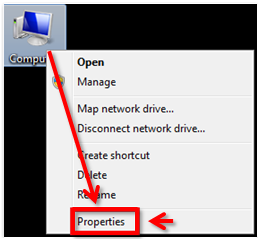
Doing this would directly take you to the System Information Window without the unnecessary traffic and hassle that you’ll experience if you access it from the Control Panel. This is also a faster way which really save time but still, another very simple way is by pressing on the “Windows+ Pause” keys on the keyboard of your machine.
How to Find the Windows Version and the System Type
The topmost section of the System Information Window should show you the “Windows edition” and on the screenshot below, you will see that it is Windows 7 Ultimate Service Pack 1. The information that you will see on this section will really depend on the version of Windows that you have running on your machine.
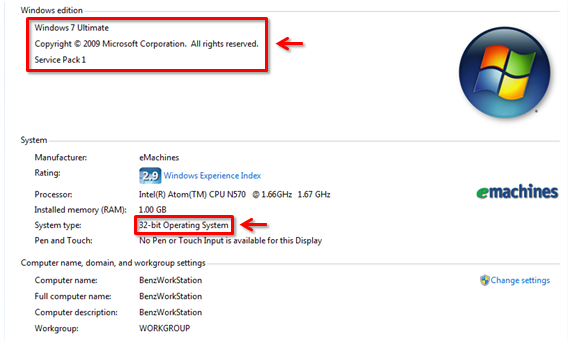
The section below “Windows edition” is labeled “System” where you can see further details such as the RAM, CPU and of course the one that you would often need which is the “System type”, whether your machine is on a 32-bit or a 64-bit operating system. On the example that I’ve shown above, the computer is running on a 32-bit version of Windows 7 Ultimate Service Pack 1.
Method # 2- Knowing it From the Lock Screen on Windows 7
If you want to learn just the version of Windows alone and not the System type as shown above then you can just do it in a very simple and subtle way, the “Lock Screen”. To do this, all you need to do is press the “CTRL+ALT+Delete” keys on your computer’s keyboard simultaneously then the lock screen will eventually pop out. From here, you can choose whatever action you wish to execute but the point is at the bottom of the options, you’ll see what version of Windows is running on your machine and on the screenshot below, it says Windows 7 Ultimate.

However, the information that you’ll get are not as detailed as the first method that I discussed but it would already serve the purpose of identifying one information that will sometimes be needed in different scenarios.
Method # 3- The “Winver” Command on Windows 7 and Windows 8
The third and last method that I’ll teach you will make use of the “Run Box” or the “Command Prompt” but we will concentrate on the “Run Box” this time since it is simpler than doing some commands on “Command Prompt”. First, you need to open the “Run Box” by opening the Start Menu and typing the word “run” on the Start Menu search box.

Then, from the “Programs” category of the search results, click on the “Run” shortcut to open the Run Box.

On the textbox that you see inside the Run Box, type the word “winver” then press the “Enter” key on your keyboard.
![]()
If you are using Windows Vista and Windows 7, you can also directly type the word “winver” on the Start Menu search box then click on the item that appears under the “Programs” category of the search results labeled “winver”.

You will then see the “About Windows” screen appear which will display some details regarding your computer’s internal Windows version and some other details of the operating system running on your machine. If you are on Windows 7, you’ll see that the version is 6.1 while on Windows 8, it should be 6.2.

Once again, you will only see the Windows version from this method and not any other details such as the system type.
And that’s all there is to it. You can now identify the version of Windows running on your machine by doing any of the methods I discussed on this tutorial. If you run through some problems while doing any of the steps above please feel free to notify or share it with us on the comments section for this articles so we will be able to help you out. We’re also welcome for any other tips that you know regarding this subject that we discussed on this tutorial.