Improving Windows Explorer by Tweaking the Folder Options Section
Windows Explorer is one of the best and the most useful features that is included in every Windows operating system. It has been in existence since the early versions of Windows which includes XP and Vista and has seen improvements and innovations as it was carried over from one Windows version to another. The Windows Explorer version in Windows 7 is even better but the one found on Windows 8 is exceptional which already includes an interface that is ribbon-based and already has fixes to the common bugs that existed on Windows 7. It also has changed its name to “File Explorer”. The default settings and configuration of Windows Explorer already does good in helping you browse through files and navigate through folders but it can still be improved to work better by tweaking some settings on the “Folder Options”.
The “Folder Options” section has tweaks and settings that can improve how Windows Explorer work. This one found on Windows 7 has slight difference with the one found on Windows 8 (with about two or three added options on Windows 8) but everything else is essentially the same. On this tutorial, we will be looking at some of the tweaks that can be done on the “Folder Options” section in Windows 7 so we can better improve how Windows Explorer work and as you will see later, doing this tweaks would be very beneficial especially if you’re using your machine for a lot of tasks.
How to Access the Folder Options Window
There are many ways of getting into the “Folder Options” section on any Windows 7 machine but this time, I will only be showing you three ways to save space and of course, to spare you time in reading. After looking at each method, you may choose which one you’ll be most comfortable with.
Searching for it Through the Start Menu Search Box
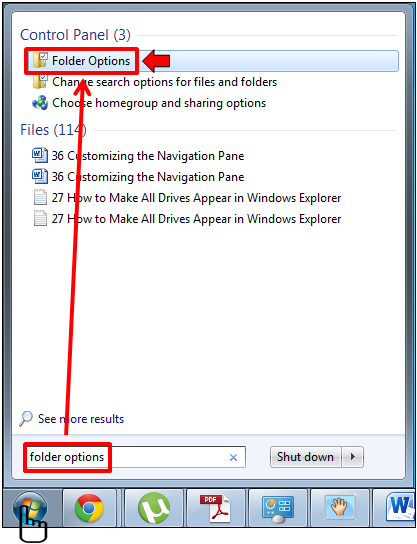
One way which is probably the easiest method of accessing the “Folder Options” section on your machine is by searching for it using the search box found on the Start Menu. Here’s how it is done:
- Open the Start Menu by clicking on the “Start” button on the bottom-left corner of your computer screen or press on the “Windows Key” and once it appears, simply type “folder options” on the search box then click on the “Folder Options” shortcut link listed first under the “Control Panel” category of the search results.
Clicking the “Organize” Tab on Windows Explorer
Another way of accessing the “Folder Options” Window is through the “Organize” tab found on Windows Explorer itself. To get to the Window where this tab is located, just follow the steps below:
- Access Windows Explorer by simply opening any library like Documents, Pictures, Music etc. then click on the “Organize” tab located on top of the Window just below the address/path bar. The screenshot below shows the Documents library opened.

- As you can see, when the “Organize” tab was clicked, a drop-down list of options appeared containing the “Folder and search options” shortcut link. Once this is link, the “Folder Options” Window will appear.

Accessing it from the Control Panel
The last method that I will show is probably the most used one especially by novice and average users and it is done from the “Control Panel”. Here are the steps in dong it:
- Open the “Start Menu” simply by clicking on the “Start” button. You can also do this by pressing the “Windows Key” on your computer’s keyboard and on the Start Menu, click on “Control Panel”.

- On the main Window of the Control Panel, simply click on “Appearance” then on the following Window, click on the “Folder Options” shortcut link.

- After doing so, the “Folder Options” Window will then appear. Alternatively, you can also access this section simply by clicking on the “Alt Key” while Windows Explorer or any other Library Window is open. Doing this will open the “Status Bar” where you’ll find the “Tools” tab as shown below. Clicking on this tab will open a drop-down list where you’ll find the “Folder options…” link which you can click to open the “Folder Options” Window.

Which Settings to Enable and Which Ones Should be Disabled
Now that you have learned how to access the “Folder Options” Window, we will proceed to identifying the settings which should be enabled or disabled in order to improve how Windows Explorer works. Looking at the “Folder Options”, you’ll see three tabs (General, View and Search) on top of it which contains configurations on how Windows Explorer works. First, we will be looking at the one which we will be doing much tweaks on.
View Tab
The “View” tab contains a lot of check boxes which can be enabled or disabled. Here are the settings and options which I would recommend that you enable on your machine to improve Windows Explorer.
What Settings to Check?
- If your computer becomes slow when loading files and folders on thumbnails then you should check the “Always show icons, never thumbnails” setting in order to enable it. Doing this will make Windows Explorer load the faster especially if you’re working with a lot of files and folders ever day.

- Another setting which you can enable is the “Use check boxes to select items” option which will help selecting multiple files and folders become easier. This setting works the same as holding the “CRTL” key on your keyboard and clicking on the items which you want to select. When this option is enabled, you can easily select files and folders by simply pointing the mouse on it and checking the small box that appears on its left side. Enabling this feature would help you select plenty of files easily that using the “CTRL” Key method.

What Settings Should be Unchecked?
- Hide empty drives in the Computer folder- When this option is enabled, all empty removable storage devices like thumbdrives, SD Cards, Memory sticks etc. will never appear on the Computer folder even if they are plugged in to your machine. I highly recommend that you disable this option since it could sometimes lead to confusion especially to novice users.

- Hide extensions for known file types- This option should also be unchecked because it could give risks to your machine. Some viruses and malicious files disguises as harmless files but the difference is that most of them will have two file extensions like “filename.doc.exe”. If this setting is enabled, the file will only appear as “filename.doc” which can entice anyone to click on it. To avoid such problems, I highly recommend that you uncheck this setting.
The General and Search Tabs
There are other tabs labeled “General” and “Search” on the “Folder Options” Window which also contains a set of configurations within them. The default settings within these tabs already work best so there is no need of changing them but if you are not satisfied of how everything works on these settings then you can change some aspects of it.
Experimenting Works Best
Different people have varying choices. The settings within the “Folder Options” section are best tweaks according to your preferences. All of the tweaks I have shown above includes just the basic changes that you can do to improve how Windows Explorer works. You can always experiment different tweak combinations on each tab and test them to see which one works best for you. If you’ve gone so far in tweaking some of the configurations within these tabs then you can click on the “Restore Defaults” button at the bottom of each tab Window to put everything to how they used to be before any tweak was made. If you know of other tips and tweaks on the “Folder Options” section please feel free to share them via the comments section.