Learn to Create Unique Screen Saver Using Your Own Photos
Previously, we’ve shown the steps that are involved in setting a screen saver for your Windows 10 machine which would make it look more awesome when on standby but are you aware that there is actually an option that will allow you to use your own set of pictures that are saved in your computer as screen saver?
If you want to add some personal touch to your computer’s screen saver then you can actually do so from the “Personalization” section of the Control Panel feature and in this tutorial, we will be going through the steps in how this tweak is done so you can follow it on your computer and be able to enjoy and relive wonderful memories recorded in photos whenever your machine switches to standby mode.
How to Access the Personalization Section in Windows 10’s Control Panel
Windows 10 has two environments existing in it which makes it different from all the other Windows versions that existed in the past. This innovation has started in Windows 8 and is now carried over to Windows 10 with much improvements of course. One of the things that users really get confused with is the existence of the modern/universal Settings app and the Control Panel. There are some who just view it as a redundancy since there are links in the Settings app that still leads to the traditional Control Panel Window but it actually is a very helpful feature that takes you to different settings and tweaks easily compared to doing them in the Control Panel.
Another fact that you need to be aware of is that the Control Panel Window is quite hard to launch and since we are going to do most of the tweaks in its “Personalization” section, let us first learn how to launch this very important Windows feature that has been around for a long time in every Windows OS version that’s been released in the past.
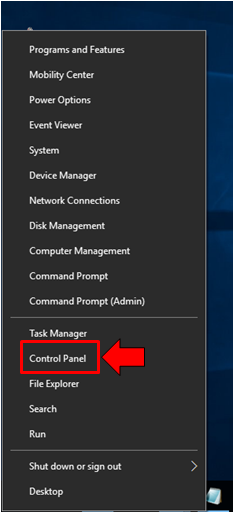
To access Control Panel, you will first need to launch a secret menu by pressing the Windows + X keys on your computer’s keyboard. After you do so, the secret menu will pop-up on the left hand portion of your computer screen and from here, you’ll simply need to click on the link that says “Control Panel” as shown on the screenshot below.
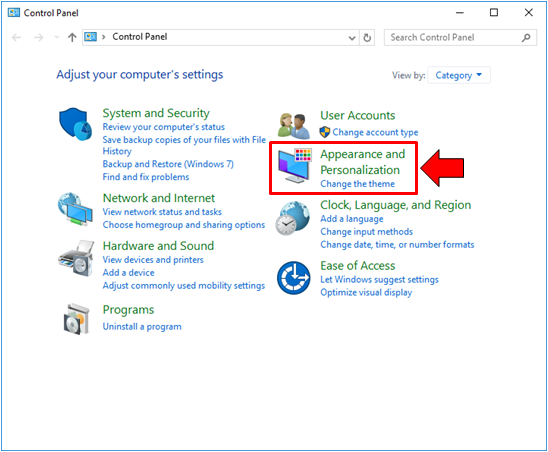
After clicking on the link, the Control Panel Window should launch instantly and take you to its homepage. From here, you will now need to click on the “Appearance and Personalization” settings category so you can see the section that will take you to the tweaks for your machine’s screen saver.
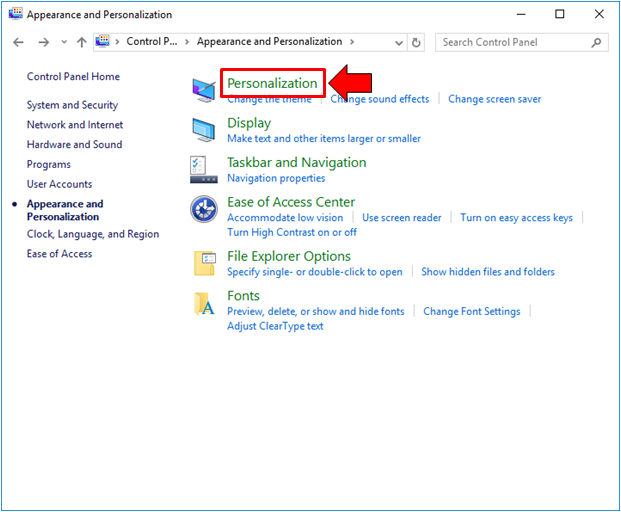
The next Window will now display all available options and subcategories for changing your computer’s appearance and further personalization tweaks. From here, just click on the first item which says “Personalization” as you can see on the screenshot below.
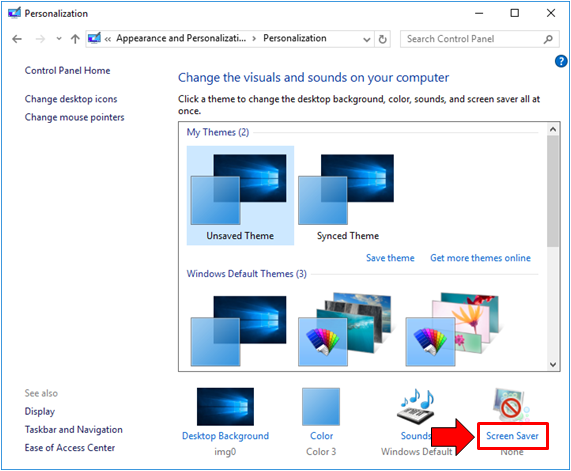
You can also choose to click on the “Change the theme” or “Change screen saver” links that are found under the “Personalization” settings subcategory if you want to change the screen saver. The former takes you the the main settings and options Window which has the “Screen Saver” link that needs to be clicked the settings Window for screen saver while the latter takes you directly to the screen saver settings Window. There are also some themes that has a sound effect and screen saver bundled with them and this is mostly found in those third party themes that can be downloaded for FREE.
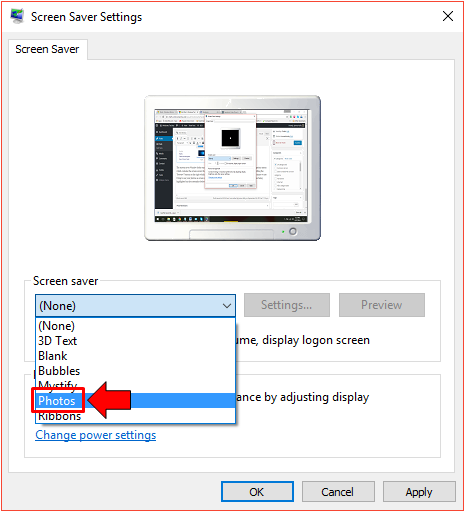
The screen saver Window looks exactly like the one shown below. As you can see, it has a drop-down options menu which contains the screen savers that are bundled for Windows 10. You can test each one of them by hitting the “Preview” button on the right which becomes clickable when you select a screen saver from the list but since we are trying to use your photos as screen saver, we’ll need to click on the one that says “Photos” as you can see being highlighted on the screenshot below.
NOTE:
The “Photos” option won’t work right away after you select it. It still needs a little bit of tweaking for it to work exactly as it is intended to- playing your own photos as screen saver. To make this screen saver option work, you must first make sure that all of the photos which you want to use as screen saver are saved in a single folder and to make it easier to locate, we recommend that you place it within the “Pictures” library although you can also save it into other locations or even other drive partitions if you want to. Just be sure that you are going to locate them easily once you come to the stage of tweaking the “Settings…” for the “Photos” screen saver option.
How to Select the Photos to be Used as Screen Saver
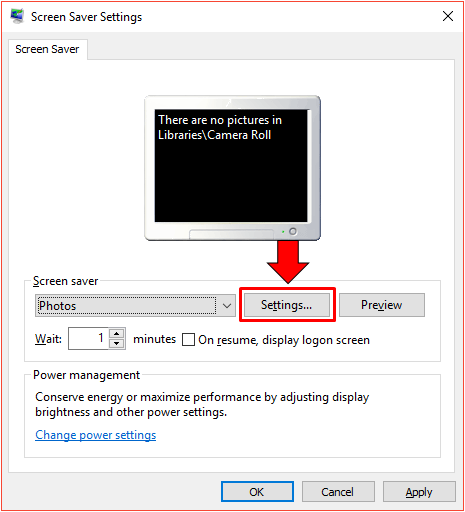
As we have mentioned earlier, the photos that you want to use as screen saver should be saved within one folder in any library (preferably the Pictures library) or drive on your computer. Once you’re done doing this, you will need to click on the button that is found on the right of the screen saver selection box that is labeled “Settings…” as you can see on the screenshot below.
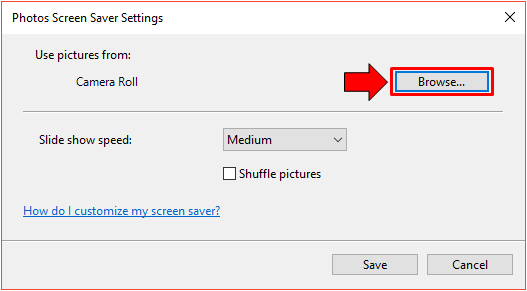
After you click on the “Settings” button, a small Window labeled “Photos Screen Saver Settings” will now appear showing the options for choosing the photos that you’d like to use as screen saver on your Windows 10 machine. From this Window, you will first need to click on the button that is found at the right which says “Browse…” as you can see on the screenshot below so you can browse through your computer’s stored files, folders, libraries and even drives in order to find the folder in which you stored the photos that you want to use as screensaver.
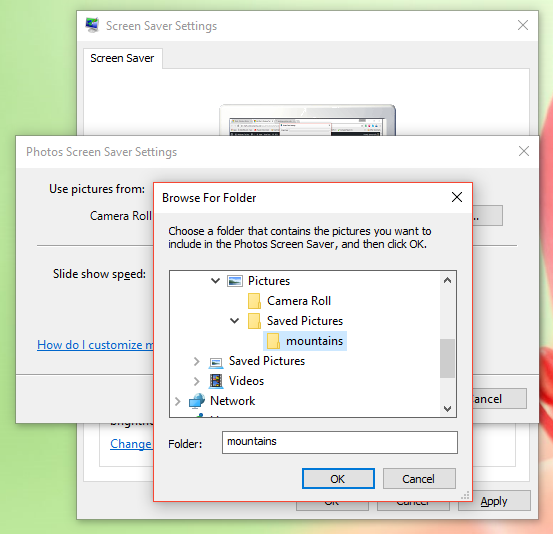
After clicking the “Browse…” button, the “Browse For Folders” Window will then launch and from here, you will need to locate the folder that contains the photos which you want to use as screen saver items that will play on your computer screen whenever it switches to standby mode. Once you find it, simply click on it so it gets selected then hit on the “OK” button that is found at the bottom in order for its contents to be used as screen saver.
The “Browse For Folder” Window will then close right after you click on the “OK” button and you will now be back on the “Photos Screen Saver Settings” Window. From here, you can do further changes to how fast the photos on the screen saver switch from one to the other. There are three speed options that are available which are “Slow”, “Medium” and “Fast” as shown on the screenshot below.
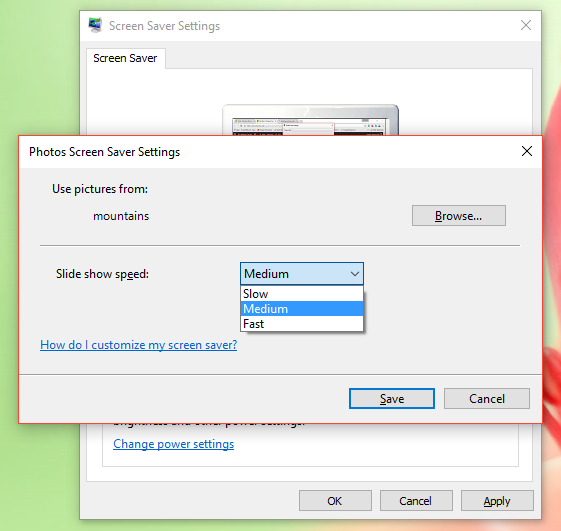
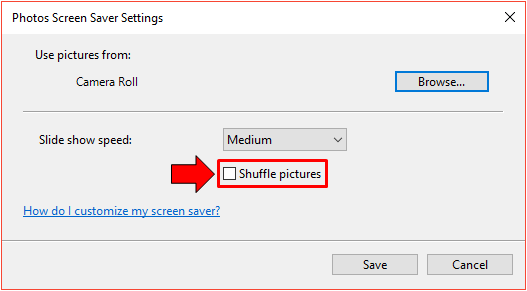
The default slide show speed is “Medium” so you can just choose to leave it that way if you wish to. Another thing that you need to be aware of is that you can choose to make the pictures show in random once they are used as screen saver. This will make it less boring to watch and in order to do this tweak, all you need to do is click inside the tick box that is found just under the “Slide show speed” options selection box which says “Shuffle pictures” as highlighted on the screenshot below.
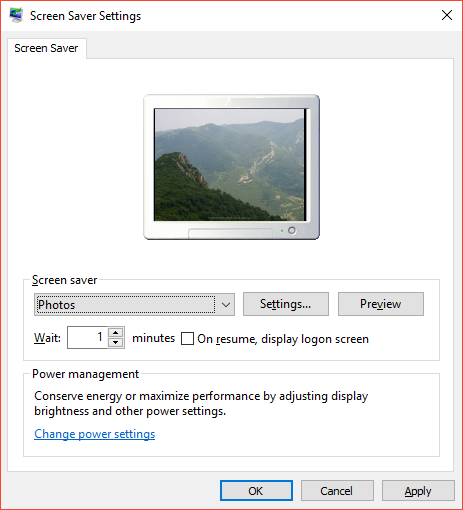
Once you are done choosing the folder where the pictures that you want to use as screen savers, changing the slide show speed and choosing whether to shuffle pictures or not when they play on a slide show, you can now hit the “Save” button in order for all the changes to be applied and you will now be taken to the “Screen Saver Settings” Window. As you can see on the screenshot below, the small preview screen on the top portion of this Window now has the image of one of the pictures that is stored in the folder which you browsed into containing all the photos which you want to set as screensaver. From here, you can choose to first click on the “Preview” button so you can see the new screen saver which you have set for your machine and if it you like it, you can now click on the “Apply” then the “OK” buttons in order to make the changes final.
Want More Screen Saver Options? We’ll Talk About Them On Our Next Tutorial
As you can see, setting your own photos as your Windows 10 machine’s screen saver is actually just as easy as 1,2,3 and if you have followed the steps that we’ve shown in this tutorial, you should now be enjoying and reliving some of your precious memories saved in photographs as your computer sets on standby and the screen saver starts playing everything without requiring you to click or press a single key. There are 6 available screen savers in the latest Windows 10 edition which you can choose from but if you are looking for something else that’s not found in the list of screen savers, you can use third-party once instead.
Now the question is “How?”! In our next tutorial, we will be giving you the top 10 third party screen savers that you can download for FREE for your Windows 10 machine so be sure to stay tuned in with us or you may also join our email newsletter so you won’t miss all of the latest stuff that we fill into our website since you will be receiving them first straight to your inbox!