Learning to Manage Storage Spaces
Memory and storage space belong to the most crucial parts of any operating system. Without such, there would be no place where the operating system can be installed and files will never be accommodated for future use. In our day and age of information, these two work hand in hand in storing, processing and letting users access stuff instantly anywhere they go. However, without proper management, these crucial stuff may easily run out and become corrupted, useless or damaged in the long run.
Windows 8 values your computer’s memory and this is the reason why they included a brand new feature called “Storage Spaces”. It might be your first time to hear about this feature but it’s existing and you can readily use it in managing your computer’s memory more effectively and allows you to add more storage space by using external hard drives or even internal hard drives and combine them to create one big memory called a “Storage Pool”.
A Perfect Feature for Securing Your Files
When you use multiple storage devices to create a “Storage Pool” through Windows 8’s “Storage Spaces” feature and you start storing files on to your computer, it’s like you are storing it in all the devices that composes the “Storage Pool” because the data is copied on all the disks. If in case one of the disks fails, the data you stored into the “Storage Pool” isn’t put to danger. It is like a user-friendly version of the otherwise complicated RAID configuration. Using the “Storage Spaces” feature really secures your files and with it, you’ll never fear losing any of your files again.
Setting up Storage Spaces
After learning what “Storage Spaces” does, it is time to learn how to set it up so you can start using it to increase your computer’s storage capacity and secure all your data as well. Setting up this feature takes some steps but as you will see below, it is easier and cheaper than setting up a RAID configuration. If you are searching for a simple yet effective and cost-efficient alternative for RAID then Windows 8’s “Storage Spaces” would definitely make a very good choice!
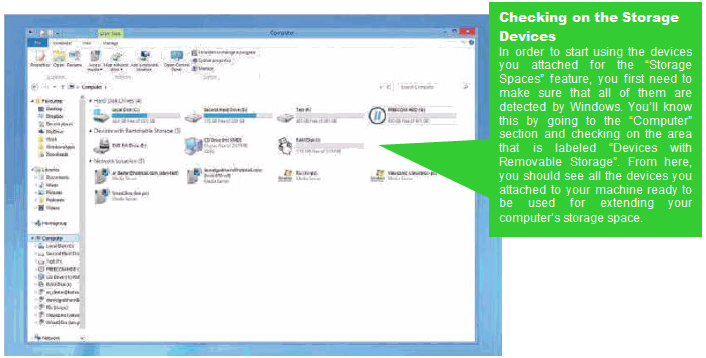
Step 1: Check if All Your Drives are Properly Attached
The very first thing that you need to do is to attach the drives that you are planning to use on to your computer and check if all of them gets detected. If you are planning to use one that should be placed inside your machine (an internal disk) then you need to open your computer and install the hardware first before you can set things up on the software side. Another option is to use external drives but we recommend those that are compatible with eSata, USB 3.0 or Thunderbolt devices so you can be assured of a smooth performance.
Step 2: Open the Storage Spaces Feature
Next, after seeing that the devices have already been attached well and are detected by Windows, you’ll need to open the “Storage Spaces” feature so you can start setting it up for the storage devices you have just connected.

The Storage Spaces Window will now appear. From here, all you need to do is click on the link that says “Create a new pool and storage space”.
Step 3: Select the Drives
After clicking on the link, you might encounter a “User Account Control” Window which asks you to confirm that you want “Storage Spaces” to open. From here, simply click “Yes”. Now, you’ll see all the devices you have attached to your computer listed on the “Storage Space” Window. The drive where Windows 8 is installed will not be included on the list.

Step 4: Check for Important Files and Start Creating a Pool
While selecting the drives that you want to use to increase storage space, you’ll also see an option that says “View files” on the left portion of each drive on the list. This option allows you to inspect the contents of each drive and gives you chance to save them first on a separate drive to secure it from being lost. Once you’re done saving all your important data that are saved on the drives that you want to use for Storage Spaces, simply click on the button that is labeled “Create pool” found at the bottom of the Window.
Step 5: Configure the Drives
On the Window that follows, you can give a name, assign a drive letter, adjust the storage size and choose the type of resiliency that you want for your storage. Just give the pool a name and assign a drive letter to it and be sure to remember these details for future uses. Resiliency will be described deeper on the next step.

Step 6: Choose Your Type of Resiliency
The “Resiliency type” determines how “Storage Spaces” distributes all data that you store on all the drives you used. The first type is labeled “Simple (no resiliency)”and saves only one copy on your drive and therefore offers no protection. The second one that says “Two-way mirror” creates two copies of the data preserving it when one of the drive fails. The third resiliency option that says “Three-way mirror” is even better but you need to have at least five drives attached to your computer to be able to use it while “Party” copies data to at least three drives.

After choosing the type of resiliency that you want to employ to the storage space that you are creating, simply click on “Create storage space” and once it is done, navigate to the computer section using File Explorer and you will notice that the drives which you used does not exist anymore but instead, you will see one new storage space formed by the combination of the drives you selected earlier.
Maintaining Your New Storage Space
Just like your hard disk, the new Storage Space composed of the disks you attached to your computer needs to be maintained. You can check the status of each disk by opening the Storage Spaces Window as you did in the earlier steps on this tutorial or navigate to “Control Panel” then hit “System and Security” and finally click “Storage Spaces”. From this Window, you can also do other tweaks on its settings. Are you experiencing problems on your Windows 8 machine? We would like to hear from you. For any questions regarding the Windows operating system, please feel free to join our community and post your concerns on the comments section at the bottom of this page.