7 Windows 10 Productivity Tricks That You Need to Start Using
Microsoft’s flagship software product called Windows is one of the desktop and mobile operating systems at present that has a host of productivity features and options which are just waiting to be discovered. Most of these have been existing since earlier versions such as Windows XP, Vista and Windows 7 and were carried over to Windows 8 and Windows 8.1. In our previous tutorials, we’ve covered much about these features on Windows 7, Windows 8 and even in Windows 8.1 but now that most users have already made the move to Windows 10, it’s about time that we continue on with the series and expose the latest list of productivity features that are found in this latest Windows operating system version from Microsoft. If you’re still using Windows 8.1 then you should be able to find these same productivity features on your computer but of course, we’d encourage you to make the move to the latest Windows operating system called Windows 10 so you can be one of the millions of users who are already enjoying the improvements, innovations and new features that were incorporated in this newest Windows build. So what productivity features in Windows 10 are we actually referring to? If you want to know them then be sure to get your Windows 10 computer fired up and join us as we explore these awesome features- some old and others new and improved- that will surely boost productivity and take it to the next level while you are using your Windows 10 machine.
1. Add Toolbars to the Taskbar
One productivity trick that is less known to most users is adding toolbars to the Taskbar section of Windows. These toolbars will then help you open certain sections on the Windows operating system quickly without the need of too much clicking and scrolling. To add these very useful shortcuts into the Taskbar, just follow the steps below.
Open Taskbar Properties
First, you will need to open the Properties section of the Taskbar and doing so is very simple. Just right-click an empty space of the Taskbar itself and after you do so, you’ll be able to see a right-click menu where you will need to click on the option that says “Properties” as highlighted on the screenshot below. 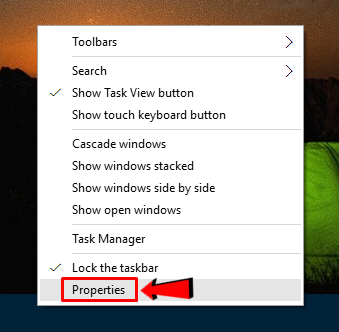
Click on the Toolbars Tab and Select the Toolbars That You Want to Add
After the “Properties” option found on the right-click menu is clicked, you will be able to open a small Window that is labeled “Taskbar and Start Menu Properties” and from here, simply click on the “Toolbars” tab located on top. After doing so, the available Toolbars that can be added will then display on its contents pane and from here, all you need to do is check on the ones that you want to be added into your computer’s Taskbar section. 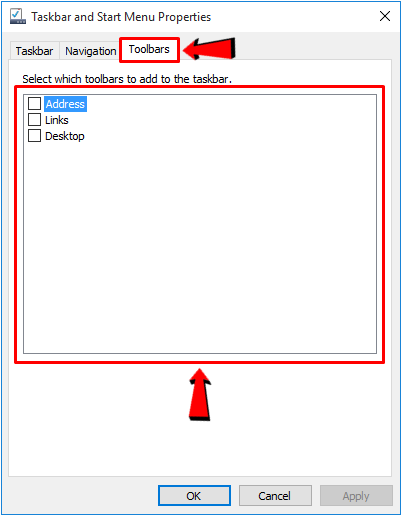 Once your desired toolbars are checked from the list, you will need to click on the “Apply” then the “OK” buttons to make all changes final.
Adding New Toolbars Aside from the Default Ones
Now, as you have seen on the steps that we have shown above, there are only three toolbars which are “Address”, “Links” and “Desktop” that can be added to the Taskbar but that doesn’t mean that its all there is to this productivity feature. Yes! You can actually make your own custom toolbar and have it added to the Taskbar anytime you like. Doing this is also simple and again, you will need to right-click an empty space on the Taskbar itself in order to summon the same right-click menu that we have summoned earlier.  Now, from this right-click menu, you will need to click on the option that says “Toolbars” and after doing so, a new white box will appear where you will see the list of the three default toolbars Address, Links and Desktop and on its bottom portion, there is an additional link that says “New toolbar…” as you can see being highlighted on the screenshot above. Just click on this additional “New toolbar…” link and you will then be able to open a new Window that us labeled “New Toolbar- Choose a folder” as shown below.
 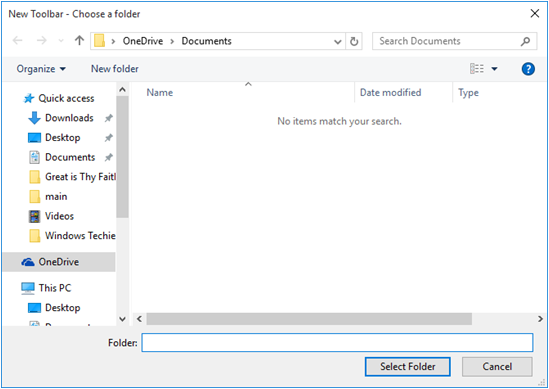 From here, just browse towards the folder that you want to add as a new toolbar on the Taskbar and once you find the folder, simply select it then hit the “Select Folder” button that is located at the bottom-right portion of the small Window. After you do so, the new toolbar will now be added into the Taskbar. For illustration purposes, I have selected my “Downloads” folder and added it as a new toolbar into my machine’s Taskbar and the result is what you can see on the screenshot below.
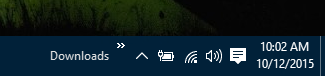
2. Start Using Toolbars for Quick Access to Different Locations in Windows 10
Now that you have learned how to add toolbars into the Taskbar portion of your Windows 10 computer, it is time to learn how you can use them since it won’t be of any use at all if you don’t know how it works for your advantage. Now, using the “Downloads” folder that I have added as a new toolbar into my machine’s Taskbar, all that I need to do to access the different folders under my “Downloads” library is to click on the right-pointing arrow located just beside (to the right) of the toolbar label itself located at the right portion of the Taskbar as highlighted below.  After this right-pointing arrow is clicked, a white box containing all of the stuff that is found in my “Downloads” library will appear and from here, I can simply click on the item that I want to open on File Explorer and that’s it! I have easily accessed a new location in just a few clicks on my machine’s mouse. It really is a lot faster and easier way to get into different system locations or open addresses and links instead of doing things the manual way.
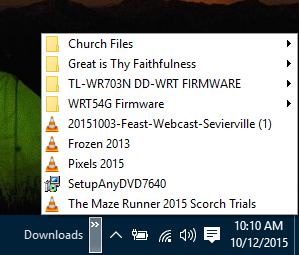
3. Pin Websites to the Start Menu
Accessing websites the manual way really takes time. You will first need to open your favorite browser, enter the website’s URL into the web address box of the browser itself and after doing so, you will need to wait for it to load fully. If you want to open your favorite websites quickly without the need of launching your favorite browser first and entering the URL into the web address box then you can do so by adding a shortcut of them into the new Start Menu in Windows 10. This only works for Microsoft Edge though so if your favorite browser is Google Chrome then you don’t have any choice at all but to use Microsoft Edge in order to take advantage of this productivity trick. To add a website into the Start Menu, you will first need to open Microsoft Edge simply by clicking on its icon that is pinned on the Taskbar or if it has been removed from there, you can access the “All apps” list of the Start Menu, look for “Microsoft Edge” then click on it. Once Microsoft Edge opens, all you need to do is enter the website URL into its web address box and wait until the website itself opens. 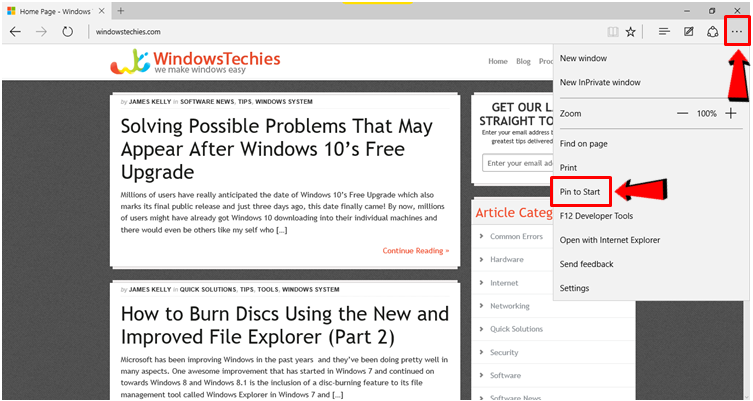 Once the website fully loads, all you need to do is click on the “More actions” icon that is found at the upper-right portion of the Microsoft Edge Window as highlighted on the screenshot above and after you do so, a drop-down options box will open where you will need to click on the item that says “Pin to Start”. Doing this will instantly pin the open website into the “Start” section (the right portion where the modern/universal app tiles are found) of the new and improved Start Menu in Windows 10.
 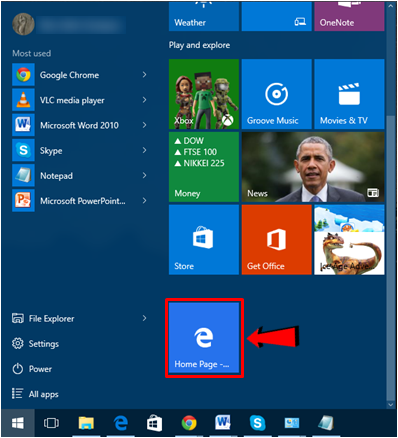 As you can see on the screenshot above, a new shortcut has now been made for the website that you have opened in Microsoft Edge earlier. To launch the website instantly without having to open a browser first, all that you need to do is click on this shortcut and Microsoft Edge will launch right away and automatically load the website. Now that’s a great savings in time and energy especially if you need to do a lot of other things on your Windows 10 machine.
4. Use Keyboard Shortcuts for Accessing Modern Features
One of the most effective way in accessing different locations, features and tools in Windows is by using keyboard shortcuts. This trick has been available even in older Windows editions like Windows XP, Vista and Windows 7 but starting in Windows 8, there have been new keyboard shortcut combinations that were introduced which are all designed to accommodate the Mobile environment which has been made to coexist with the traditional Desktop environment that we have all been accustomed with. Below is a list of these new keyboard shortcuts coupled with some brief descriptions of what they do.
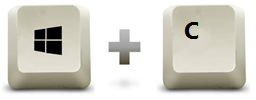
- Windows + C- When this keyboard shortcut combination is pressed, the Charms bar (in Windows 8 and Windows 8.1) slides in from the right-edge of the screen.
- Windows + S- Press this keyboard shortcut combination in Windows 8, Windows 8.1 and even on Windows 10 and you will be able to open the modern Search screen where you can simply enter your search query into the designated search input box.
- Windows + X- A new keyboard shortcut that has just been introduced in starting in Windows 8 and was carried over to Windows 8.1 and now in Windows 10 to assist with the missing Start Menu (in Windows 8 and Windows 8.1) and to make it easier for users to access system locations, settings and tools in Windows 10. This keyboard shortcut opens the WinX menu also known as the Admin menu which pops out of the bottom-left portion of the screen.
- Windows + I- Modern Windows versions such as Windows 8, Windows 8.1 and Windows 10 has a new environment that coexists with the traditional Desktop world which we’ve all come to love. Along with this new Mobile environment are new ways in changing some system presets and one way is by accessing the modern Settings screen. Pressing the Windows + I keys in your Windows 10 machine (and even in Windows 8 and Windows 8.1) will open the modern Settings Window instantly.
- Windows + A- Want a very quick way in accessing the prompts, notifications and other messages coming from Windows and even those that came from third party applications that are installed on your computer? Doing this is very simple and if you want to use a shortcut, all you need to do is press the “Windows + A” keys and the Action Center section should slide-in from the right edge of your computer screen. From here, you can view the prompts, notifications and messages that comes from Windows informing you about some stuff that you need to know about and as well as those coming from third party applications informing you about the stuff that you need to know regarding their present status. At the bottom portion of the Action Center screen are buttons which are collectively called “Quick Actions” which will help you activate or deactivate Wi-Fi, Bluetooth or get into different system locations quickly.
- Windows + H- Another brand new keyboard shortcut combination that has just been added in modern Windows operating system versions (Windows 8, Windows 8.1 and Windows 10) is “Windows + H”. Try pressing this keyboard shortcut on your machine’s keyboard and you will be able to open the “Share” screen which will allow you to share certain contents through email or social media app that you have installed on your computer.
- Windows + K- Just like the previous keyboard shortcut, “Windows + K” is also a newly introduced one which is made to make it easier for users to open the “Connect” screen which would display a list of devices that your computer can actually connect to via Bluetooth and other wireless means. This includes audio and display devices which may be connected to your machine via wireless means and as well as those that are attached to your machine through different wired interfaces such as HDMI, VGA and others.
- Windows + L- Are you in a hurry to leave your computer at home or in the office and you don’t want anyone else to get access to it? You can use the “Windows + L” keys to quickly lock your computer screen and prevent unauthorized access to the stuff that you are currently working or sneak into the opened tabs on your favorite browser.

- Windows + E- Windows Explorer has been renamed File Explorer in modern Windows operating system versions like Windows 8, Windows 8.1 and Windows 10 and if you want to open this tool quickly on your computer, all you need to do is press the “Windows + E” keys and after doing so, the File Explorer Window should open instantly which lets you avoid all the clicking and scrolling that would be involved along with the process if File Explorer is accessed manually.
- Windows + P- Do you have a secondary screen connected to your Windows 10 laptop or PC? If that’s the case then you can use the options under the “Project” section to control whether your screen is displayed on that secondary screen, choose to just extend it so that the secondary screen shows a different Desktop than what you are using or just make the secondary screen work and turn off your computer screen. The options for this “Project” feature can easily be launched simply by pressing the Windows + P keyboard shortcut combination.
5. Use Keyboard Shortcuts for Quickly Switching Through Active Windows
Aside from the new shortcuts that are available in Windows 8, Windows 8.1 and Windows 10, there are also others that are designed to let you skim through some active Windows of apps and programs on your computer without really using the mouse. This will then translate to quick completion of tasks and smooth transition between open stuff. If you want to know what these keyboard shortcuts are then here they are:
- Alt + Tab- This keyboard shortcut is available in Vista, Windows 7 and was carried over to Windows 8, Windows 8.1 and even to Windows 10. It basically opens a screen that shows all of the active tasks on your computer and if you keep on holding the “Alt” key and then press the “Tab” key again and again then you will be able to move from the first thumbnail down to the next one until you reach the last one and back the first one once again. Once the active program or application that you want to open is selected, simply release both keys and the program or app will open instantly.

- Windows + T- All active programs and apps in the Windows operating system display icons on the Taskbar which is found at the bottom portion of the screen. If you want to take a quick peek on what each of these programs and apps contains without needing to point the mouse on them then you can use the “Windows + T” keyboard shortcut to do so. If you want to move through active program and app Windows on the Taskbar the just keep holding the Windows key then press the “T” key again and again and you will see that the icons will be highlighted one after another.
6. Open Different Tools Using Keyboard Shortcuts
Another productivity trick that can be accomplished using keyboard shortcuts is launching different built in tools in your Windows 10 computer. In this portion of our tutorial, we will show two important tools in your Windows machine that you might need especially when you’re trying to solve problems on your computer.
- Windows + R- There would be times that the mouse would be unresponsive especially when your computer is not working that well and during this trying times, you might need to open File Explorer or any other system locations. In order to still be able to launch different stuff even without the use of a mouse then just launch the “Run” box tool simply by pressing the “Windows + R” keys. Once this tool opens, you can simply enter the command into its input box then hit the “OK” button to launch the program, app or system location that is represented by the command that you have entered.
- CTRL + Shift + Esc- There would be times that some programs and apps on your computer would not respond so well or worst is when they really don’t respond at all. When this happens, you can easily close such active but unresponsive programs and apps using the Task Manager tool. To access this tool even without the use of your mouse, you can just simultaneously press the “CTRL + Shift + Esc” keys and just wait for a few seconds for the Task Manager tool Window to open and once it does, just feel comfortable to use it in closing all the apps and programs that you wish to get rid of especially those that are not responding so well so you can restart them and make them responsive once again.
7. Use Keyboard Shortcuts to Help You Accomplish Things Quickly When Working With Documents
- CTRL + C- Having to do the right-click method of copying certain pictures, words or even an entire paragraph from one document or even from a webpage towards a document is a big hassle especially if your computer is slow (probably because of dwindling system resource space) so instead of experiencing delays in doing this common task while working with documents, you can simply just highlight the stuff to be copied and once they get selected, simply press the “CTRL + C” keys to copy them instantly.
- CTRL + V- After learning the keyboard shortcut for copying some stuff from one location to another, you will of course be curious about the shortcut for its partner function which is called “Paste”. Well, its keyboard shortcut is just one letter away from that of the “Copy” function. To paste items quickly to different locations on your computer, all you need to do is press the “CTRL + V” keys and after doing so, the stuff that you have copied earlier should now be pasted to the new location where you want it to be in.
- CTRL + Z- Want to get rid of enormous changes in a document that you are working on? This can be accomplished using the mouse and the “Backspace” or “Del” key on your machine’s keyboard but if you want to really do it quickly and start from the point where you initiated the changes then simply press the “CTRL + Z” keys. Doing this will undo all the changes that you have recently made which thereby ensures that what remains are only the stuff that you have started with before making any changes on a certain document or photo that you are editing.

- CTRL + Y- Have you pressed the “CTRL + Z” keys too many times which caused some of the stuff you’ve added to a document be suddenly lost? If this is the case then you can add back the deleted stuff by using the keyboard shortcut for the “Redo” function. To be able to do so, just press the “CTRL + Y” keys simultaneously until your desired point is on the document is reached. It’s really a lot comfortable to use than clicking on the “Redo” icon that is located on the top-left portion of a Microsoft Office application such as MS Word, Excel or Powerpoint.
- CTRL + X- Still on the documents aspect and even on File Explorer, you can easily “Cut” things out from one location and have it copied to a new one by using the “CTRL + X” keys. While this option is also available on the right-click menu and as well as in the ribbon-based options section on top of File Explorer, it is still a lot easier to use a keyboard shortcut combination and “CTRL + X” is the duo that you need to press.
- CTRL + B, CTRL + I, CTRL + U- Now, if you want some quick ways in making the characters and words that you have typed in become Bold, Italic or Underlined then you can simply use “CTRL + B” for Bold, “CTRL + I” for Italic and “CTRL + U” for Underlined. These keyboard shortcut combinations are very useful especially when you are working with documents on Microsoft Word, Microsoft Excel, Microsoft PowerPoint and even on Microsoft Publisher. It also works even in other text-editing applications that are not developed by Microsoft and in fact, I am also using these shortcuts whenever I write tutorials for WindowsTechies.com directly into my post management application on WordPress. So instead of spending some time looking for the buttons that correspond to these formatting options, just use these keyboard shortcuts and you will surely appreciate that they actually exist and do the trick quickly and instantly for you!
More Productivity Tips to Come as We Discover Them in Windows 10!
As you can see, there really are plenty of tricks that you can actually use to make it easier for you to complete any task while using your Windows 10 computer and the list that we have shown here isn’t everything yet. There are still make other tricks just waiting to be discovered and we’ll compile them all for a future tutorial. For now, you can enjoy trying out the stuff that we have included in this tutorial and if you liked each one of them, please don’t hesitate to share them with your friends and spread the word through Facebook and Twitter!