How to Schedule Shutdowns and Other Tasks in Windows 10
Do you want a quick way in scheduling certain tasks such as shutdown, logoff, lock or even starting a program in your Windows 10 machine? These actions can readily be performed using certain built-in features such as the Task Scheduler tool or the Command Prompt but most of the steps involved are quite advanced and hard to follow especially to novice users.
Thankfully, we have discovered a tool that let’s you do these tasks easily and schedule then on your desired time of the day. You can also choose to have these tasks repeated daily or in any frequency you like. Yes! There exists a handy tool that help you do these with ease and the good thing about it is that it’s actually free to download!
The tool is called “Simple Shutdown Scheduler” and while its name only indicates 1 task (shutdown), concluding that it can do that single thing alone would be wrong because it can do some other tasks such as scheduling when your computer restarts, logs off, sleeps, powers off, locks and it can even schedule when you’d like to start specific program.
If you want to get this tool and learn how you can use it in scheduling the tasks that we’ve mentioned above then all you need to do is follow the steps that we’re going to show in this tutorial.
Where to Get Simple Shutdown Scheduler
Did the word “free to download” ring a bell in your head? If you’re thinking that this freeware contains some bloatware then you are wrong because it is a clean and pure free open-source tool that is designed to install just one application alone and that is the Simple Shutdown Scheduler with no strings attached.
Just make sure to download it from its official download page and once you get it into your computer, you will need to run the .exe file in order to initiate the installation process.
How to Install Simple Shutdown Scheduler (SSS)
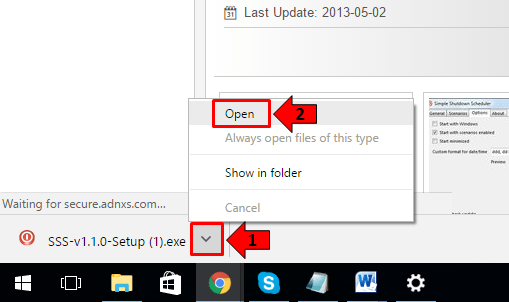
Once you are done downloading the install file for the Simple Shutdown Scheduler or SSS software for short, all you need to do is run the downloaded file to start the installation process. If you used Google Chrome in downloading it, you will be able to see the downloaded file at the bottom portion of the Google Chrome Window and all you need to do is click on the arrow-up icon on its right portion in order to pull up a menu where you will need to click the option that says “Open” as you can see below.
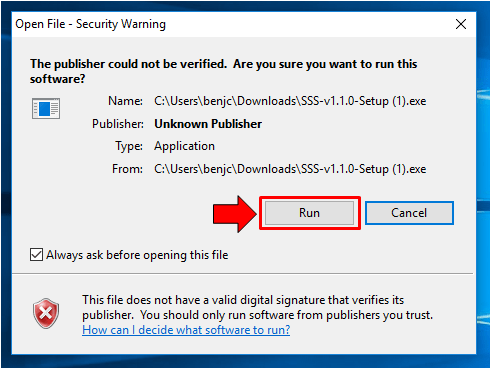
After clicking the “Open” option, there should be a security warning prompt telling you that running the file can cause potential problems and threats since the publisher could not be verified. Just ignore this message and hit the button that says “Run” as you can see being highlighted on the screenshot below.
Next, the User Account Control feature will show a prompt which is a normal security step that you need to go through when installing unverified apps. From here, all you need to do is click on the button that says “Yes” in order to proceed to the next step.
NOTE:
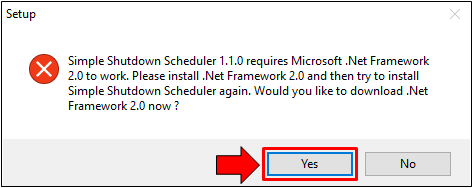
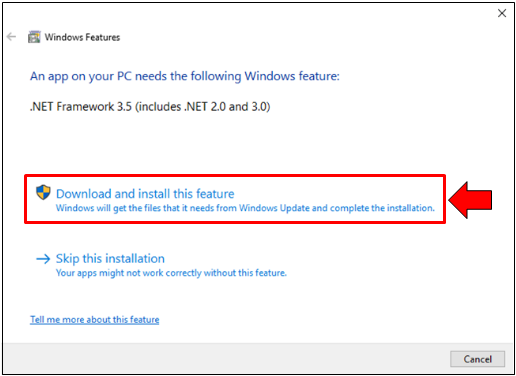
Upon installing Simple Shortcut Scheduler, you might encounter a message that would first require you to install Microsoft .Net Framework 2.0 as you can see on the screenshot below. This is because the SSS (Simple Shutdown Scheduler) software actually requires it to work properly. If you see this prompt, just click on the button that says “Yes” in order to open the “Windows Features” Window.
On the Windows Features Window, you will need to click on the link that is found on its bottom portion which says “Download and install this feature” as you can see being highlighted on the screenshot below and the required .Net Framework 2.0 will automatically be downloaded. Just wait for it to be downloaded and installed and the setup wizard for SSS should just proceed on to the next step once the required feature gets installed into your Windows machine.
If you did not encounter the step which requires you to install Microsoft .Net Framework 2.0 then it means that it has already been installed into your computer maybe because of another program which you installed before that required the it so you don’t need to download and install feature. The Simple Shortcut Scheduler install wizard will just continue with the installation process and all you need to do is follow the next steps until the tool gets completely installed on your Windows computer.
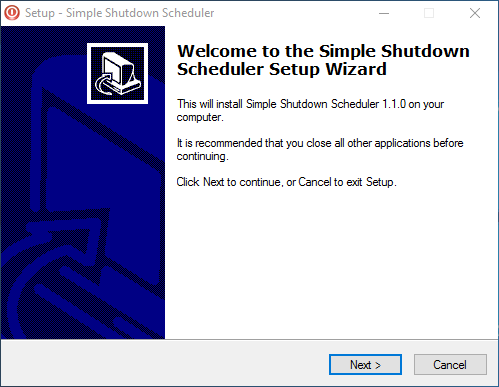
The whole install process should not take that long because the application is just a small one and as its name itself suggests, it is really a simple yet very useful tool that will help managing your computer a lot more like a breeze. Once the last step appears, just click on the button that says “Finish” and Simple Shortcut Scheduler should be ready to use right after you do so.
Setting Up Simple Shortcut Scheduler for the First Time
Now that you’ve already installed the Simple Shortcut Scheduler tool into your Windows computer, it is time to use it for its first obvious job which is scheduling a shutdown process for your machine but before that, let’s first get familiar with the software’s interface which you can see on the screenshot below and set it up so you can use it in scheduling certain power off tasks.
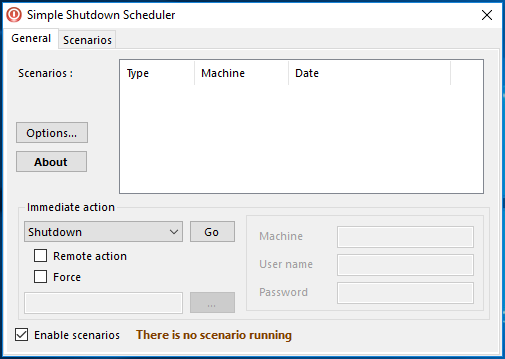
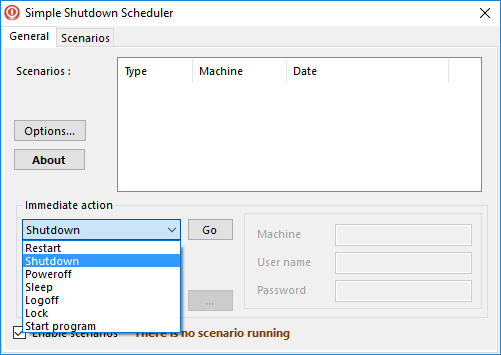
As you can see, there are two tabs on top which are labeled “General” and “Scenarios” on top and the contents of the former is what is being shown by the software by default when you first launch it. The “Scenarios” tab simply contains all of the scheduled tasks that you have created and it will be empty by the first time you launch the Simple Shutdown Scheduler tool for the firs time as you can see on the screenshot below.
Before creating your first ever scheduled task, you will first need to make sure that the tool is configured in the right way so it can work smoothly whenever you use your computer. To configure it, you will need to go back the the “General” tab the click on the button that is labeled “Options…” that is found at the left as you can see being highlighted below.
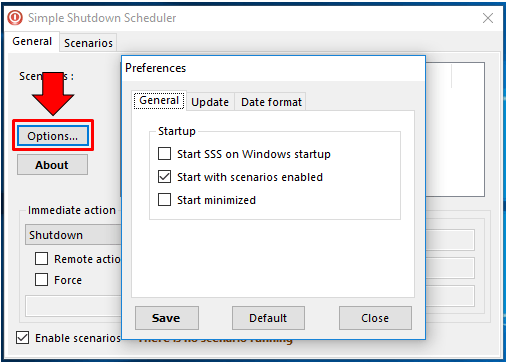
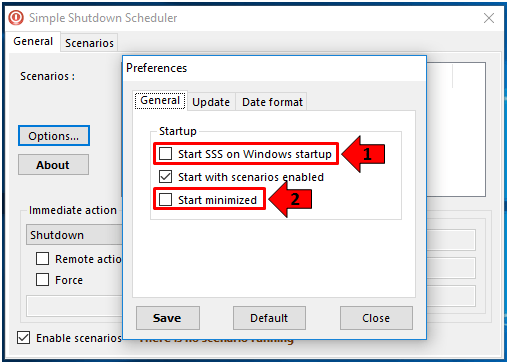
After clicking on the button that says “Options…”, you should then be able to open a small Window which is labeled “Preferences” and under this Window, you will need to enable the options that says “Start SSS on Windows startup” and “Start minimized”. The first option will make sure that Simple Shortcut Scheduler will automatically start when you open your computer and the third option will make sure that it does not become annoying by starting it minimized into the System Tray section of the Taskbar.
After enabling these options, all you need to do is click on the button which is found at the bottom-left portion of the small “Preferences” Window which says “Save” in order to apply all the changes that you have just made. Once you are done with this, you’re now ready to create some scheduled shutdown and other power off or Desktop locking tasks using the Simple Shortcut Scheduler tool.
Creating Your Very First Shutdown Schedule
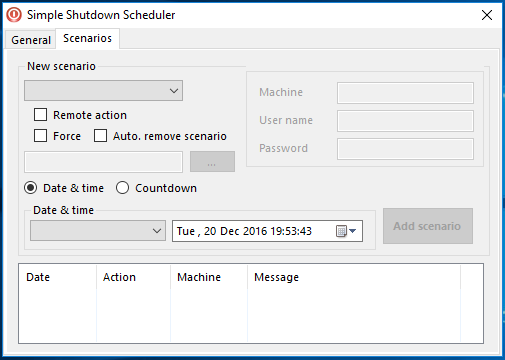
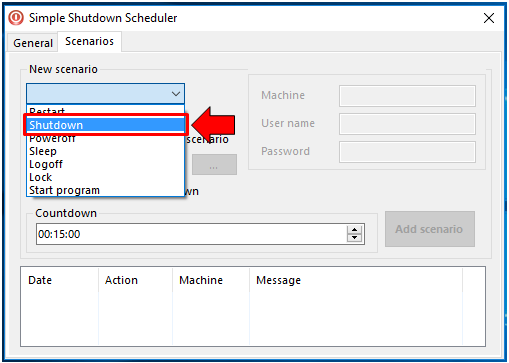
In order to create a scheduled Shutdown task for the Simple Shutdown Scheduler tool, all you need to do is click on the drop-down options box that is found under the “New scenario” section of the “Scenarios” tab as you can see on the screenshot below and on the options that would appear in the drop-down menu, simply select the one that says “Shutdown”.
To make sure that the Shutdown process will be executed even if there are programs that might prevent it from happening, all you need to do is check the option that says “Force” as you can see being highlighted on the screenshot below. Doing this will ensure that the new task or scenario that you are about to create will really be executed no matter what!
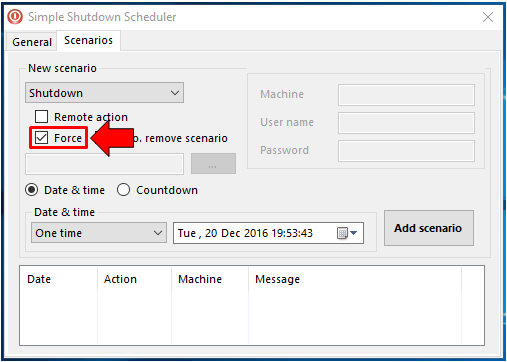
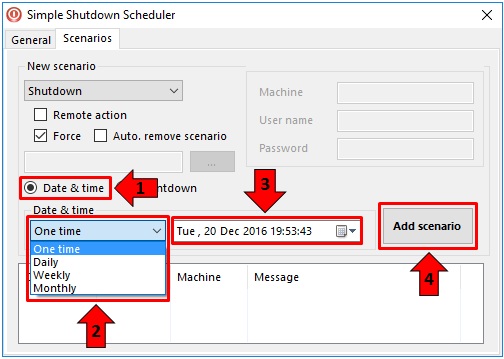
Next, you will need to choose whether you’d like the shutdown scenario to happen after a countdown or on a specific date and time. We’ll first choose the “Date & time” option and next under the “Date & time” settings section, you will need to specify whether you want the shutdown event to happen “One time”, “Daily”, “Weekly” or “Monthly” as you can see on the screenshot below. After choosing your desired frequency, you can specify and set the date and time when the shutdown would happen and it is the final step in creating a new shutdown scenario. Once everything is set, just click on the button that says “Add scenario” as you can see being highlighted as #4 on the screenshot below.
After adding and saving the scenario which can you actually did after clicking on the “Add scenario” button, it should now appear under the “Scenarios” section of the “General” tab. Go ahead and click it and you should be able to see that the empty box now has the very first shutdown scenario which you have just created.
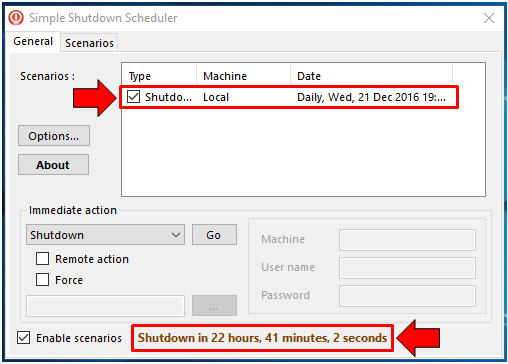
And at the bottom portion of the “General” tab, you should be able to see the countdown timer which indicates how many hours, minutes and seconds still needs to pass before the shutdown scenario happens.
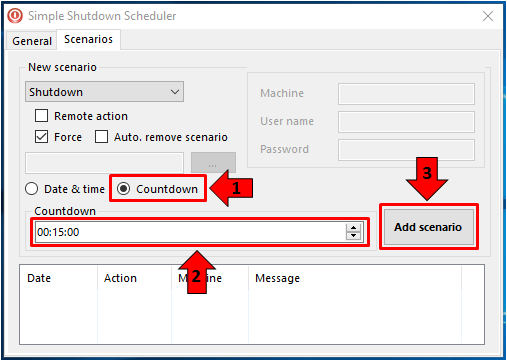
You can also choose to perform a shutdown event using the “Countdown” option, in order to do this, simply select the “Countdown” option and after you do so, you’ll notice that the boxes for selecting the frequency as well as the Date & time will disappear. What would replace them is just a single box where you can enter the amount of time that you want to set as starting point for the countdown as you can see being shown on the screenshot below.
So that’s exactly how you can add a shutdown scenario in the Simple Shutdown Scheduler software but that’s not everything that you can do with the tool itself. There are still some other scenarios that you can choose to perform on your chosen time and that’s what we’re going to discuss as we move on in this tutorial.
What Other Scenarios Can SSS Schedule?
Aside from scheduling a shutdown process in your Windows computer, Simple Shutdown Scheduler also allows you to schedule other tasks such as Restart, Power Off, Log Off, Lock and it can even be set to start a program of your choice though it only works for Desktop programs and not with the modern universal apps.
The process in setting up any of these tasks is the same with setting up a shutdown schedule using the software. Just be sure to select the scenario that you want to set a schedule for and follow all the steps that we’ve already shown above.