Sharing Your Files Safely
One of the things that we often use our computers for is sharing files either by using a wireless method (bluetooth or on a wireless network) or by transferring it to a portable storage device and finally copying it to the machine that you want to save the files in. However, with Windows 8, all of these are a thing of the past. All you need to do is setup all your devices correctly so if you have some pictures, music or a nice movie in one of your PCs at home which is stationed downstairs, you can easily have it on your Windows 8 tablet that you usually take with you when you go to your bedroom upstairs.
It’s not only a wonderful way to use your Windows 8 device to its fullest but is also extremely easy to set up. The files that you’ll be able to share isn’t just purely media but even documents! With this feature, you’ll be able to share documents and files to your other device and continue working with it wherever you go.
There’s really an endless list of possibilities that can be derived from this feature and you will learn how to make the most out of it in this tutorial.
Learn to Access and Create a HomeGroup
The HomeGroup feature was first seen in Windows 7 and has easily become popular to people who are looking for a fast, easy and secure way of sharing files between different devices. Enabling the share feature on all of your Windows 8 devices means turning on the “HomeGroup” feature. To do this, simply follow the steps below:
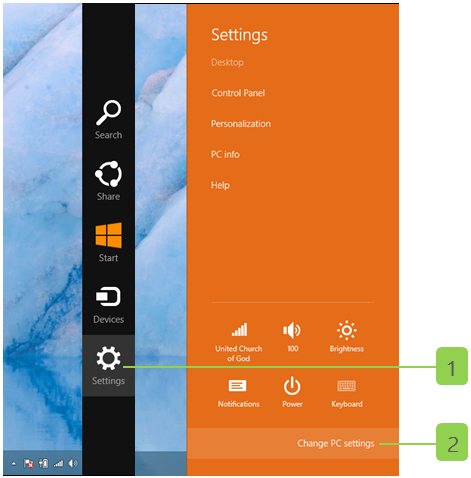
1. Access the “Settings” Charm by getting to the “Charms Bar”. If you’re new to Windows 8, you can access the Charms bar by pointing the mouse to the upper or lower-right side of the screen until a bar containing 5 icons appears. These 5 icons represent the “Charms”. From here, simply click or tap on the icon that is labeled “Settings”.
2. Once the “Settings” screen appears, click on “Change PC settings”.
3. On the PC settings section, you should be able to see the “HomeGroup” section on the left-hand side of the screen. When you click or tap on it, you will see its contents open at the right side of the screen. If a HomeGroup has not yet been setup on your PC, you should be able to create one by clicking a button labeled “Create” found at the right portion of the screen.
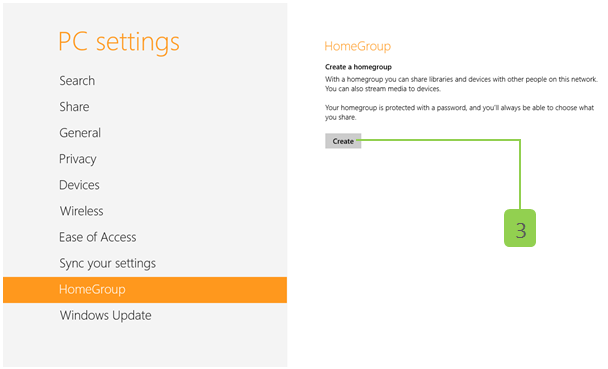
After clicking on the “Create” button, it won’t take too long until the HomeGroup settings and options appears at the right. From here, you’ll see some sliding on/off switches for available tweaks that you can do to the HomeGroup you have set up.

4. To add some devices to your HomeGroup, you will need to take note of the password under the “Membership” section. This is what you are going to enter on each of the device that you want to be joined to the HomeGroup that you have setup.

5. To open HomeGroup on your other Windows 8 devices, simply access the “Settings” charm then click or tap on “Change PC settings” then hit HomeGroup just like what you did in Steps 1 and 2.
View Files and Folders in Your HomeGroup
After setting up the HomeGroup feature on your PC and have it running on the existing network that you have at home, you can start viewing the files as if they are folders on your machine’s hard drive. To do this, simply follow the steps below.
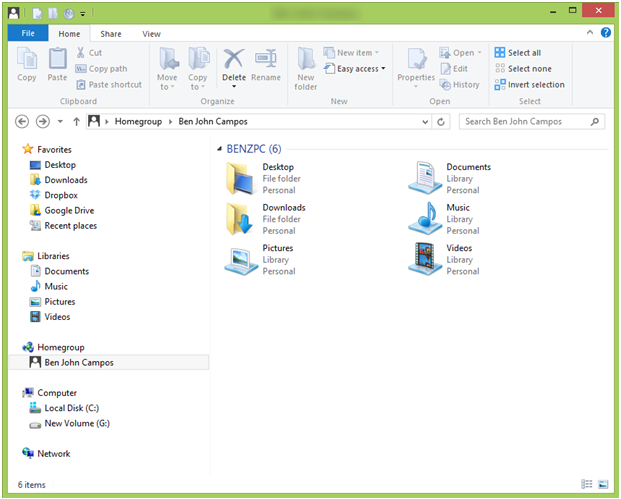
6. Go to the desktop screen and click on the “File Explorer” icon on the taskbar.
7. Once the File Explorer Window opens, look for the “HomeGroup” item on the navigation pane located at the left. After doing so, you will see your account’s name and picture on the main screen which you’ll need to click to view the files and folders that are enabled for sharing.

8. If you want to view the other devices and the files that are being shared by them, simply open the “HomeGroup” folder again (as in Step 6) after adding other devices to your computer and you will see them as other users within the “HomeGroup”. Clicking on each one of them will show the stuff that are being shared by them.
9. You can tweak the HomeGroup settings by going to the “HomeGroup” section on File Explorer’s navigation pane as in Step 6 and 7 then on the ribbon options on top, you’ll see a “Change homegroup settings” link which you need to click to open all available tweaks that can be done on the HomeGroup you’ve set up such as changing its password, tweaking what type of stuff are being shared, allowing other devices to play the contents you shared etc.
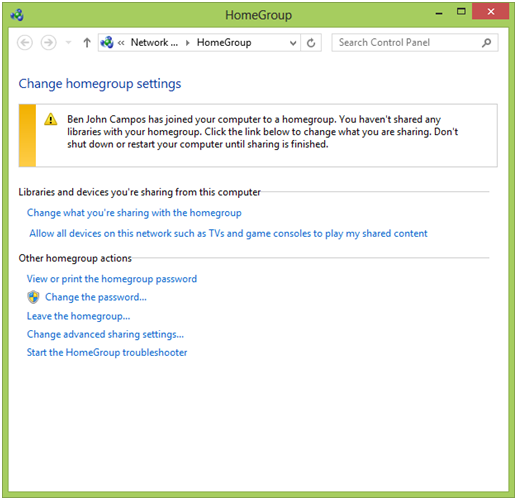
10. From the options, you can also find a link that will open the HomeGroup troubleshooter. This tool will help you identify problems and fix them to make your sharing working smoothly again. Another way of accessing this tool is by going to the Start Screen and start typing “HomeGroup” then click on the “Settings” search results category. From here, you should be able to find a link that says “Find and fix problems with HomeGroup” and clicking on it will open the troubleshooter.

Quickly Share Files to the HomeGroup
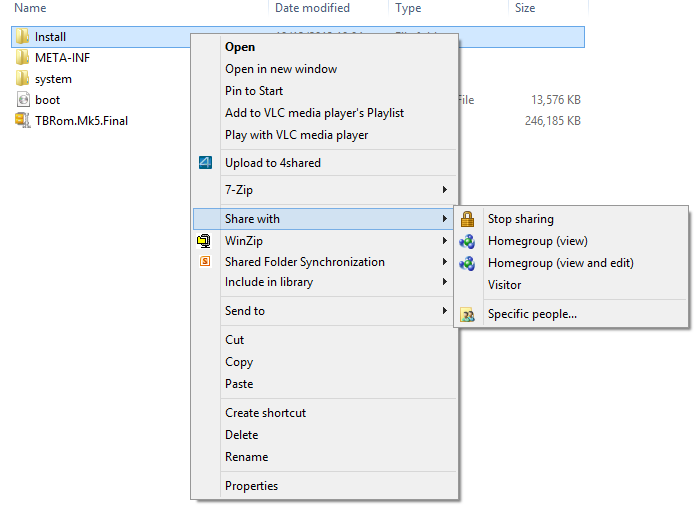
When you’re working with some files and you want to share them to your other devices, simply save it first (if it’s a document) and take note of where you stored it so you can easily find it. After saving the the file, simply navigate to its location then when you find it, just right-click on it, hover your mouse over to the “Share with” option then on the pop-up options that appears, just click on “HomeGroup (view)” if you just want it to be viewed but not edited or “HomeGroup (view and edit)” if you want to do both viewing and editing on the file.
Share Your Files Quickly and Safely
The HomeGroup feature is no doubt a very useful tool in sharing all your important files as well as favorite media to your other Windows 8 devices or even to other people who are joined to your network and as you can see, setting it up is very simple. Take time to experiment on this feature and you’ll surely love it especially the way it gets all your stuff to all your devices in not time. Say goodbye to all the manual methods of bringing your files along with you for in Windows 8, the HomeGroup feature is going to take care of it all for you!