Adding a Printer Device to Your Windows 8.1 Computer
Every Windows computer is capable of being connected to other devices such as printers, cameras and others such as microphones and in most of this situations, you will be needing a USB cable or in rare occasions, a FireWire cable. Devices such as printers have an installation disk that comes with it which is used in loading all the needed drivers and as well as its control panel and other additional features into the host computer.
Other devices like webcams, microphones may also come with disks depending on the brand and the features that it offers but most will work right away after being plugged in to any USB port on a computer. These type of devices are mostly generic ones and the drivers that can make them work are often included in Windows Updates or in other cases especially when your computer is connected to the Internet, Windows will just automatically search for a driver from any online source that it finds. In this tutorial, we will be looking at the steps that are involved in installing and adding a device to your computer so you can start using it in doing certain tasks.
Preparing the Device
In every device installation that you are going to do especially in the case of printers, you will first need to do some preliminary steps to make sure that the installation process really goes through. Here’s a list of tasks that you need to do first before trying to establish connection from the device to your computer
1. Check for Wires to be Used
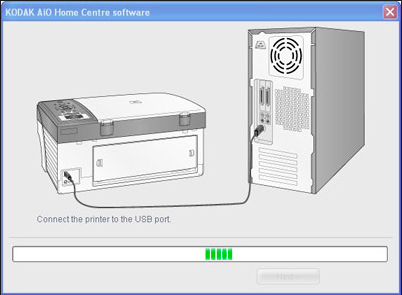
Since we will be using a printer here, you will need to make sure that the needed wires are available. Printers usually use a USB wire connection so check for one from the packaging and be sure to have it connected to the port on the printer itself. Also, you need to plug in the power cord to its designated port on the printer as well. Once everything is in place, plug the printer to a power source and turn it on.
2. Install the Cartridges
Printers won’t work without ink cartridges so be sure to check the user manual to see how you can place the ink cartridge into your printer. In most printers, there are two inks, a black and a colored one that you need to put properly in place on its assigned slot inside the printer. Don’t panic or get frustrated because all of the instructions should be found in the users manual.
3. Prepare the Installation Disk
Again, every complex device such as a printer that is capable of being connected to a computer will not work if you won’t install its drivers which is actually saved inside the installation disk that comes with its packaging so be sure to get this disk, insert it on to your computer’s DVD drive and initiate the installation. There’s a wizard that will guide you through the installation process so you shouldn’t worry about getting mistakes. Also, if you are going to install it into a laptop computer, be sure that the battery level is enough for the whole installation process because it takes quite a longer time to complete in most printer brands. If you see that the battery level will not suffice then it will be good to just plug your computer to a power source.
4. You’re ready!
After the drivers are installed, you can now connect the other end of the USB connection cable into your computer. Be sure that the printer is plugged in to a power source and each end of the wires both for the power cord and the USB connection fit tightly into their designated slots.
Adding the Device
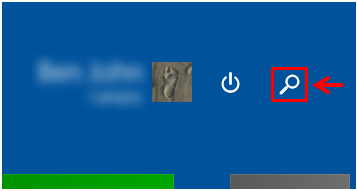
After making sure that the power and as well as the other connections are perfectly in place, you will need to check if the device has been recognized by your computer or not. To do this, you will need to access the “Devices and printers” section on your Windows 8.1 computer. Just access the Start Screen first and once you are on it, click on the “Search” button that is located at the top-right portion of the screen.
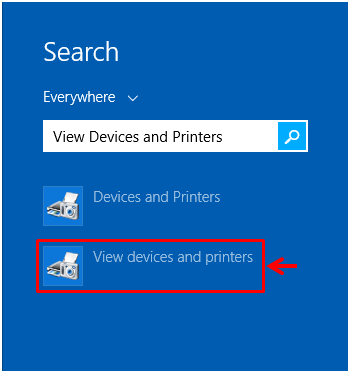
After doing so, the Search screen will appear from the right edge. On this screen, you will need to input the words “View Devices and Printers” into the search input box that is located on its top portion and after doing so, the search results should display the “View Devices and Printers” shortcut. This is what you will need to click so you can open the Window where you can see all the devices that are connected to your Windows 8.1 machine.
Now, try to see the brand and model of your printer device. You need to take note of this information so you can easily spot it on the Devices and Printers Window. If there has already been a lot of printers that were connected to your computer in the past, the Devices and Printers section will be filled with entries that represent each of these printers and in case most of them are of the same model, you might be confused along the way so be sure to know your printer device details first.
Once you already know the brand name and model of your printer, it is time to check on the Devices and Printers Window if it is properly connected or not. A printer that is properly connected will have a green circular icon that has a check mark in it as you can see on the screenshot below under the Printers and Faxes section.

On the other hand, if a printer is not properly connected or is totally disconnected from your computer, a triangular icon with an exclamation point (!) inside it will appear at the bottom-left portion of the thumbnail that represents it as you can see below.

If this happens, you can do some inspection on the physical connections first. Check for any loose connections between the computer and the printer. You might have also inserted the wire to the wrong slot on the printer so pay close attention to the details and steps that are shown on the user manual.
If there are no problems at all with the connections, check again on the printer itself. It might have not been turned on yet or the power plug is not yet connected to the outlet. Physical inspections are important before you really try to fix using the troubleshooting wizard which would relatively take longer to complete.
Start Printing at Will
As you can see, the steps in ensuring that your printer device is properly connected to your computer is quite easy and there should be no reason that you can’t print the documents that you need anytime. Now that you learned these crucial steps, you can try installing your brand new printer and loading its drivers to your Windows 8.1 machine and start printing all your needed files anytime.