How to Turn On System Restore for Your System Drive in Windows 8.1
Troubleshooting problems on your Windows computer is one of the most important skill that you need to learn. No matter how perfect an operating system like Windows work when it is new, it will still deteriorate in terms of performance as you use it every day and after years of having it, there would be problems that could arise which can bring dire risks to all of your data that took you many years to collect.
Minor problems like those that affect your network connection can be considerable and very easy to fix but when it comes to some other troubles that pose high risk on your files and other saved data then everything gets a lot more serious. When things like this happen, it is important that you know how to fix things up to keep all your data safe and at the end of the day, still save your computer the same as how superheroes save the whole city in the last minute from utter destruction.
One way of getting yourself ready for any serious problem that can happen in your Windows anytime in the future is by creating a “Restore Point”. This feature works by saving a previous functional copy of your operating system which you can choose to revert into in case something serious happens and in this tutorial, we will be showing the steps in how you can create “Restore Points” in your computer and save it for the future.
What is a Restore Point and How Does It Work?
The way that a “Restore Point” works is quite simple but understanding the principle behind it would greatly help you in times of serious problems. Just think of it as a time machine for your computer which will help you get back in time so you can have it to work again. System Restore reverts your computer into a saved “Restore Point”while keeping all your files safe. The whole process removes or uninstalls any program or app that you have recently installed which might have caused certain problems like making your computer slow or hang/freeze often.
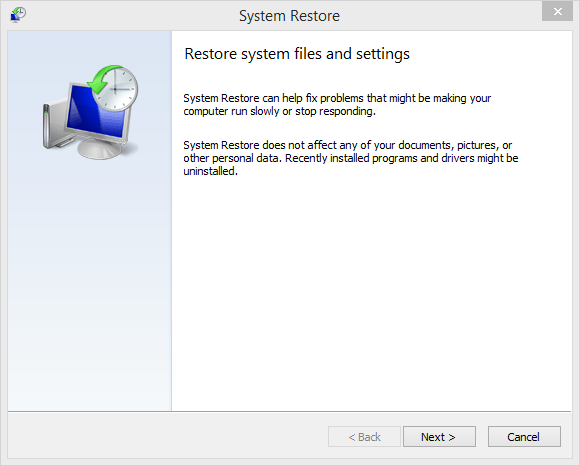
The recent Windows versions like Vista and Windows 7 both have System Restore built-in within them and in Windows 8 and Windows 8.1, this feature has been improved and made even better to serve each Windows user; both advance and novice ones. If it is your first time to hear about System Restore then you need to read through towards the end of this tutorial so you can learn how to use it in your computer.
Creating a Restore Point
The Restore Point feature won’t really work without you setting it up first. If you are using a computer that runs on Windows 8 or Windows 8.1 that you have purchased recently, chances are System Restore is already turned on in it so in the event that something serious happens, you can simply open this feature and bring back your computer to a previous working state.
However, if you just upgraded your old machine running on Windows 7 to Windows 8 or 8.1, the System Restore feature might be turned off and you need to turn it on. To do this, you will need to access the System Restore settings section on your computer by pressing the Windows + S keys and once the Search Charm opens, simply type the words “system restore” into the search box located on its top portion.
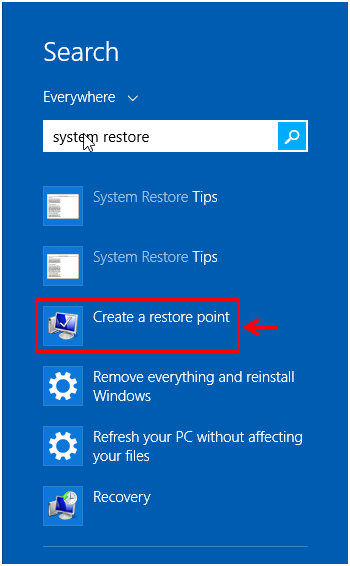
After you do so, just wait for a few seconds for the search results to appear underneath the input box and once you see them, you will need to click on the one that says “Create a restore point” as highlighted on the screenshot above. Now, a small Window labeled as “System Properties” will open and show you the “System Protection” tab. Towards the bottom of this small Window, you will see a list of all available drive partitions on your computer with information of whether System Protection is activated on each one of them or not.
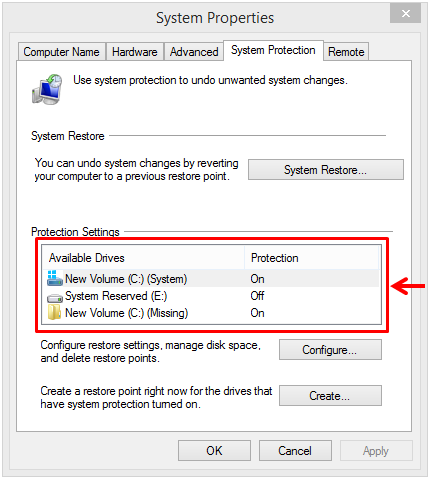
From here, you will need to check if Windows automatically creates a restore point for your computer. You will know this if you see the status that says “On” under the “Protection” column. You can easily identify the partition where Windows is installed because it will have a Windows logo overlay on it and its default drive letter is “C:” except if you assigned another letter to it manually. If you see that it is “Off”, simply select on your system drive then click on the “Configure…” button.
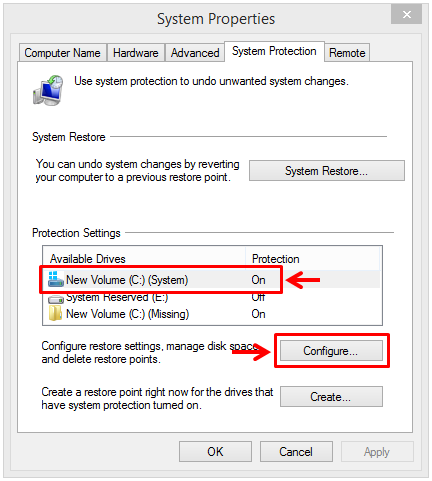
After you click the “Configure…” button, there will be another small Window that will appear which will now allow you to turn on System Protection for your computer’s system drive (the partition where Windows is installed) and as well as adjust the memory space that System Restore can use for storage of Restore points. From here, just mark the “Turn on system protection” option under the “Restore Settings” section then click on the “Apply” then “OK” buttons.

As I have mentioned earlier, you can also adjust the amount of space that System Restore uses as storage for the Restore Points. To do this, you will simply need to click-and-hold then drag the sliding knob that is located under the “Disk Space Usage” section. There’s also a “Delete” button found near the bottom-right section which you can simply click in order to delete all restore points that are saved for the drive that you have selected.
NOTE:
Restore Points doesn’t really take too much space so you don’t need to allocate very big chunk of storage for it. As you can see on the screenshot above, I only allocated 2% of memory for it which is equivalent to 3.91GB but you can always choose to increase it according to your preference. The size of a single Restore Point ranges from 60-100MB in size so if you are fond of manually saving restore points due to certain reasons like testing software on your computer for instance then increasing the size of restore point storage allocation would be a very good idea.

System Restore: A Valuable Yet Often Ignored Feature
Windows System Restore has long been a part of the Windows operating system but it seems like it is also one of the most ignored features in every Windows machine ever! There are varied reasons for this but one of the most common is that this feature is quite hidden under all the other major features that the operating system contains. This is the reason why we are dedicating two tutorials for Windows users to be aware of its existence especially in Windows 8 and Windows 8.1. In our next tutorial, we will be showing you the process in creating a Restore Point and how you can use it in case your computer fails due to some inevitable reasons so be sure to stay tuned with us here on WindowsTechies.com to learn more secret tips and tricks in using the world’s most popular operating system!