Steps in Using Windows 8.1’s Camera App
Most devices that are out in the market at present have image capturing features and this is also common even on mobile computers such as laptops and notebooks. These features are perfectly integrated in smartphones and tablets with an app dedicated solely for the purpose of getting the hardware work as it is supposed to but in laptop computers especially back in the days of Windows 7, you need to install a driver or a program that will work with the webcam so you can use it for taking photos and doing video calls.
However, everything saw a big change in Windows 8.1 with the introduction of some modern style apps that will surely take your computer usage to the next level and just like your mobile smartphone or tablet, there’s also a modern style Camera app in every Windows 8.1 machine that you will surely love! In this tutorial, we will be discussing the basics in using this app and explore some options that you can do with it so be sure to get your Windows 8.1 machine geared up and follow the steps that I will be showing below.
Accessing the Camera App
There’s a good set of very useful modern style apps in Windows 8.1 that will surely transform your computer into a perfect tool for doing any task that you want to accomplish and if you are fond of taking photos with your machine, the Camera app is the perfect one that you can use. To access this app, simply click on the Start Button or press the Windows key to open the Start Screen. After doing so, just look for the Camera tile and once you find it, simply click or tap on it.
If in case the tile does not appear on the Start Screen, don’t panic, it might have just been unpinned accidentally. To find the shortcut that will let you open the app, simply move the mouse pointer on the Start Screen and when a circle button bearing an arrow down icon appears at the bottom-left portion of the screen, simply click or tap on it and you will be able to access the Apps view screen. From here, simply click on the shortcut that is labeled “Camera” under the Photo category.

After doing any of these two ways in accessing the Camera app, it will automatically open in full screen and ask you if you would allow it to use your location together with two buttons which are labeled “Allow” or “Block”. If you feel that it is okay to share your location then you can click allow but if you are trying to implement strict privacy on your computer and as well as your personal information then you can click or tap on the “Block” button.
Camera App Controls
Just like the Camera app in your smartphone or tablet, the one found on your Windows 8.1 machine works in camera mode for taking still images and a video mode for taking clips of the moments that you want to preserve. Switching between these Camera app modes is simply done by clicking on any of the two buttons at the right hand side of the screen which represents the “Video” mode on top and the “Camera” mode at the bottom.

Unlike the apps that you got used to, clicking on any of the buttons will automatically start the function. For instance, clicking or tapping on the button at the top will automatically start the video recording process and if you want to stop it, simply click on the same button which should have now changed into a stop symbol.
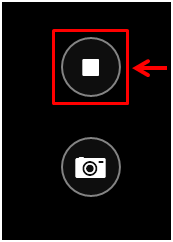
You will also see the length of the video that is currently being recorded at the bottom-left portion of the screen represented by a decently large minutes and seconds timer as shown on the screenshot below.

If you want to use the Camera app in capturing still images then you can simply do so by clicking on the second button just below the video button. After doing so, the image that has been captured will automatically flip towards the left of the screen and disappear to make way for the next image that you want to capture using the app. Just repeat this same process if you want to capture even more images of you and your child for instance or take “Selfies” while using your Windows 8.1 machine.

Accessing the Videos You Recorded and the Photos You’ve Taken
After recording some videos, the next thing that you need to learn is how you would be able to access them. Unlike recording videos on the desktop screen with the use of a desktop program which requires you to jump from one library to another, accessing videos within the Camera app will just need a single right-click action on the screen and on the App bar that appears at the bottom, simply click on the option located at the extreme-left end that says “Camera roll”.
![]()
After doing so, the most recent video that you recorded will automatically play and you can pause it simply by clicking anywhere on the screen then play again by doing another click action. If you recorded multiple videos, you can simply move to the other ones by clicking on the arrow left or the arrow right buttons located on both sides of the screen as you can see on the screenshot below.
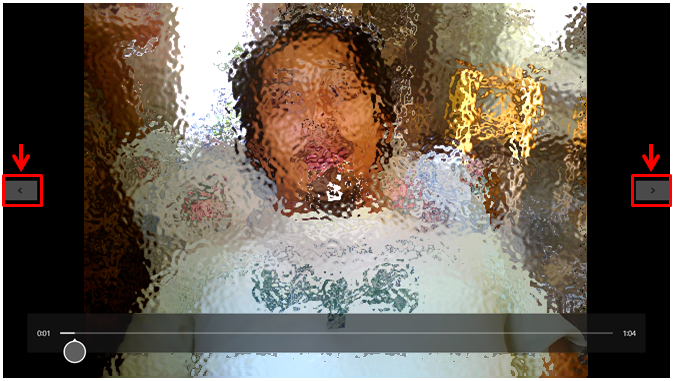
In the process of scrolling through all your available videos, you will also be able to access the still images or photos that you took using the Camera app which makes it more comfortable to browse through all of the images, videos and other stuff that you captured. Just imagine being able to access all your stuff in one place without the need of going to different libraries like Videos and Picture which would be the case if you use two separate desktop programs in recording videos and taking still images.
Easily Take Snapshots and Videos and Access them Quickly
As you can see, the Camera app which is built-in with every Windows 8.1 machine helps you record both video clips and still images all in a few simple steps without the need of too much clicking and scrolling as the case would be if you use some desktop programs in Windows 8.1. Modern style apps are really designed to get some tasks become more easier to accomplish making you become more productive in many ways.
The Camera app still has more options that you need to learn but we will be covering them in the next tutorial for our Windows 8.1 Camera app tutorial series. For now, just explore and take time to follow the steps I have shown in this article and be sure to master them so you won’t find it hard to use the app in capturing images and recording videos. You can also check out our other tutorials that shows the details in using the other built-in modern style apps in your Windows 8.1 machine by browsing through out articles from our website’s Home Page.